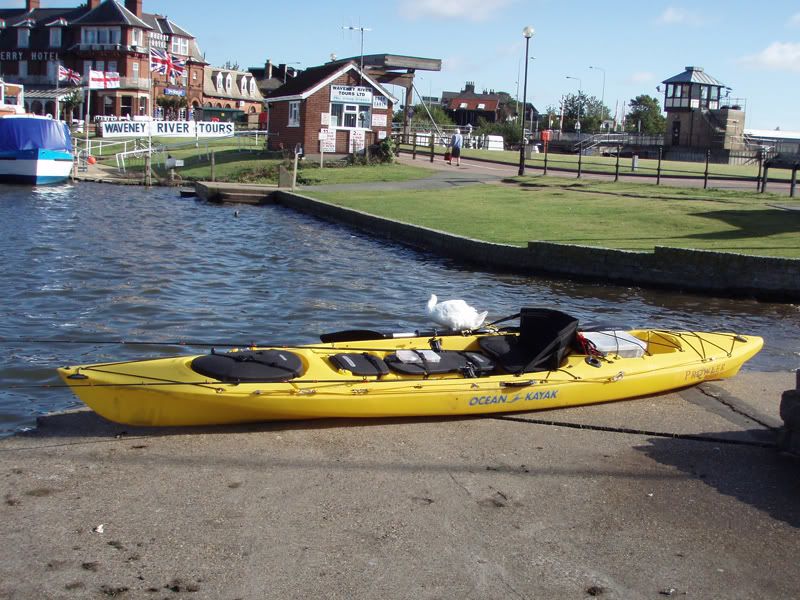
I’d read the forums and looked at the photographs and so on and decided that I would start a thread on mine, from the start until, well, whenever it’s finished. So let us start at the beginning:
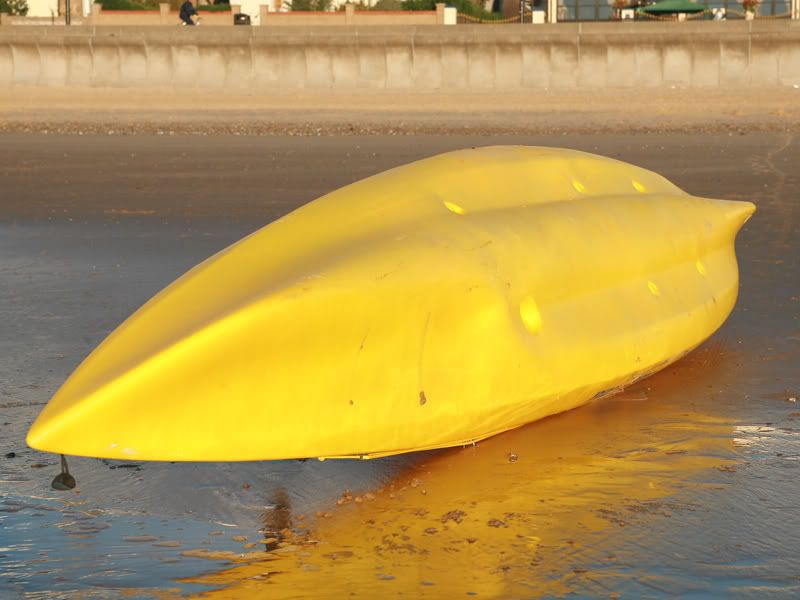
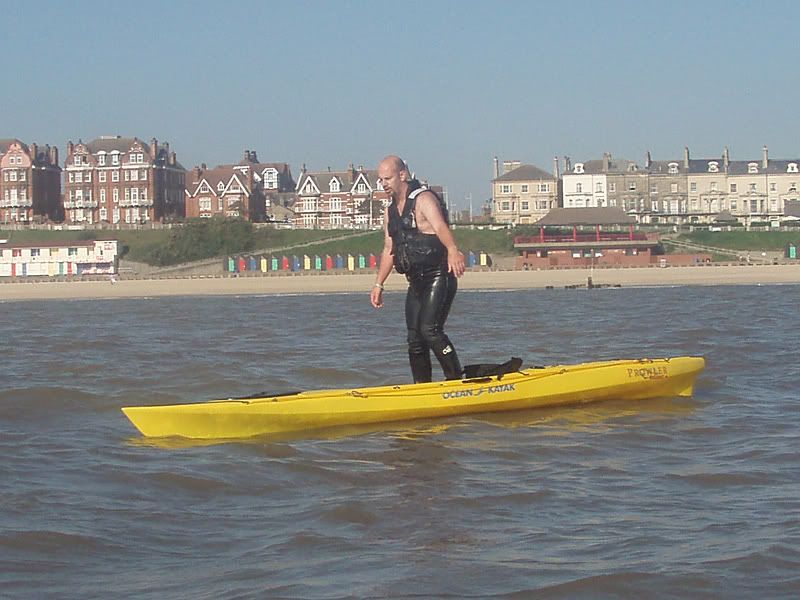
Just like Christmas, a parcel, all wrapped up, was lying on the floor for my attention. A 15ft long parcel. A couple of minutes later and this was all on the floor around it and I got my first real view of a Trident. It was love at first sight! Initial thoughts were that it looked solid, purposeful and well thought out. Closer examination brought out even more extra details and I realised that it wasn’t another kayak that had been turned into an angler edition by merely adding some flush mounts but something that had actually been designed for the sole purpose of being used for chasing fish all day long, comfortably, ergonomically, safely and thoughtfully. It just looked ‘right’. Once safely strapped to my roof bars it was time to see how it handled being driven as I took it home on the dual carriageway, slowly increasing in speed to 70mph or so – steady as a rock, no flexing or additional noise. It passed the first test and I’d happily go on a decent run with it on the roof.
Back home I grabbed a C-Tug, a PFD and my camera and unstrapped it from the roofbars, proper reviewing starts here.
Immediately noticeable was the weight – officially 1.8kg more than the Prowler 15 Anglers I’m used to, weighing in at 27.2 KG’s (60lbs instead of 54lbs in old money). I’m no nine-stone weakling but no weight-lifter either and I’d say that the average man in the street would be quite able to car top it solo, but it’d take effort. That said, the load balance seemed better spread than the 15 and it was easy enough to manoeuvre.
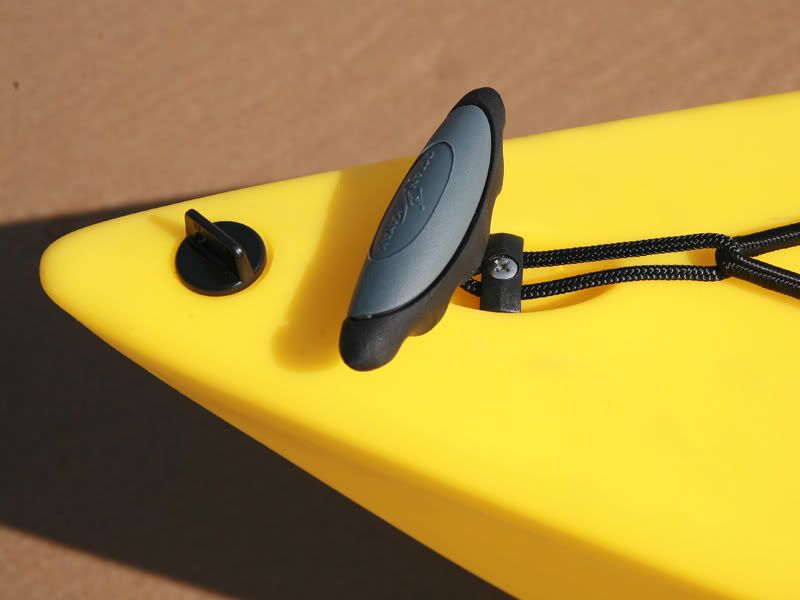
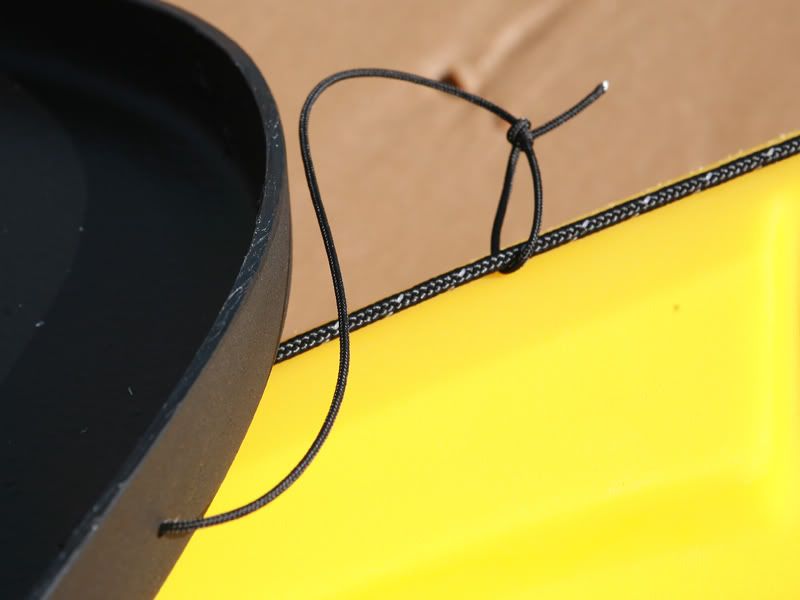
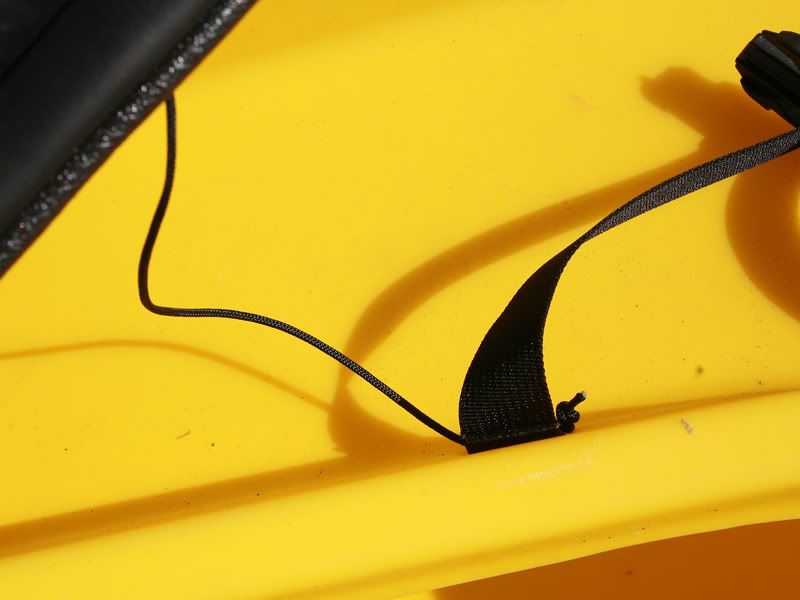
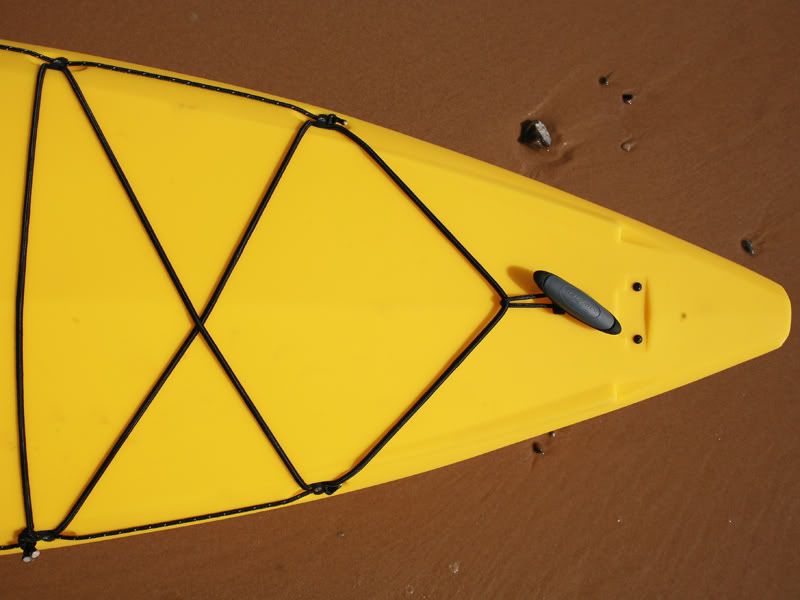
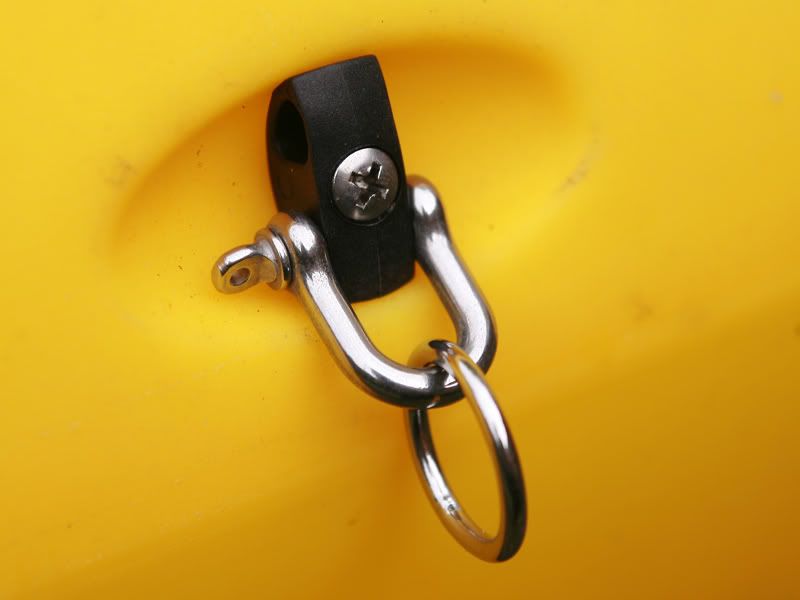
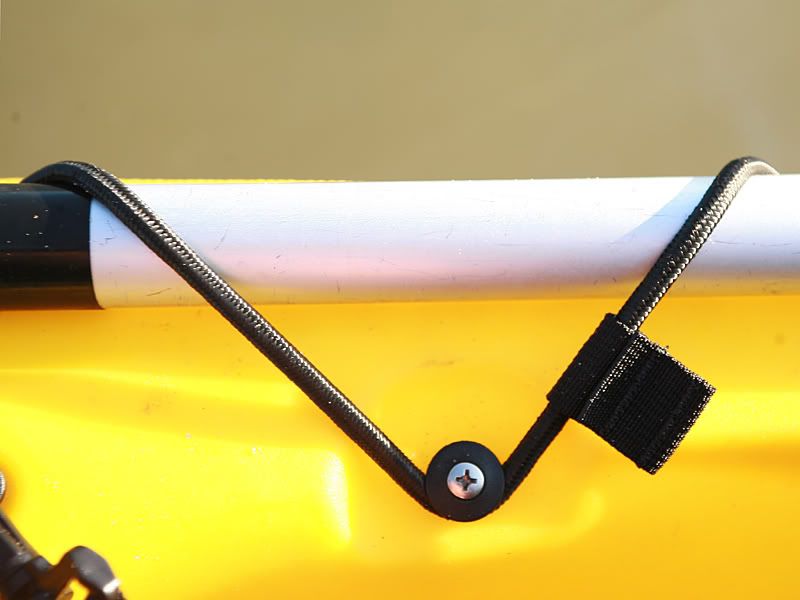
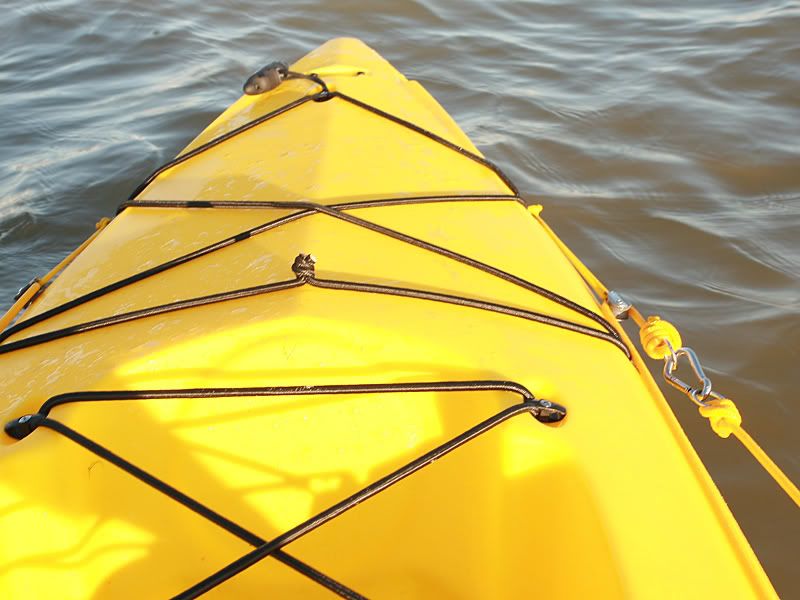
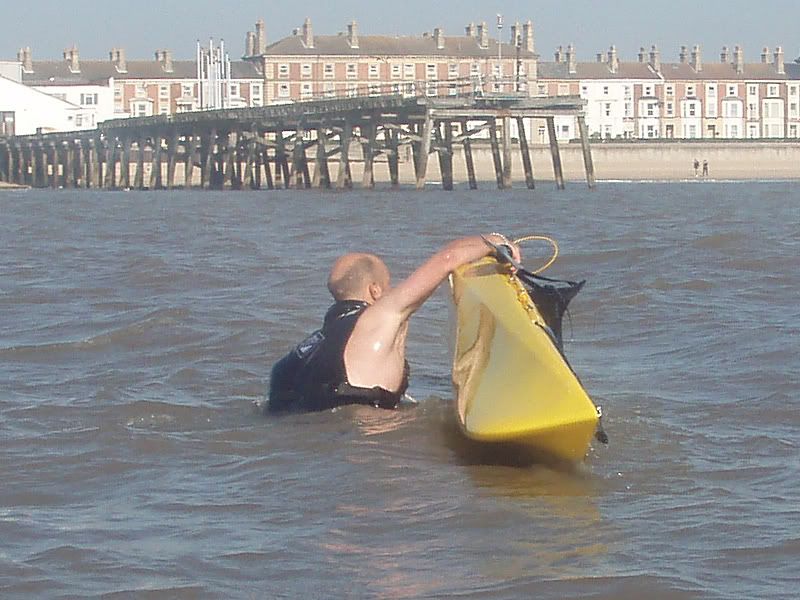
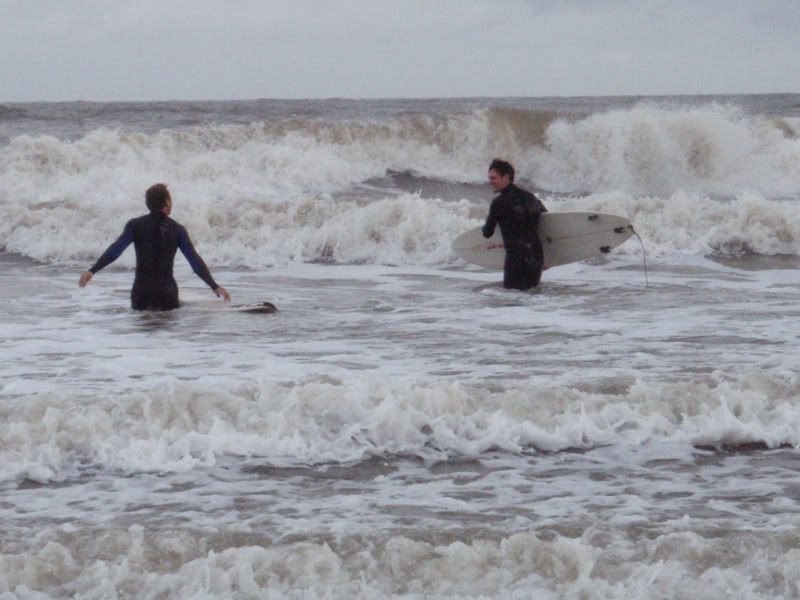
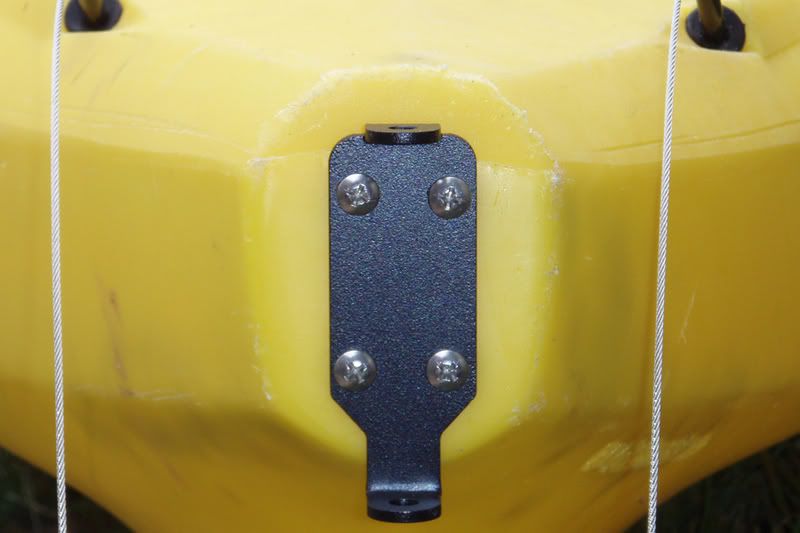
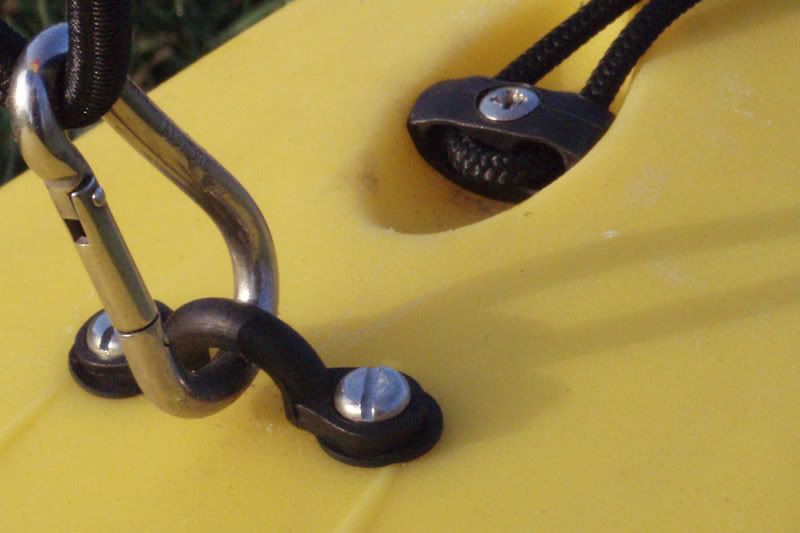
Once on the C-Tug and tightened up I took hold of the rear toggle handle and began to haul it down to the beach. Again, the extra weight was clearly noticeable but at no time did it become a struggle. Here I took heed of the first change in the fixtures. The toggles aren’t attached to their own point as on the 15 but instead go through the two holes and around a shock-cord deckline. This has the effect of pulling tight any slack and thus making the pulling of the kayak more steady and I would imagine it also keeps rattles down. The following photographs show what I mean, but using the forward toggle:
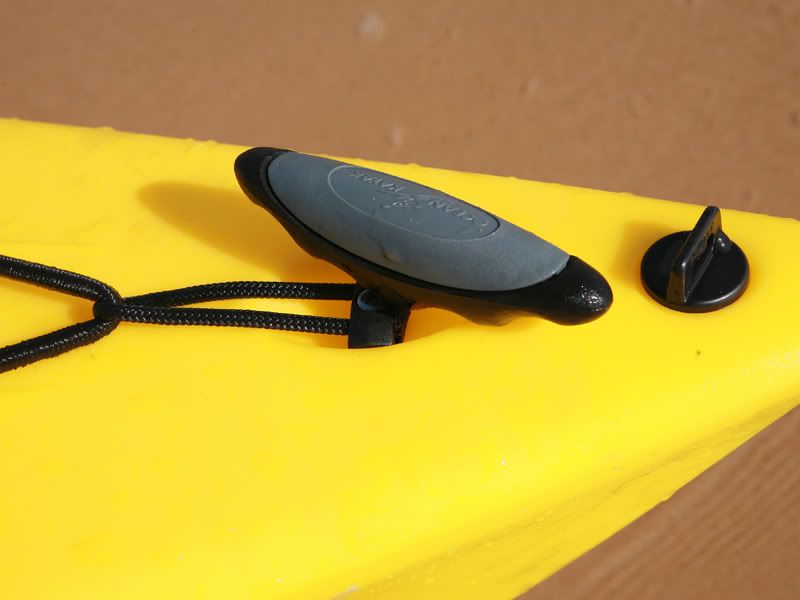
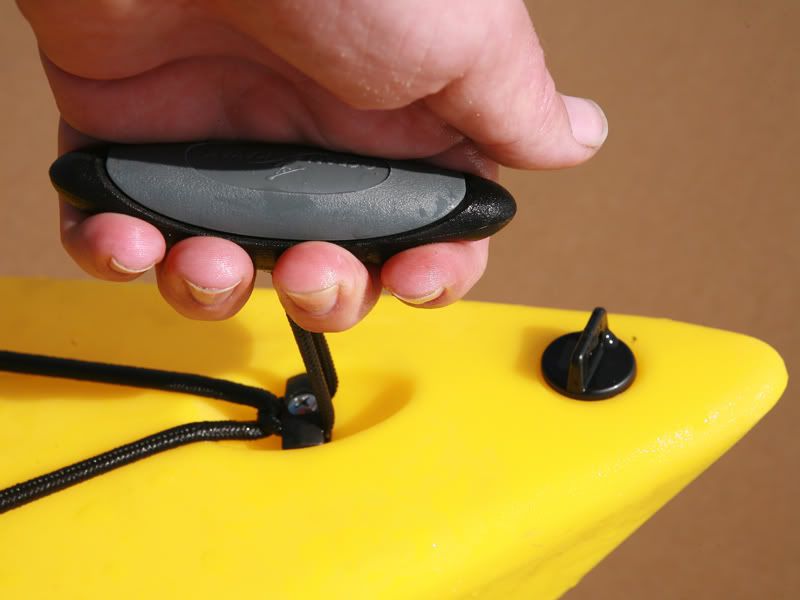
On the way down to the beach I liked that, and found it well thought-out and useful. I changed my mind, however, on the way back when I used the front toggle to pull it home. SO different. Maybe it’s tighter pressure on the shock-cord or something but it was uncomfortable for me. This was compounded by having the drain plug in the way as well and by the time I’d returned home I had changed my tune completely. It was no major job to undo the various fixtures and cords and re-thread them though and I now have the toggles hanging loosely with the bungee pulled tight – and the pressure on the toggle will be the same with or without extra’s placed under the bungees. Incidentally, the drain plug appears to be made from a stronger and more hard-wearing plastic than that on my 15.
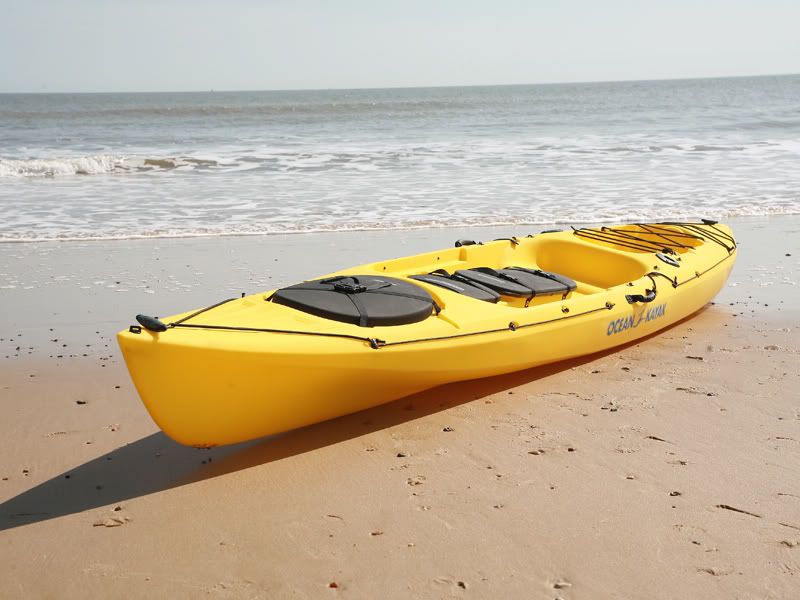
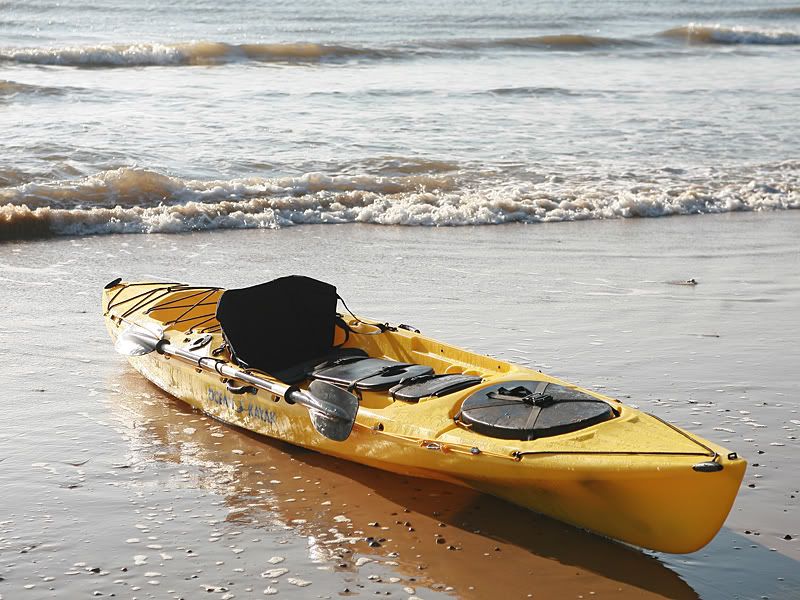
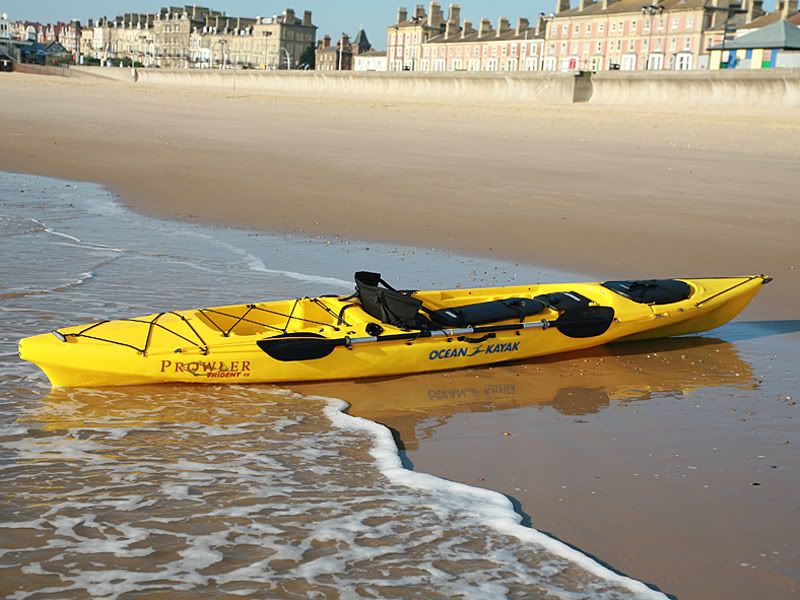
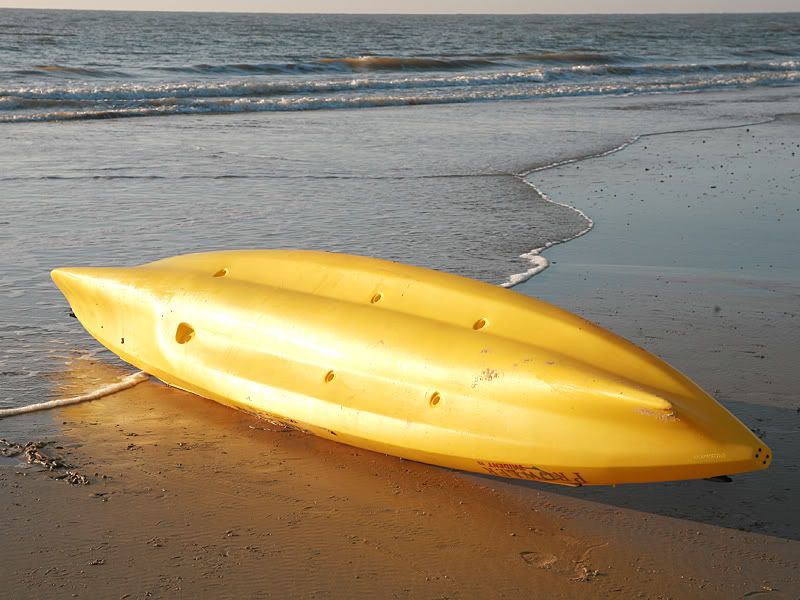
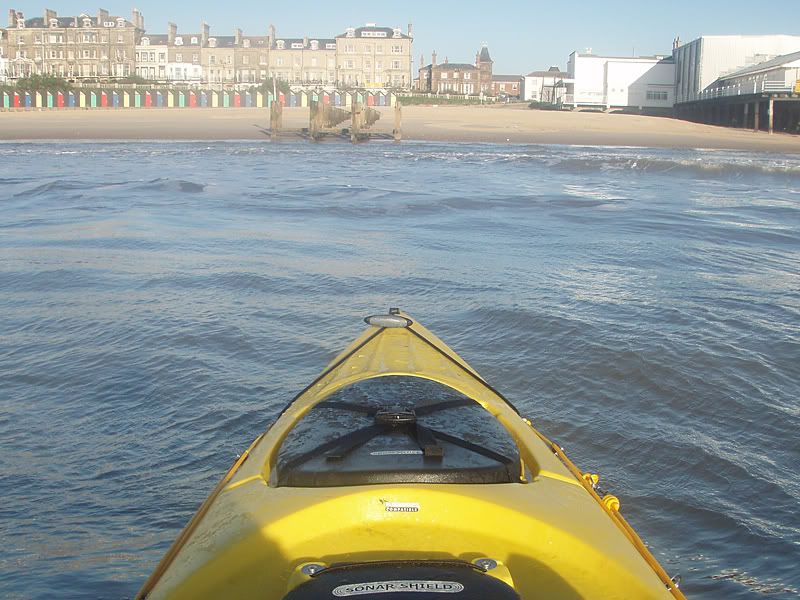
Once at the beach I unloaded and dragged it into position without the trolley. It moves easily enough on wet sand. I then took the following general shots of the whole boat:
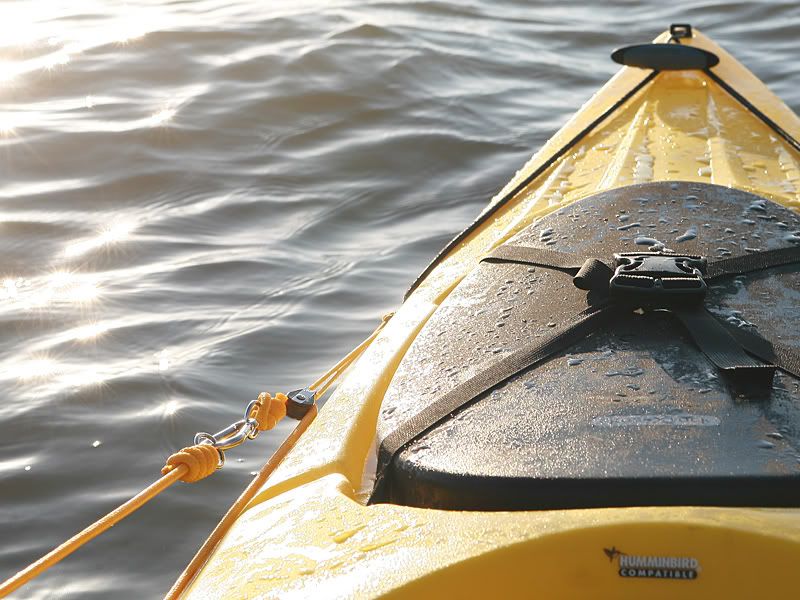
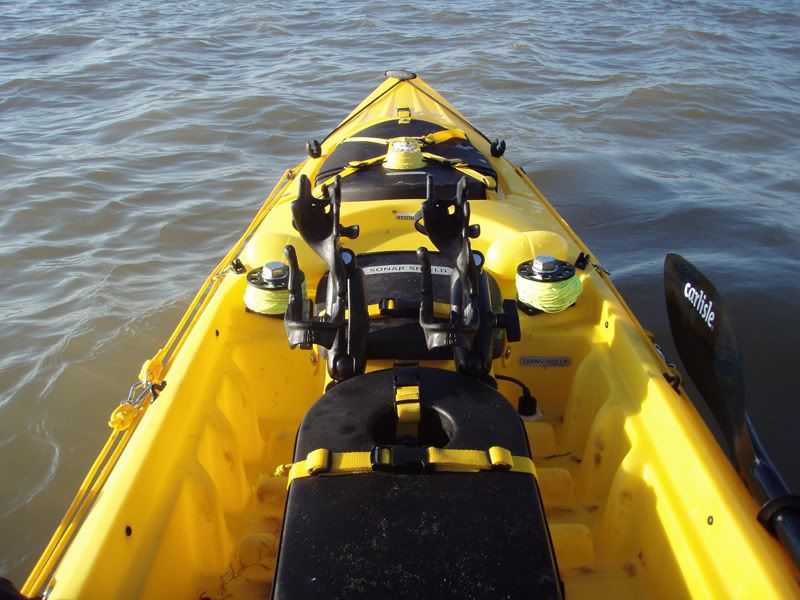
Front quarter, showing the bow:
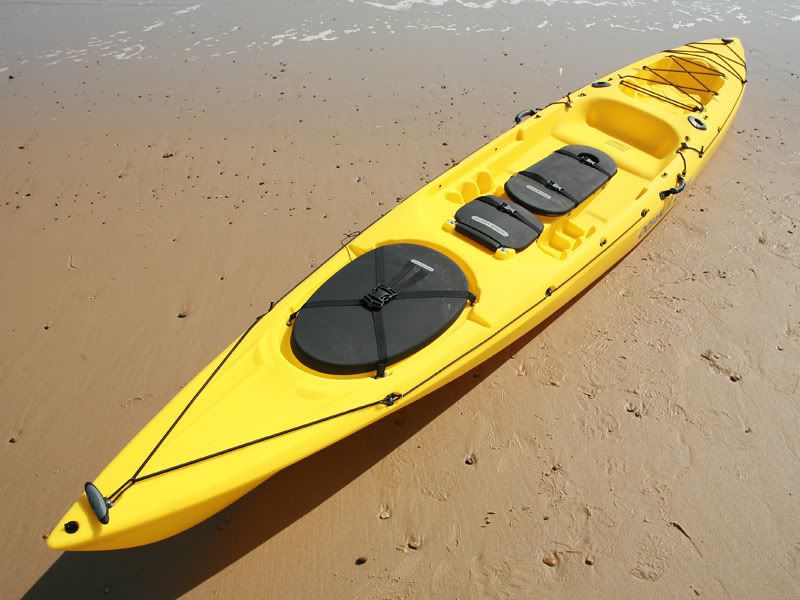
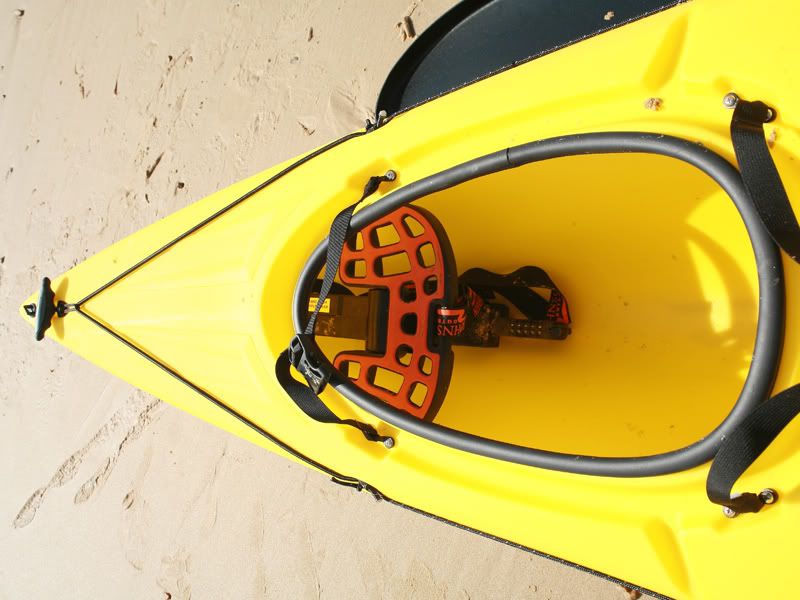
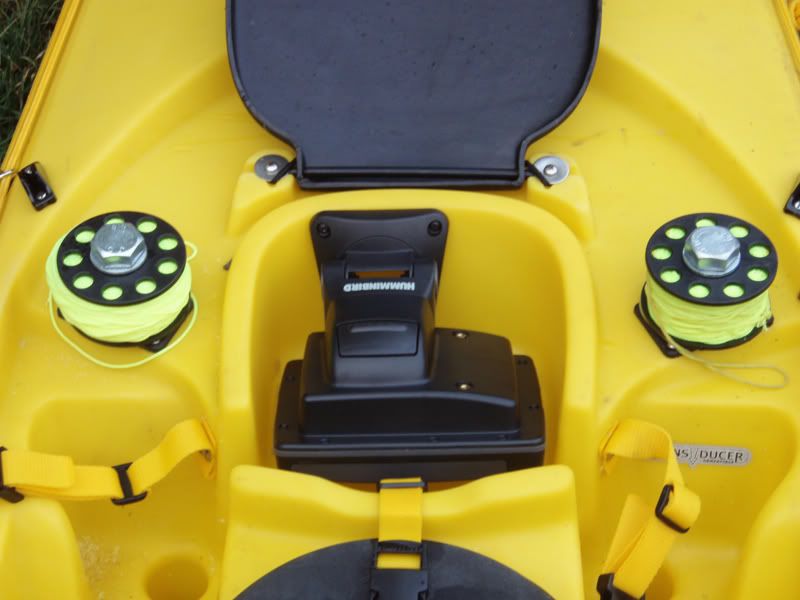
A higher angle to better show the general layout of hatches, tankwell and seat area:
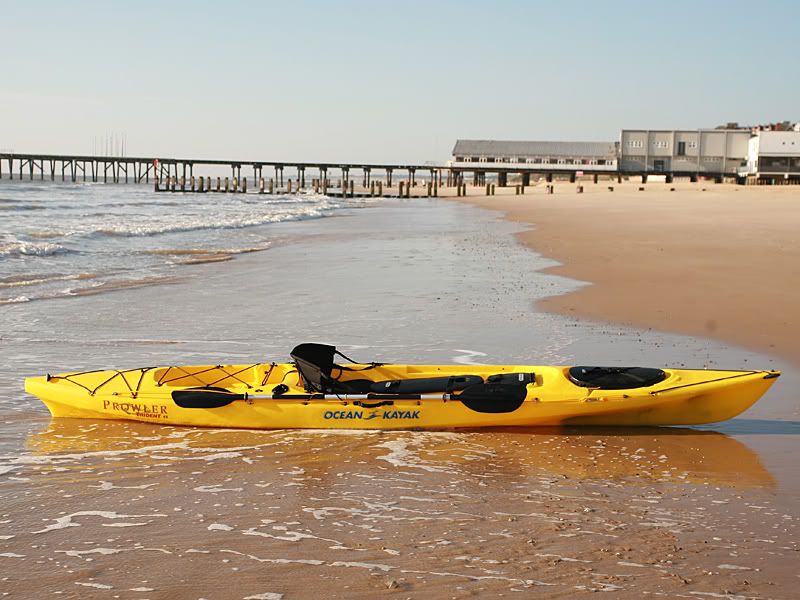
The rear quarter and a view of the rudder fixings and rear bungee area
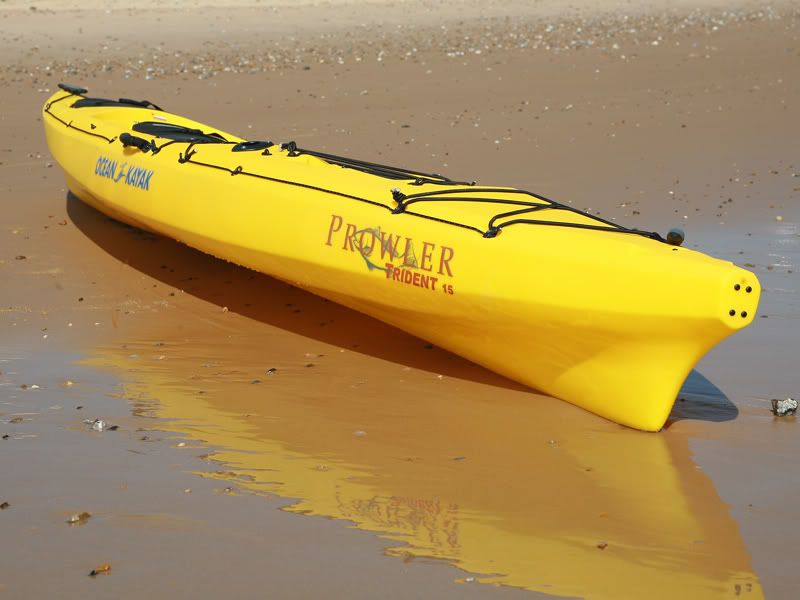
A side view which draws attention to the more angular look of the moulding than on the Prowler 15:

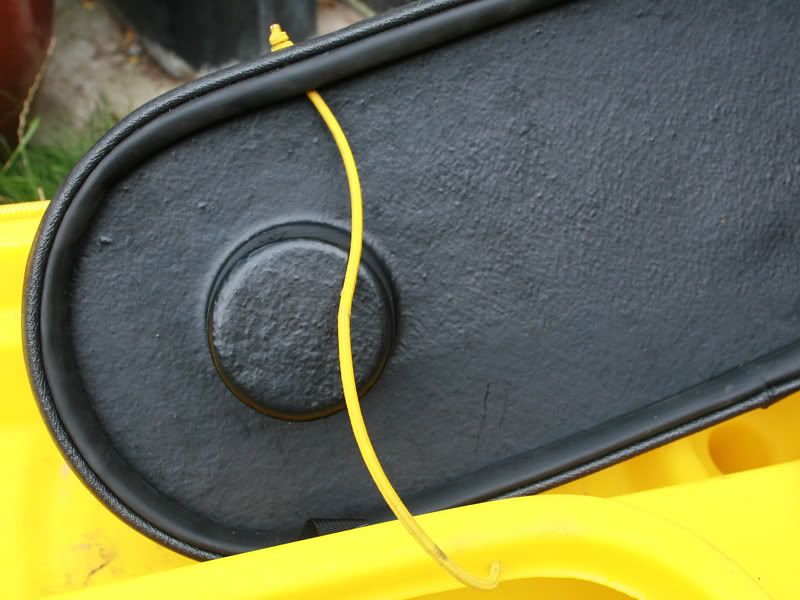
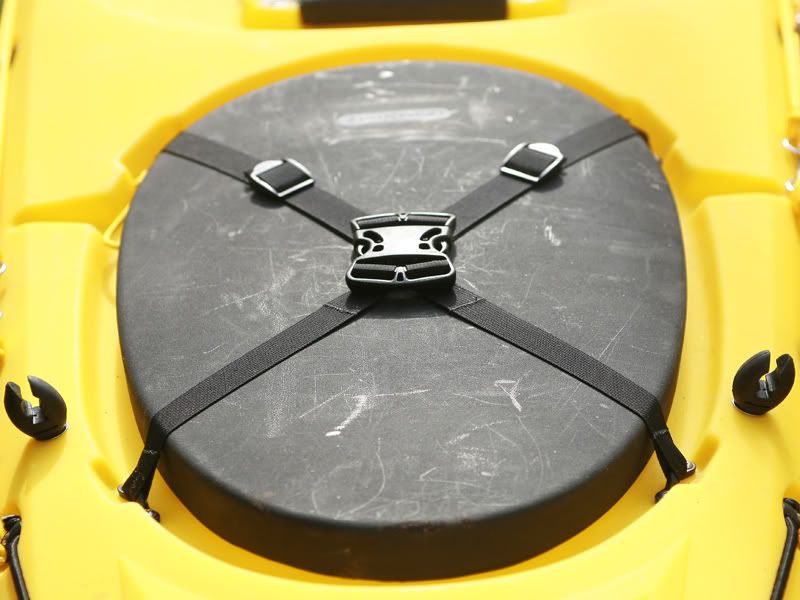
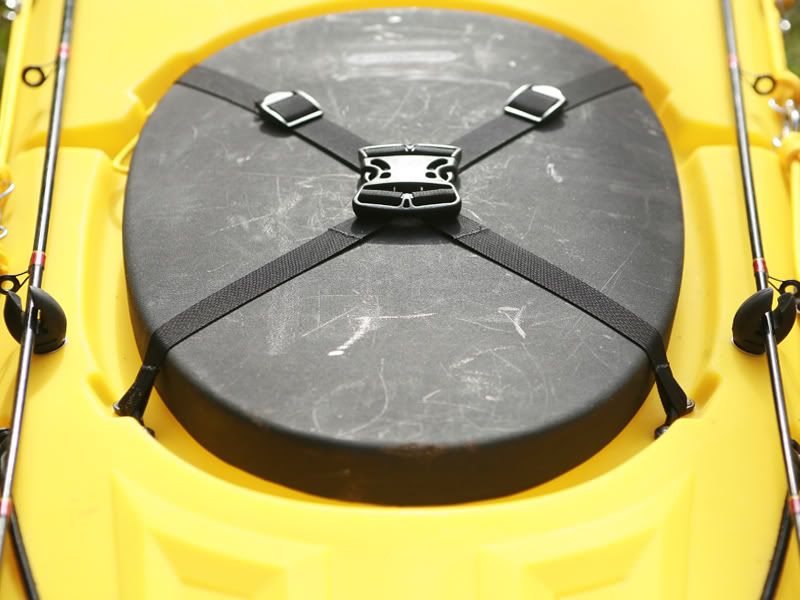
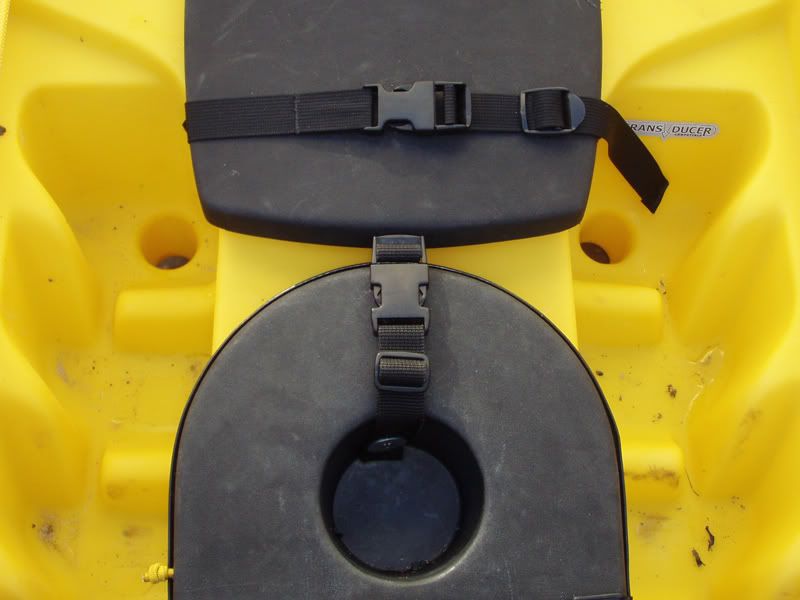
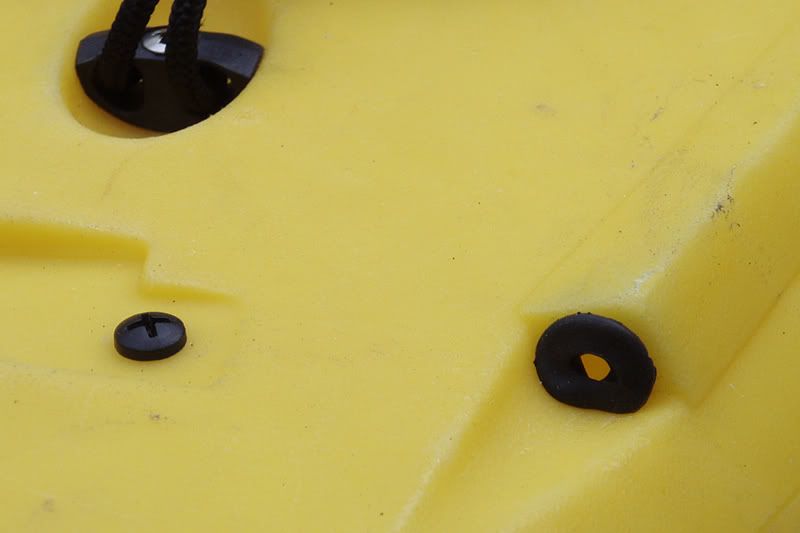
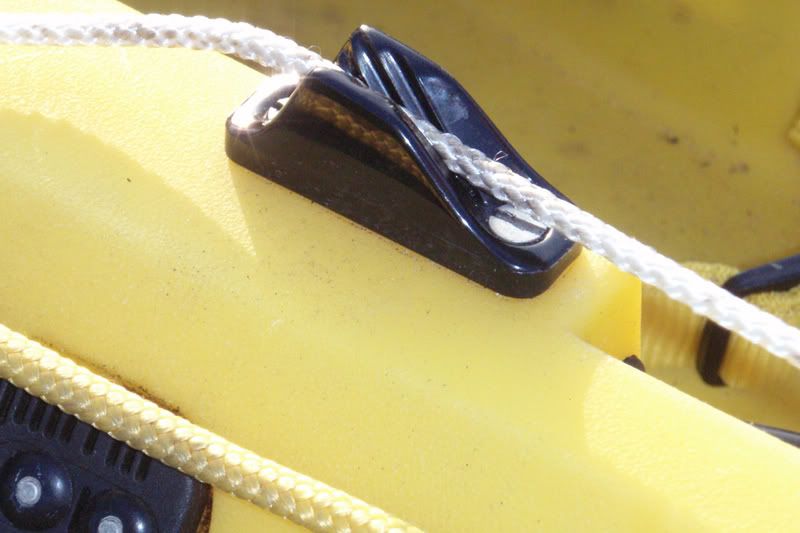
Starting from the front you have the drain plug and toggle handle, both already mentioned:
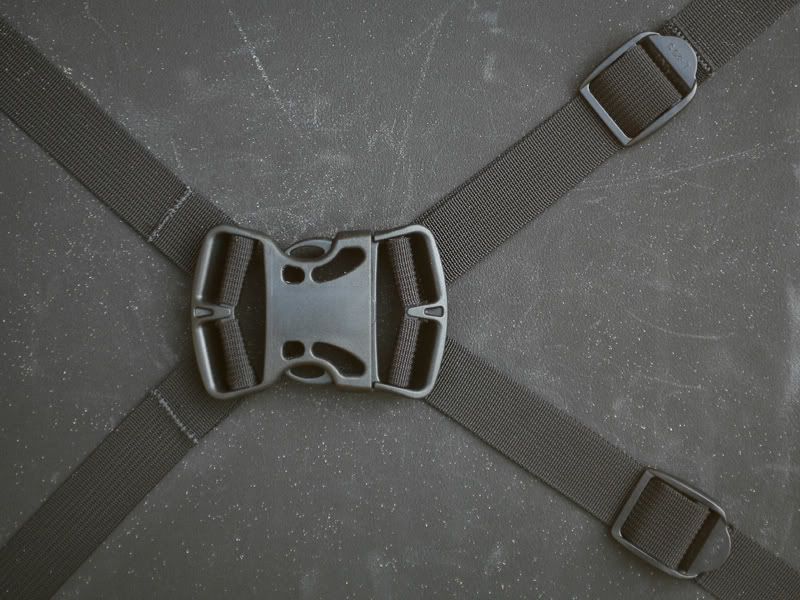
Next comes the forward hatch which is of a less flexible and more sturdy feel than that on the 15 and which feels a lot more secure ‘in-place’, giving an impression of water-tightness. It felt snug and secure.
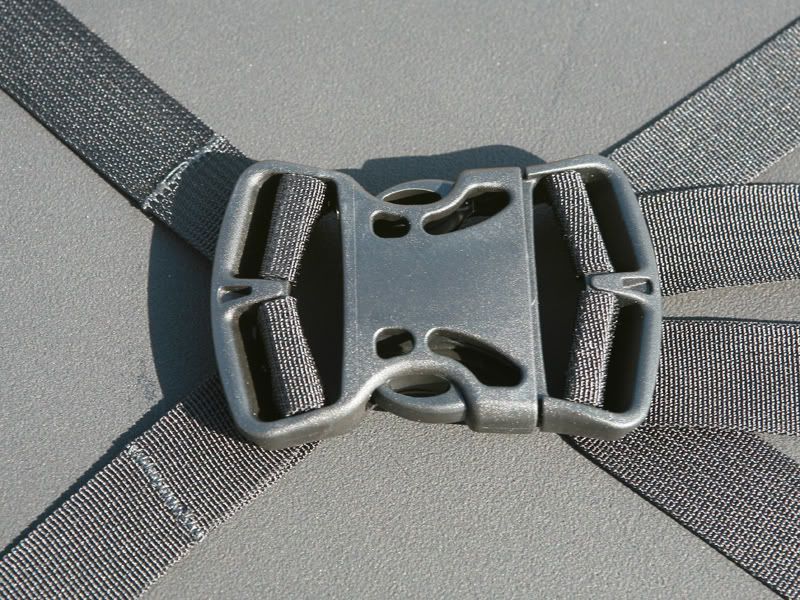
The hatch is then secured by the crosslock buckle which is again very secure and inspires confidence. It also appeals visually and ergonomically – and doesn’t need two handed operation or 4 straps to be put into place.
Now, on the 15 there is an extra strap on the front of the hatch which secures it so it can’t fall off. OK have opted instead to put a thin cord through a small hole in the side of the hatch and tie this off to a bowline. Effective and lightweight for sure and a minor detail but it doesn’t quite match the quality of the rest of the design – it looks like an afterthought, but does the job.
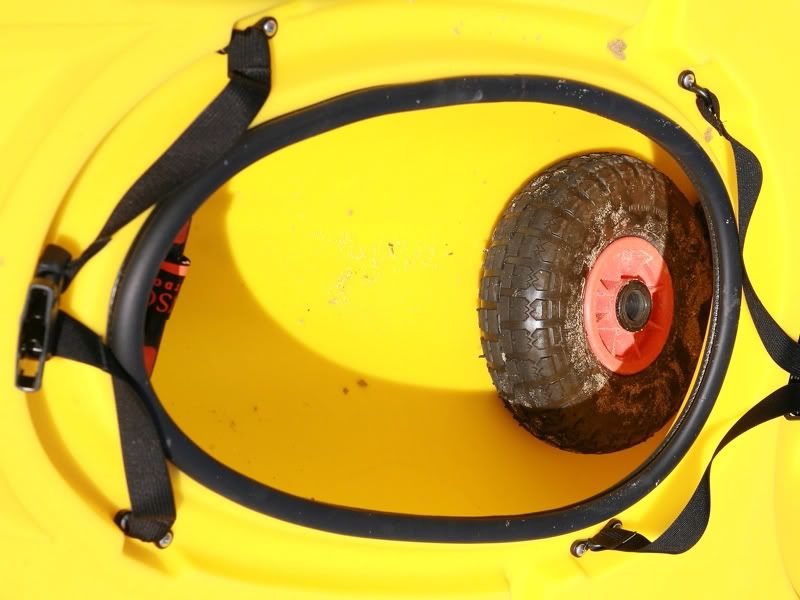
But what a hatch! It’s HUGE! Until you try to put stuff in you don’t appreciate quite how different it is. I usually have to put my C-Tug in methodically to get everything to fit and balance out after stripping it down into 5 parts. The Trident will take it in 3, the two wheels went to the rear and the crossmembers and supports stayed in one piece and pushed up to the bow. This had two immediately obvious advantages over the 15. Firstly, the balance would be better as the forward pieces remained upright and wouldn’t move about loosely. Secondly, by shifting the wheels backwards the nose would be lighter and thus more buoyant. Furthermore, I still had loads of room and could easily add a buoyancy bag or dry bag full of clothes. Perhaps even both.
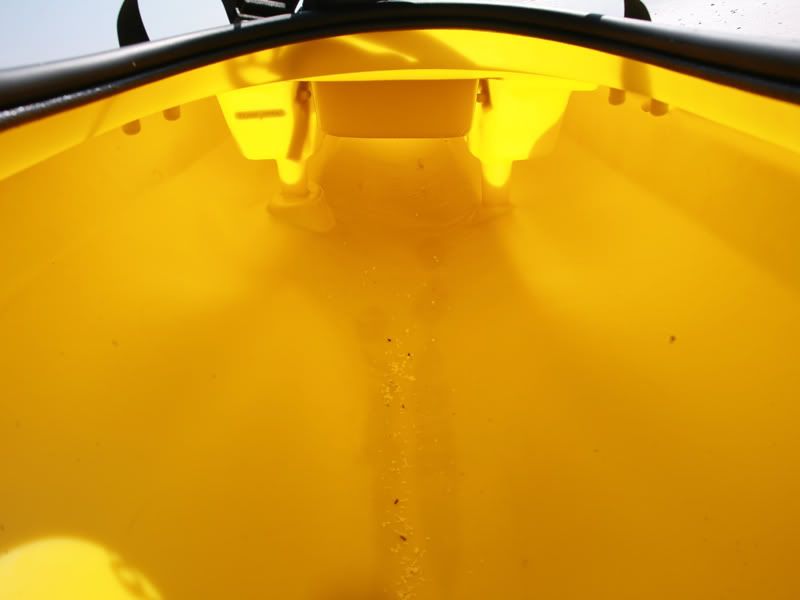
From inside, looking backwards:
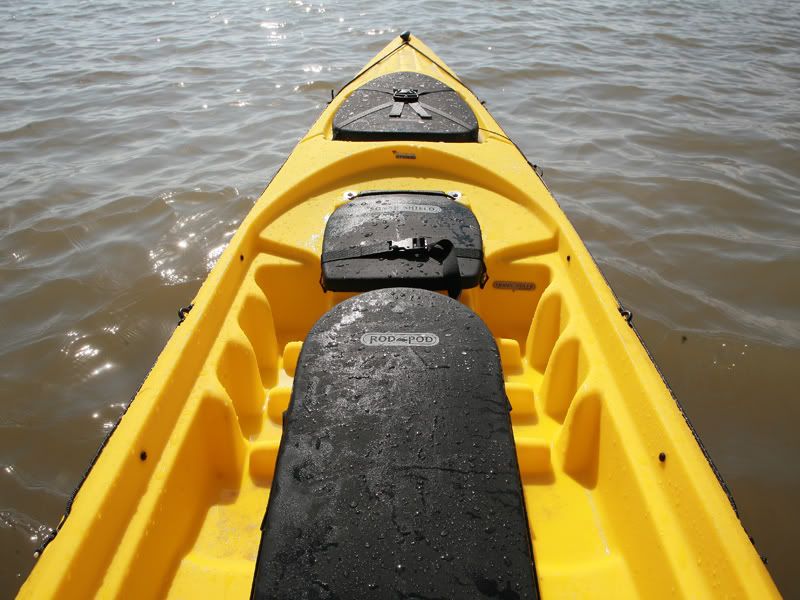
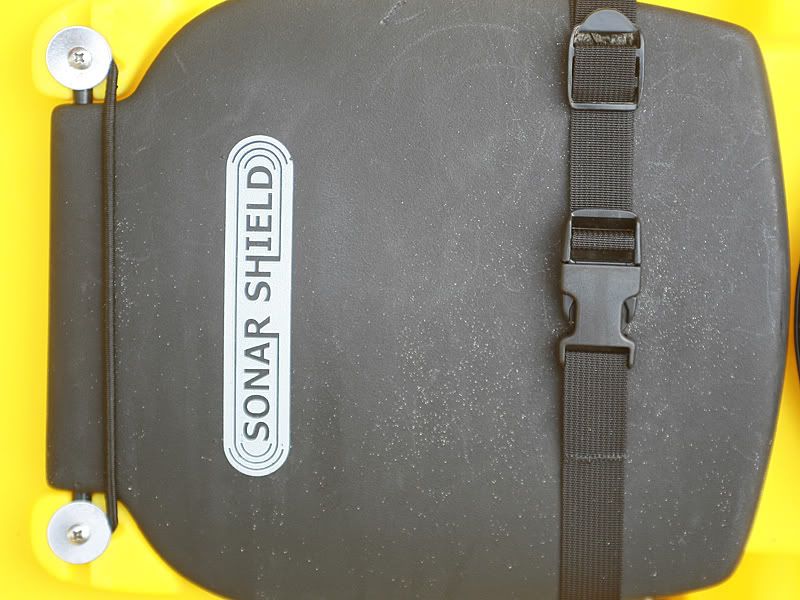
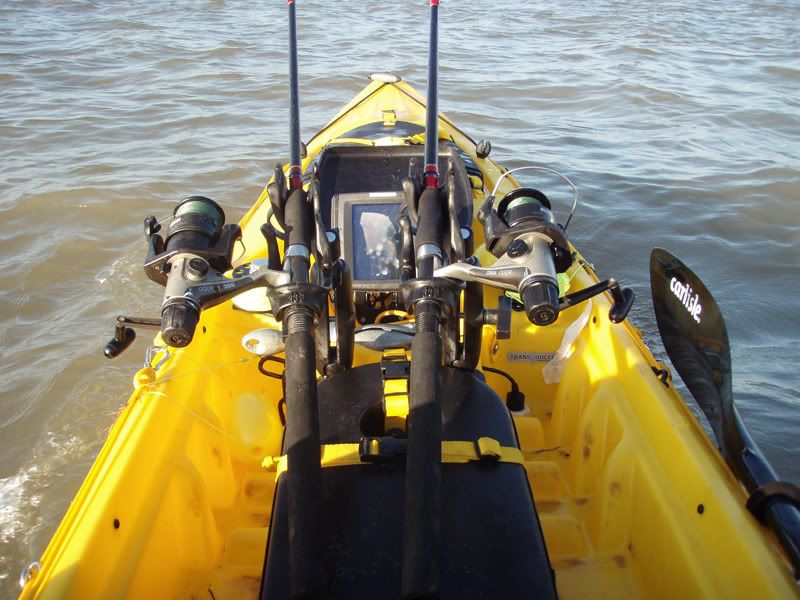
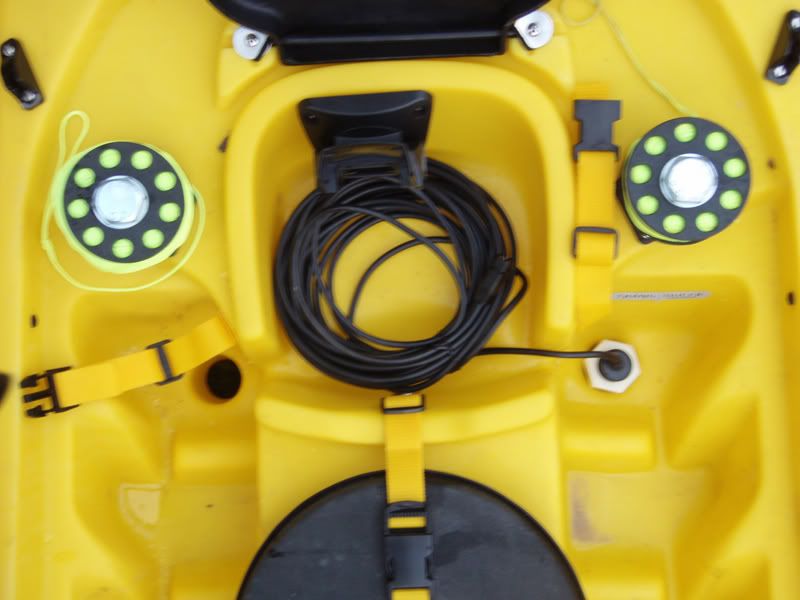
Next up was the sonar shield and fishfinder well. To me this is a very welcome addition – whenever I launch a wave goes over the bow and hits the back of the finder. The pressure of this is greater than that which the waterproofing is generally rated for and thus condensation becomes an issue on the screen in short order. I don’t see a problem now – the finder itself can be folded flat with the shield over the top and clipped down, streamlining everything and keeping the rear dry (ish) and away from excess pressure. The shield then flips up for actual use and still shields the back of the unit as well as reducing flare. Shock cord acts as a spring to keep it pushed down onto the finder itself too, in position and not flapping about in the wind.
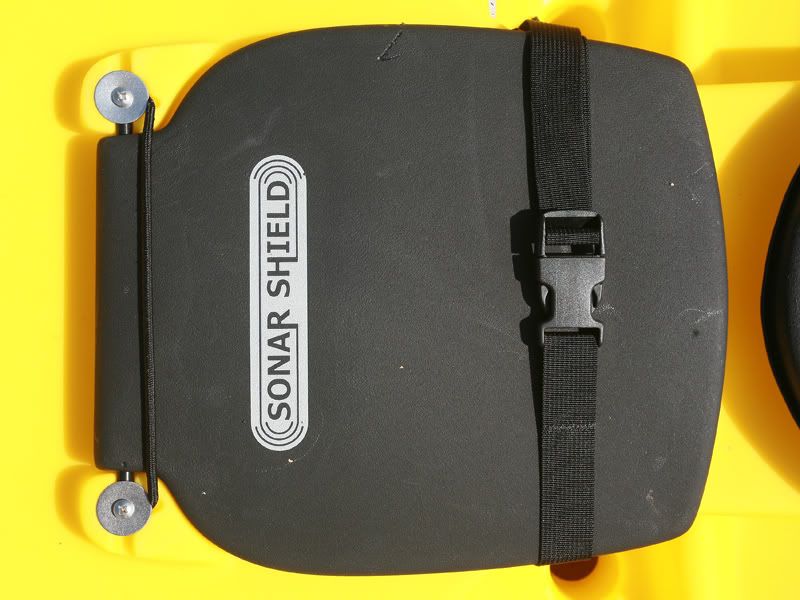
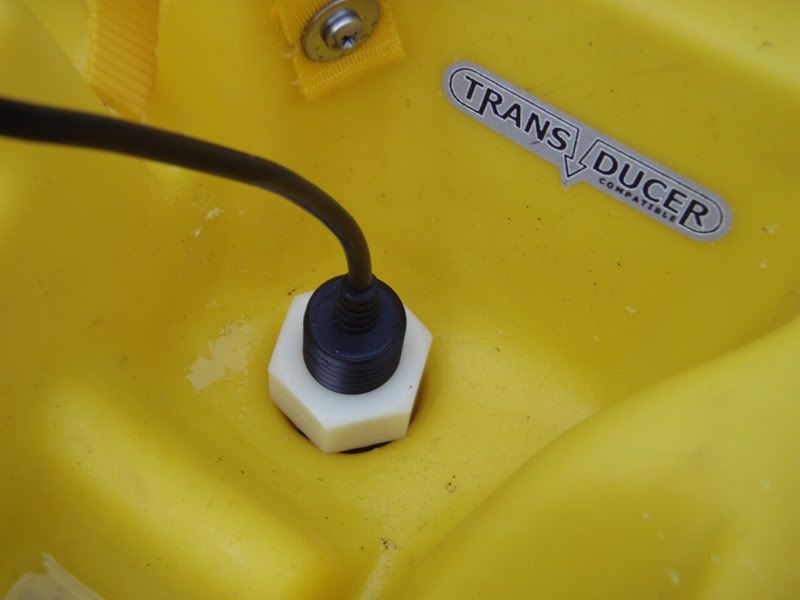
More thought has been put into this too. Drainage slots are a featured part of the well and these also allow the transducer cable to run down to the transducer scupper making the addition of a hole for running the transducer inside the hull unnecessary. This is one less area for a leak and also means the transducer will give more accurate information on water temperature and optimum performance as a finder.
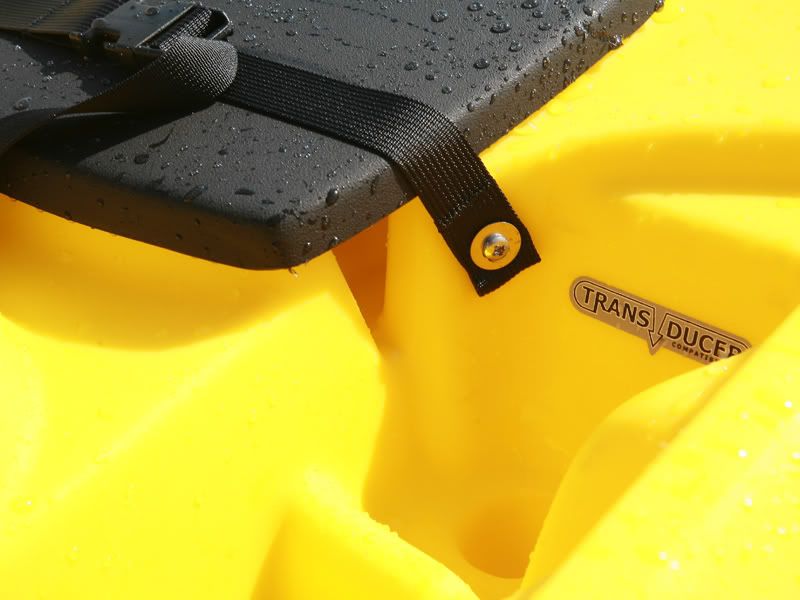
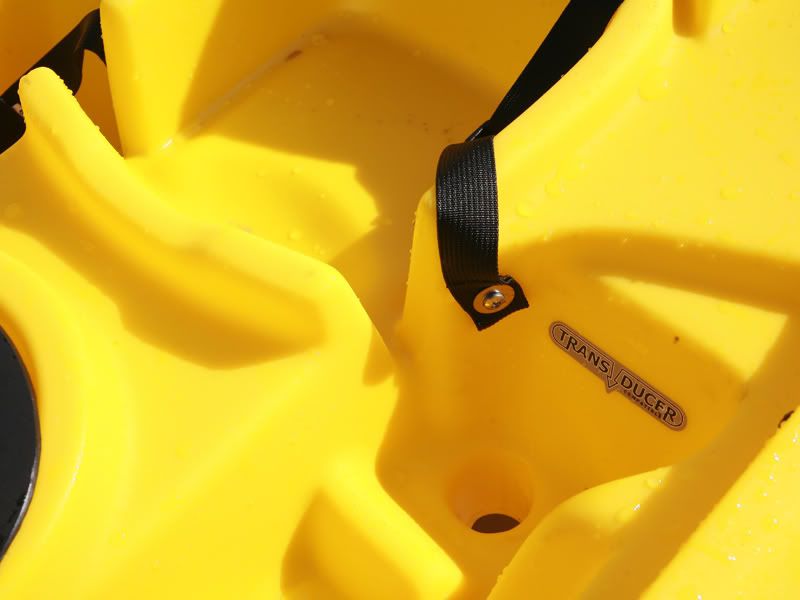
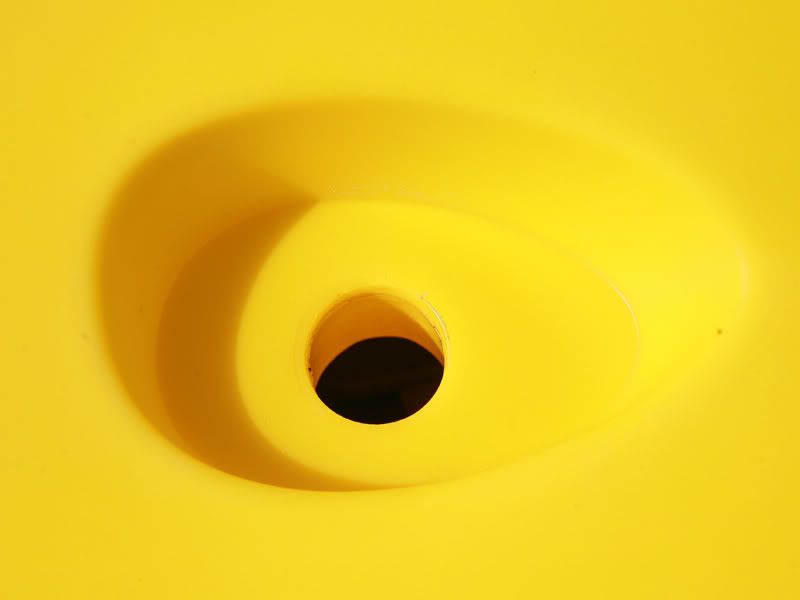
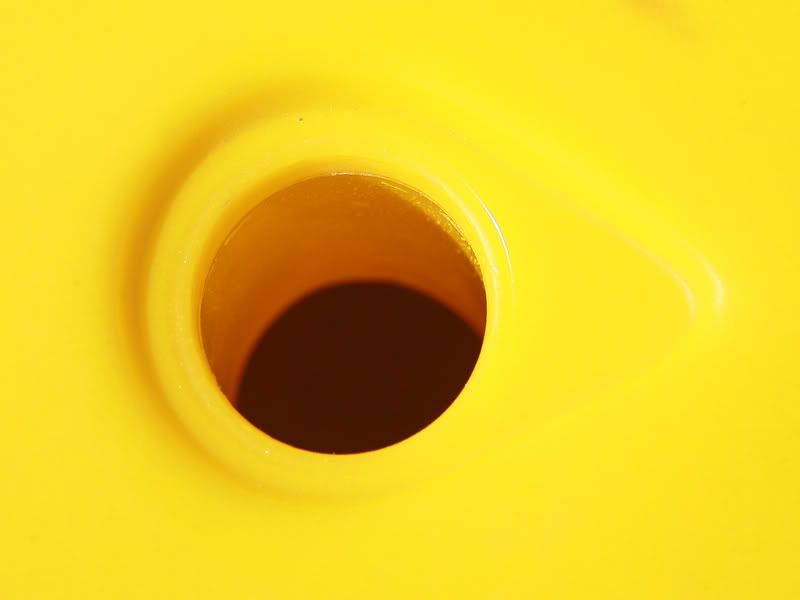
The transducer scupper hole, from underneath, is obvious in that it is far larger than the normal ones. It’s actually quite deep and formed in a teardrop shape which I presume to be for enhanced aerodynamic flow of water as the standard scupper holes also have a teardrop-shaped surround. (Please note that the photographs of the scuppers are not at the same magnification and are thus not in scale with each other).
These scupper holes are in the footwells. These have been redesigned and are self-draining. In the Prowler 15 I would always have water retained between the ridges but the Trident has gaps for this to flow through and down where it does drain away very efficiently. I know they work because although I still got a lap full of water going out through surf it all disappeared. A great improvement and one which will be of added benefit when fishing in the winter.
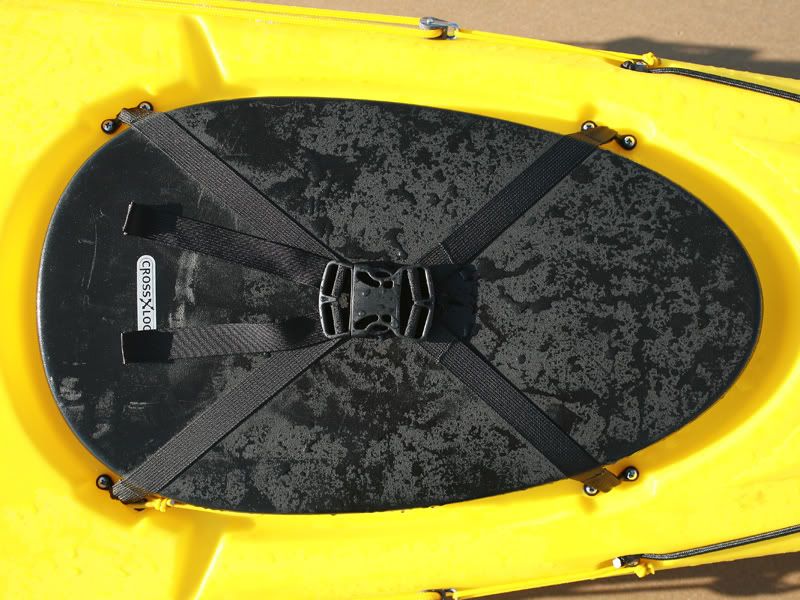
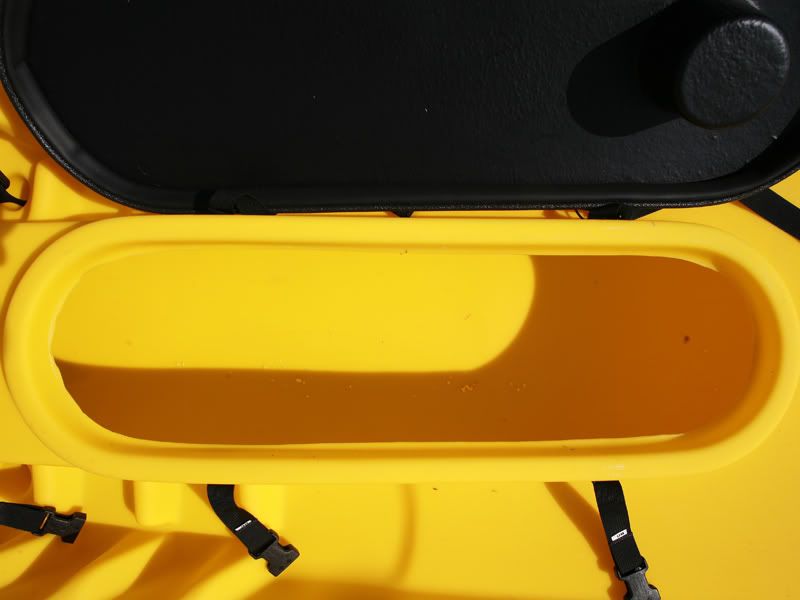
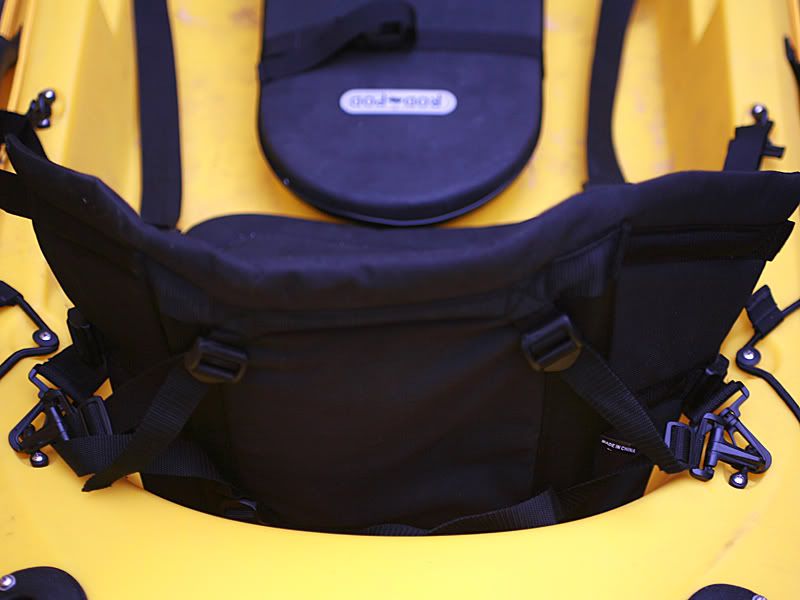
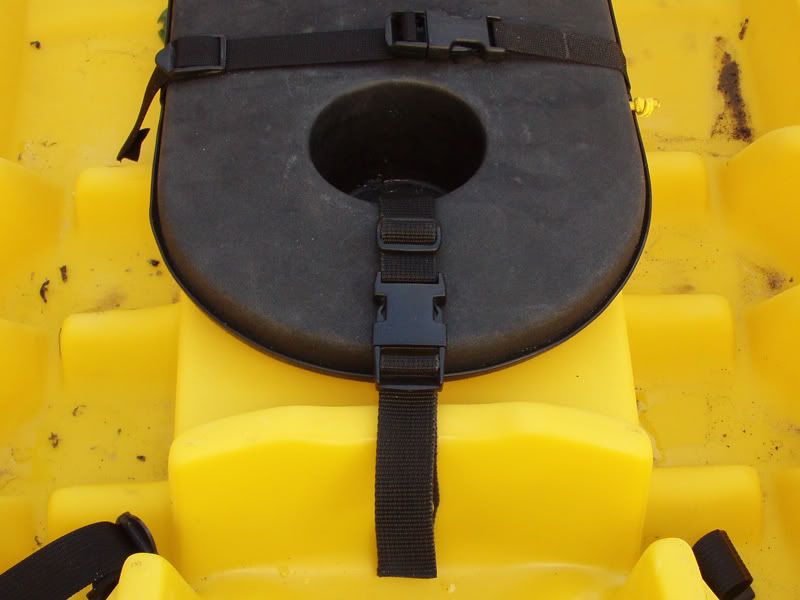
Next comes the Rod Pod (or Cod Pod with a bit of luck!). This is the feature that first impressed me when the Trident was announced, and which I had admired on the Kaskazi Dorado. On the 15 I had always wondered what I would do with a decent haul of fish that I wanted to keep - chance would be a fine thing – but now this is no longer an issue. I can now treat fish like beer and send them straight down the hatch! Again, the cover is solid and not too flexible and fits snugly. It is also held down by a couple of straps (though not a Crosslock this time, which would be useful for opening one-handed but not so secure in the event of a capsize).
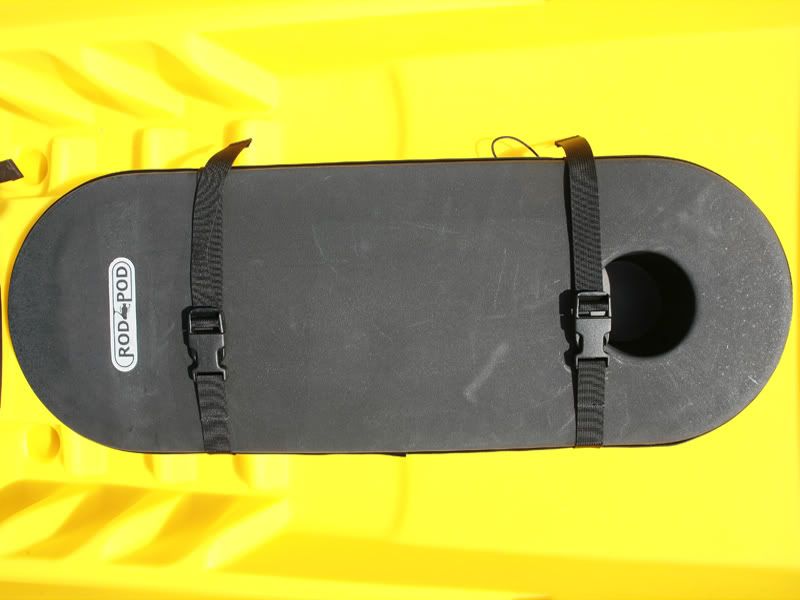
Opening up there is a tray covering half the length. This can be moved around and will prove to be ideal for my use by holding bait where it can be kept dry and secure (ie ragworm/lugworm wrapped in newspaper). Other small items could be stowed here too, or food, and in my opinion it is a useful addition.
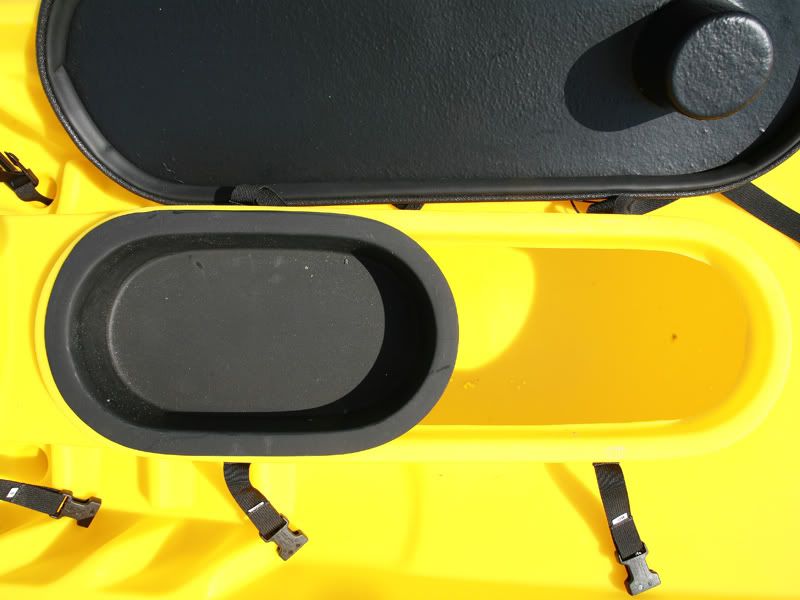
Take the tray out and the entire interior of the hull is accessible. The length and width – not to mention the position - of the hatch itself will make stowage of tackle a piece of cake. No more messing around with rod clips or paddle-keepers or risking flushmounts or turning rod holders around and lowering them, no, even rods of a good length should go in with no trouble. Not only that, any heavy stuff put there is close to the centre of the boat and thus won’t affect the ride adversely. As someone who doesn’t use a crate but who wants to be able to stow things away this is ideal. As a photographer as well as an angler I also now have the option of being able to take a decent SLR with me, where I can get to it at will, without the danger of damage instead of just relying on a compact in the PFD. Hell, I could even get my Crown Graphic in there! OK have just designed the first truly photographer friendly yak!
Oh, the hatch cover also has the bit of string attached.
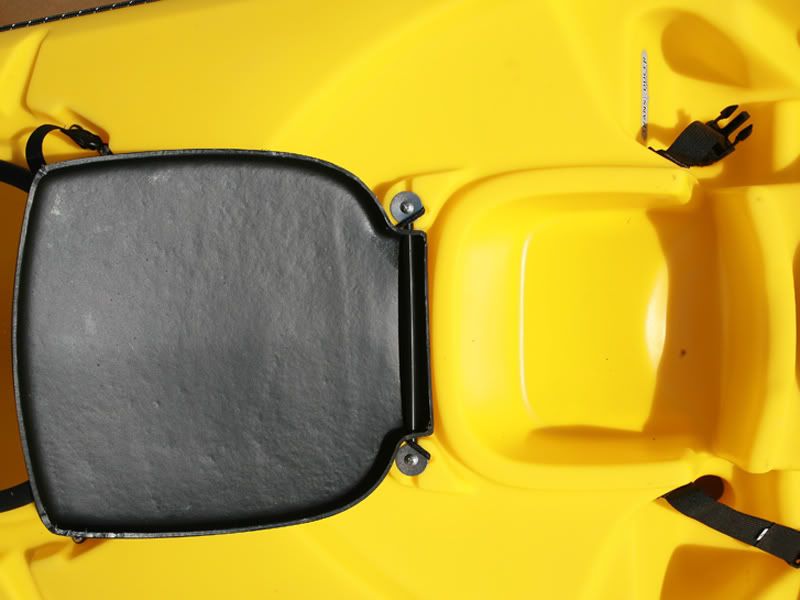
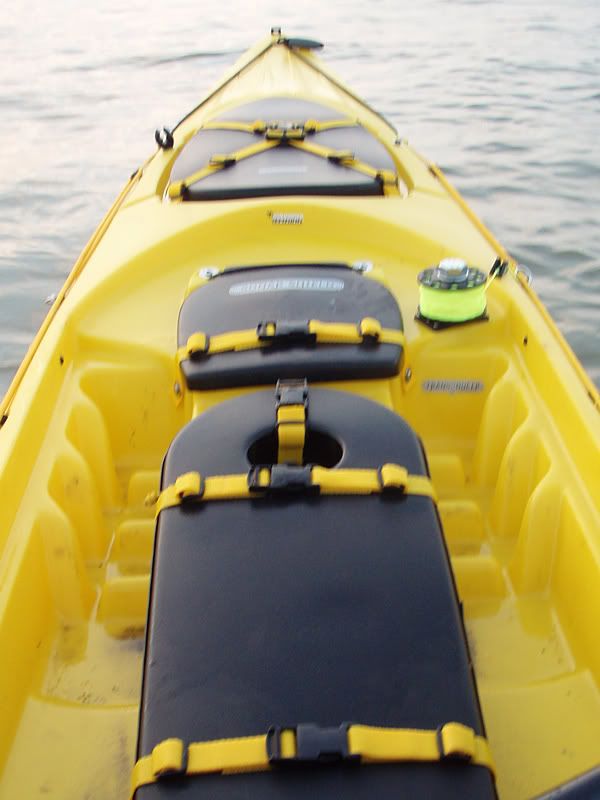
So, from the seat forwards you have the following; hatch, sonar shield, hatch, bowline, toggle, carry handles, pad eyes and rudder peg fitment area:
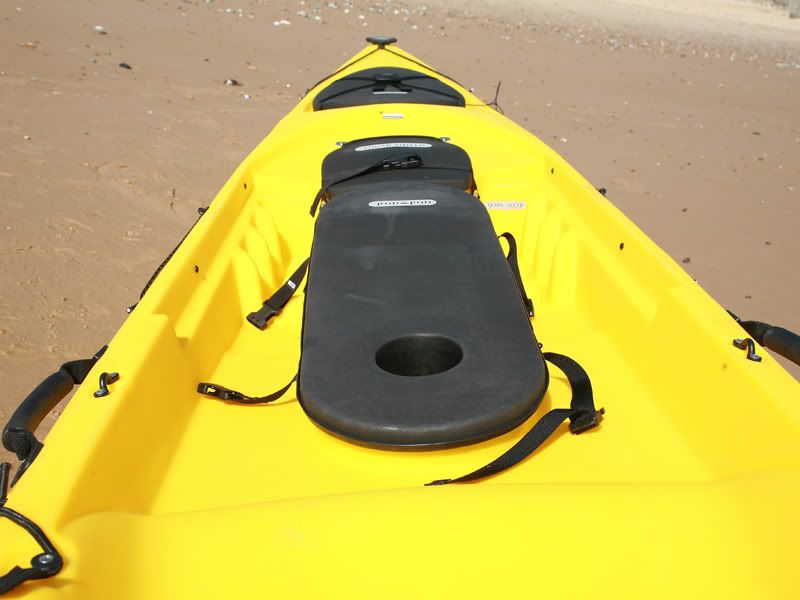
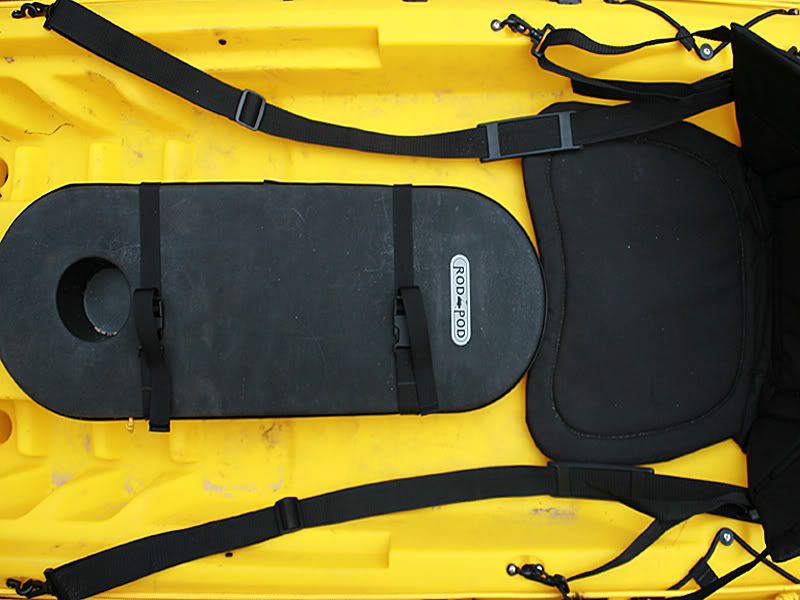
At the bottom of the photograph above you will see a ‘contour’. This is the front of the seating area. Looking the other way you can see the overall shape, with a build up at the front and a slope to the rear (and scupper holes). Thus much of the shaping for a good seating posture is already built in.
Add the new high-backed Comfort Plus Seat Back and you’re away. Now, there are many options for seats and supports in the OK range and while I found this to be comfortable and with good support in the short time I was afloat today I also found the Basic Seat Back fine for half-day paddles in the Prowler 15. This came a lot higher up though and should make heavy paddling easier.
The seating area:
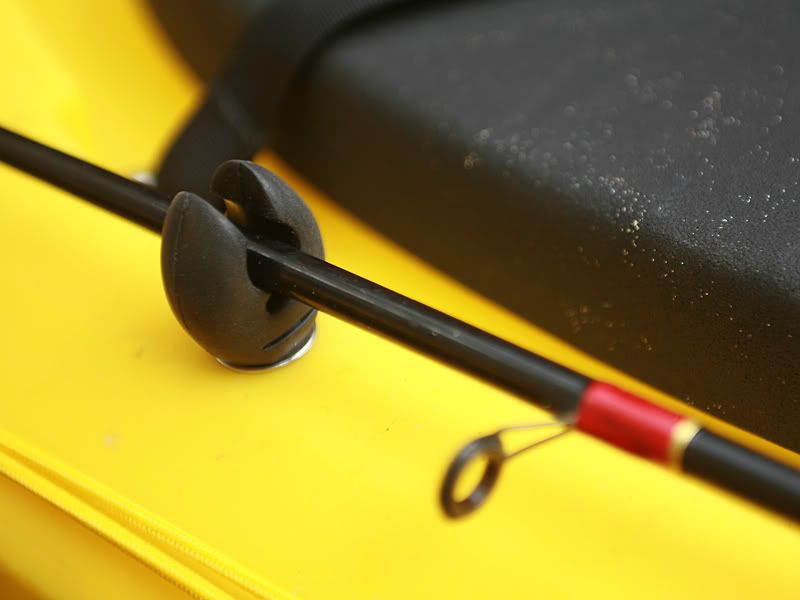
The paddle keepers are almost the same as those on previous kayaks but have the addition of tabs that make it a bit easier to grab hold of them, especially with gloves. Nice attention to detail that.
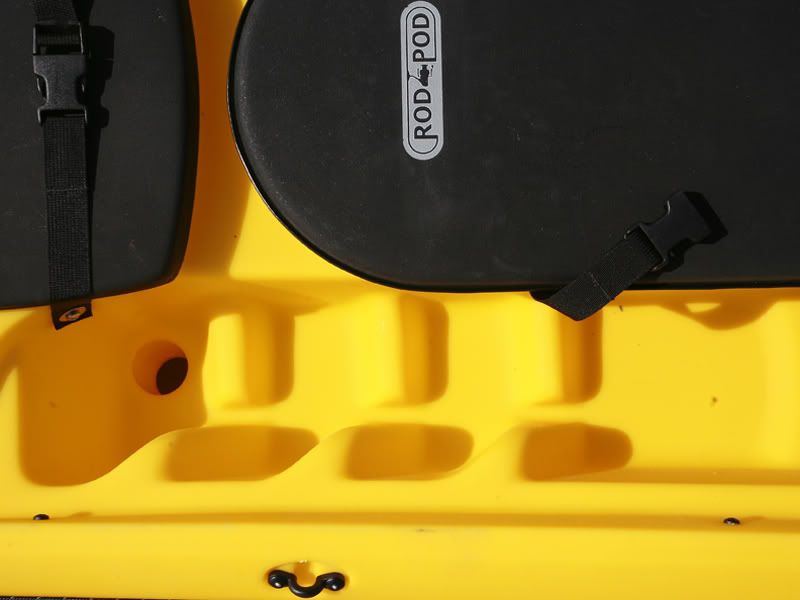
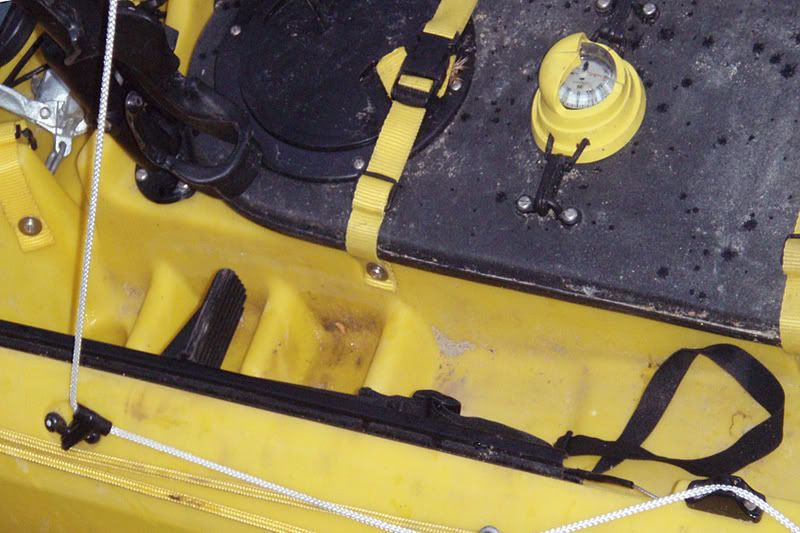
Behind the seat are, of course, the flushmounts. These are unchanged and useful for both rod storage on the water and trolling lures from as well as fishing from if sitting side-saddle.
The rear tankwell is next. Proportionally this appears to take up less area than that of the 15, having thicker sidewalls, but does in fact appear to be larger. However, it has been extensively redesigned and a lot of thought has been put into it. No longer is there a flat tray with 2 scupper holes – this is shaped and channelled and the scupper holes are actually lower than the main body and thus get drained into. This may not seem that big a deal but I for one will find it a bonus.
Something that I also liked was the central ‘dog clip’ attachments on the shock cord. Bungees can go everywhere when unhooked from buttons but this will all stay in position and the clips can no doubt be attached to crates by those who use them. There is also some bungee cord across the narrow piece of the tankwell just behind the cockpit. I can’t work out it’s purpose (nor, actually, the narrower section as it happens) but if it does get in the way it is easily removable. The pad eyes are sure to come in useful anyway.
From the other end:
Right on the stern there is more shockcord formed into a small cargo web. Handy to have but most likely not something that will be used much.
That’s the end of part one, what it looks like and how it’s laid out. My personal opinion is that it’s very well designed throughout with only the odd minor niggle as already pointed out. It looks the business and appears to be a capable kayak.
But don’t just take my word for it:

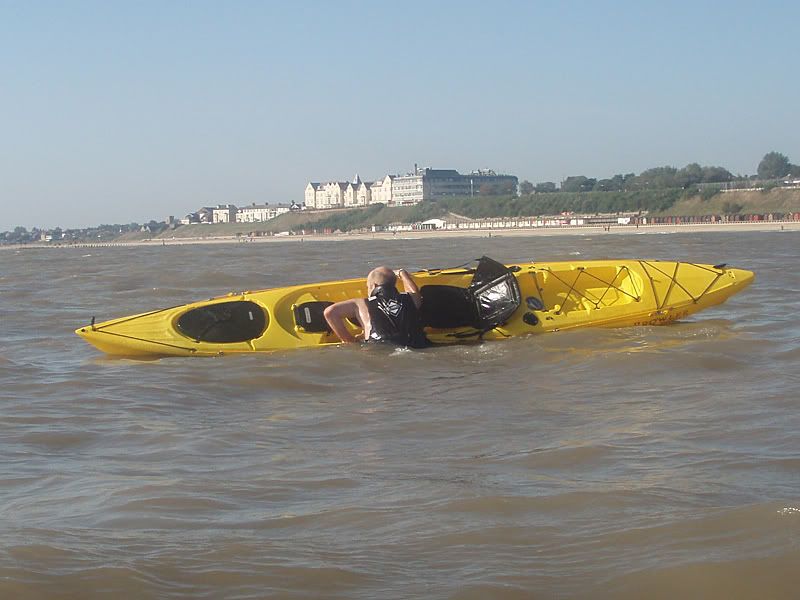
The C-Tug stowed in the front hatch, camera in the rod pod and PFD on I dragged the trident into the water, getting in without about 8 inches beneath me. Swell was a couple of feet tops with a decent distance between each wave. Wind was fairly strong and blustery.
I was also trying out a new paddle, a Carlisle carbon fibre two-piece jobby that I was quite excited about. This was not a good idea though as I realised after launching that I couldn’t compare handling if using a different paddle to the one I normally use. Furthermore, I think the paddle is too short for me unless I need to alter my technique and the kayak was practically empty. Hence this is just a short and generalised review, not felt to be accurate, and while I am reporting things they will be revised the next time I go out – don’t take them as gospel.
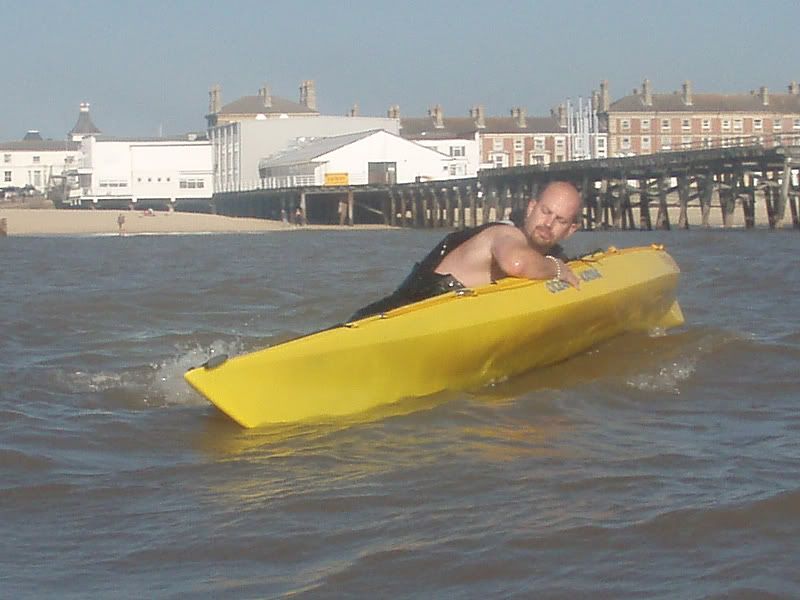
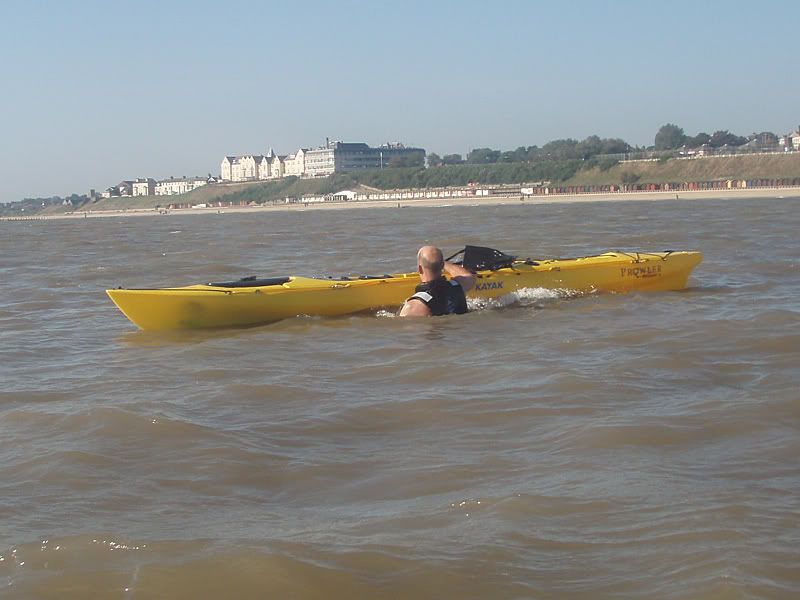
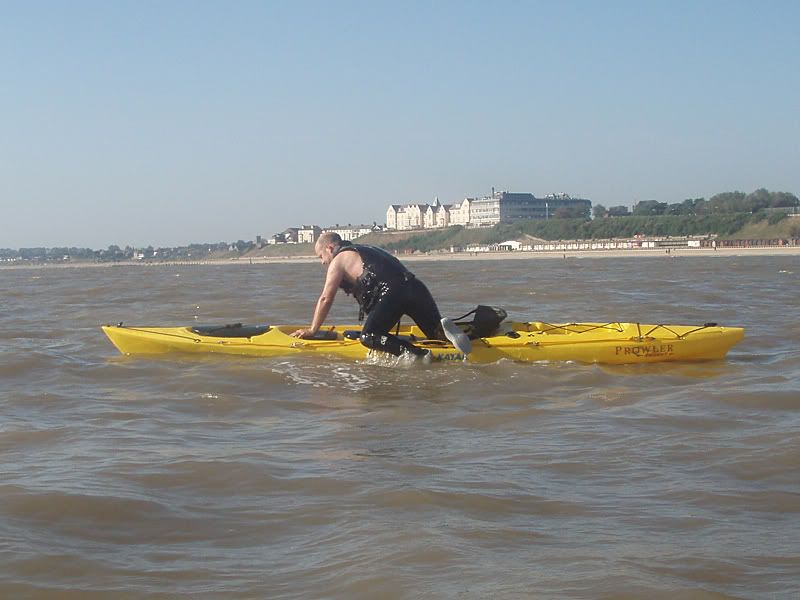
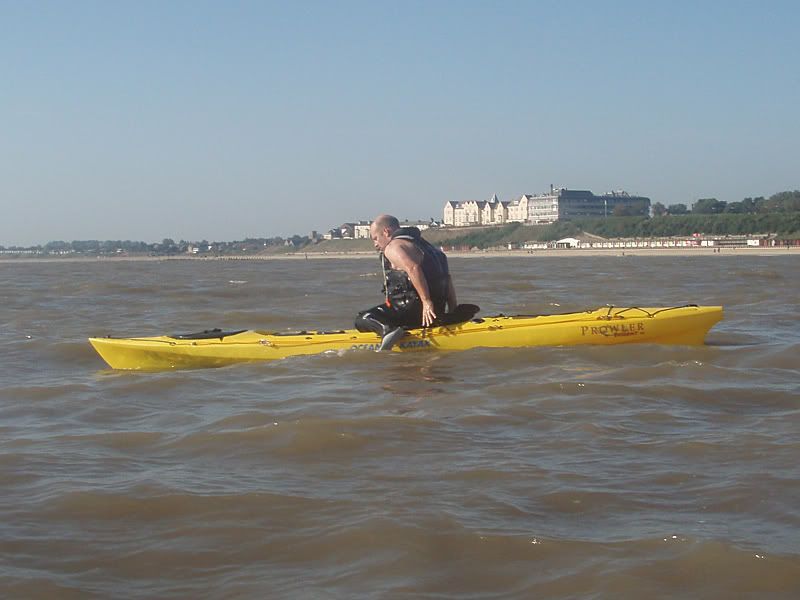
I paddled out, head into the surf. The first thing that struck me was that the nose was more buoyant than the Prowler 15. The second thing to strike me was a breaking wave that dumped water in my lap. So, the dry ride promised on all the forums was not 100% truthful… Directional stability was very good and the kayak kept its course with ease on the way out. It was a stable ride through the surfzone and I took it gently just to test these things. I could feel it was heavier and for all the talk of its speed I felt it was slower than the 15 on this occasion.
Getting out into deeper water and away from the groynes I started to feel the main difference I’d heard of; the seating position is higher than on my previous yaks. While it didn’t feel tippy or unstable, it did feel different and I seemed to feel more movement than normal – but this is possibly down to being used to a different boat as well as the higher seat. Response to the paddle was more like a Frenzy directionally with the nose veering slightly with each stroke. This may be due to the new paddle though as I also found that if I paddled equally and in an intended straight line I gradually turned in a circle. It was also hard work to get anywhere!
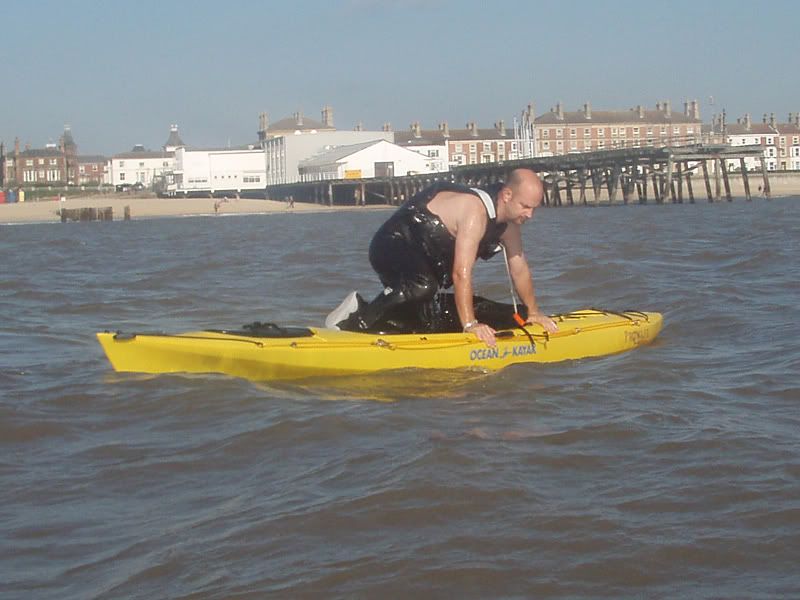
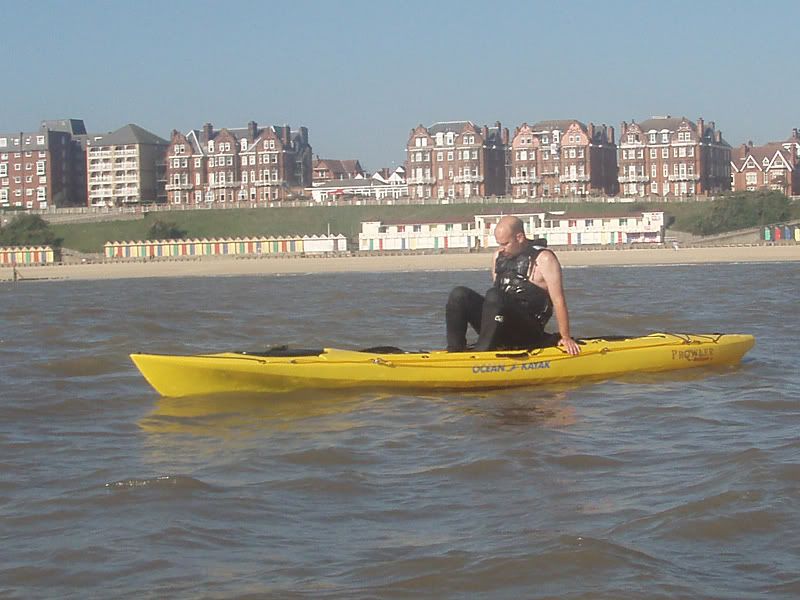
I decided to not bother with the paddling things any further for the time being and just to see how it responded when left to is own devices. It seemed to weathercock slower than the 15, which was good, and less water came in from the chop. It also drained out of the footwells and scupper holes very effectively (the lap full of water at launch was very quickly gone). It was also quite comfy to lie down in but so is the P15. Next I decided to try it in the surf.
As I paddled towards the surfzone I noticed it was very keen to pick up a wave on its own and ride it. It was doing it every time with no attempt by me to do so, even when I was not paddling but just slowly drifting in. After enjoying this I got to the point where I’d usually head in and caught a decent wave. Straight as a die, no need to correct with extra strokes and no tipping. The bow stayed out of the water and I glided in effortlessly, turned and went back out. It turned easier than the 15 too at this point. The next time I came in it was very slowly. Again, no turning from my course, no dipping of the bow under the water and no tipping. Very impressive. The last time I caught an even nicer wave by chance (the yak made me do it!) and I surfed it in easily, being turned a bit when I got into about a foot or so of water.
Certainly today it marked itself as a better surf yak than the Prowler 15, but an inferior paddle. I’ll give it another go tomorrow with my usual gear as the latter is contrary to other reports.
Today saw me beginning the rigging of the Trident ready for when it gets out on the water for a fishing trip.
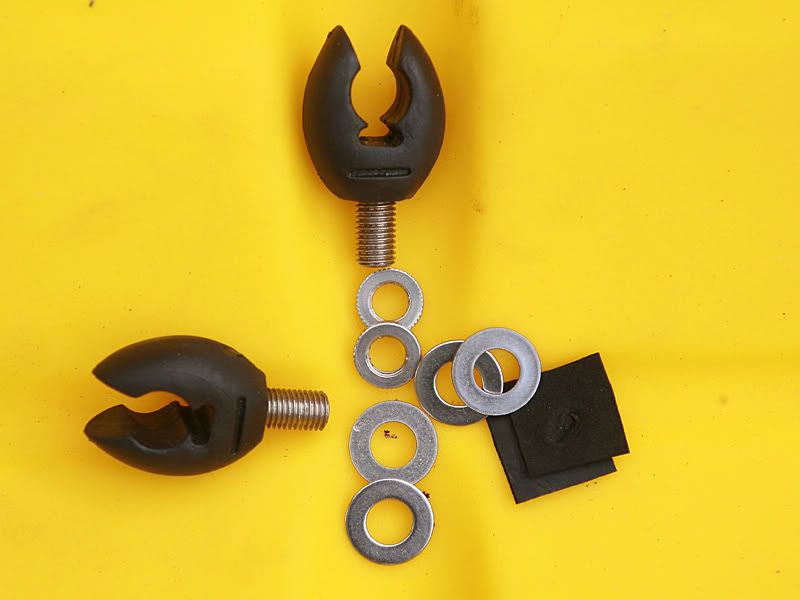
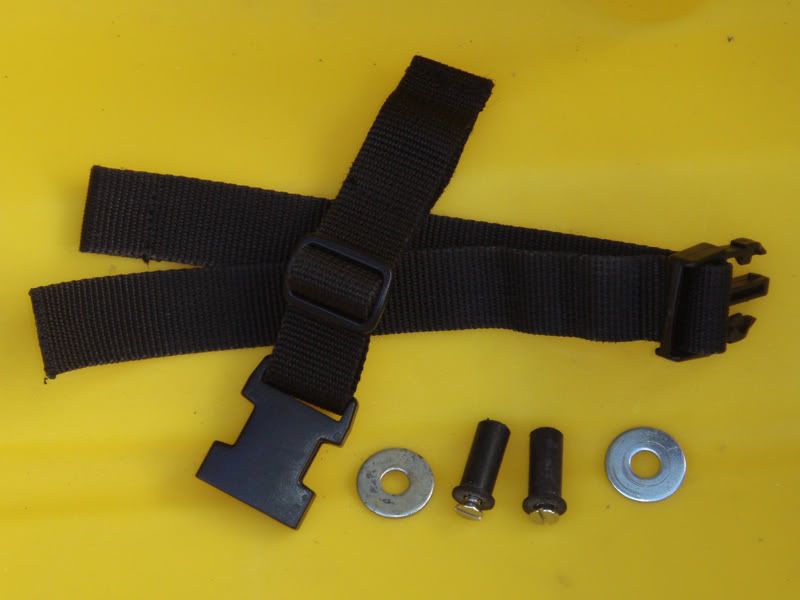
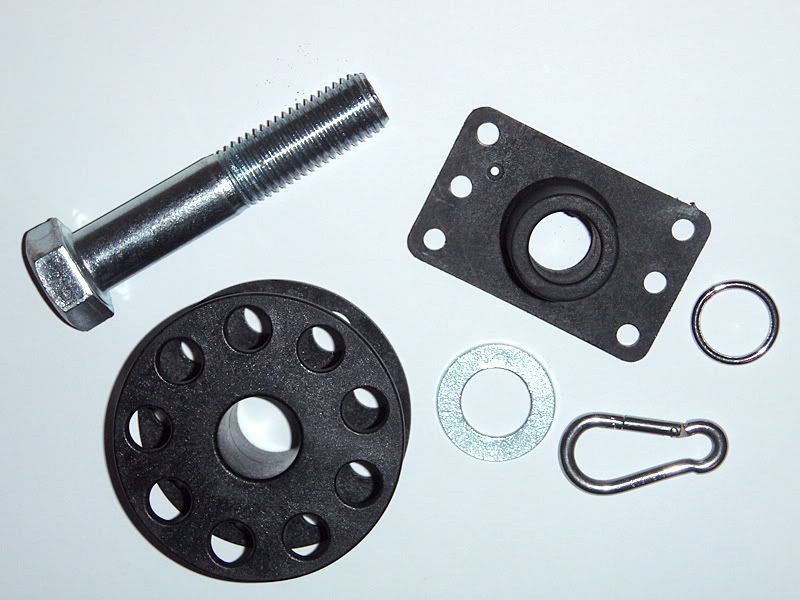
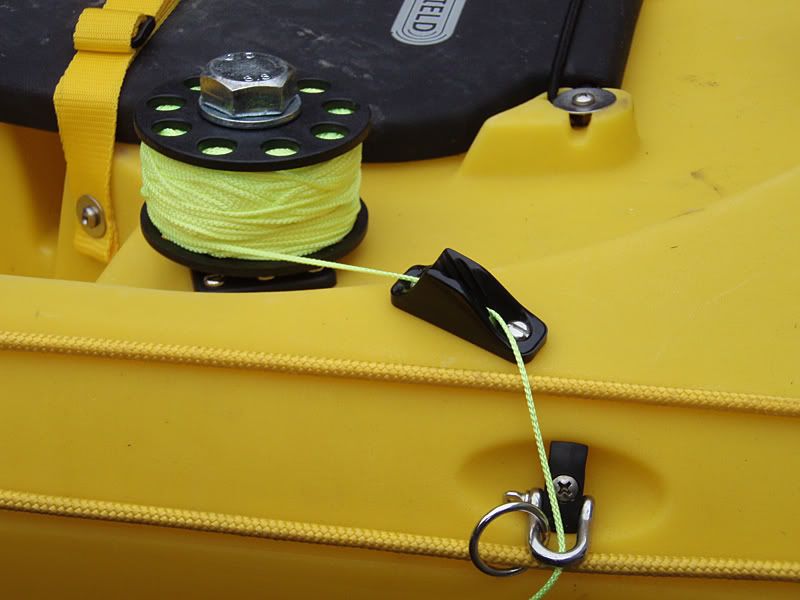
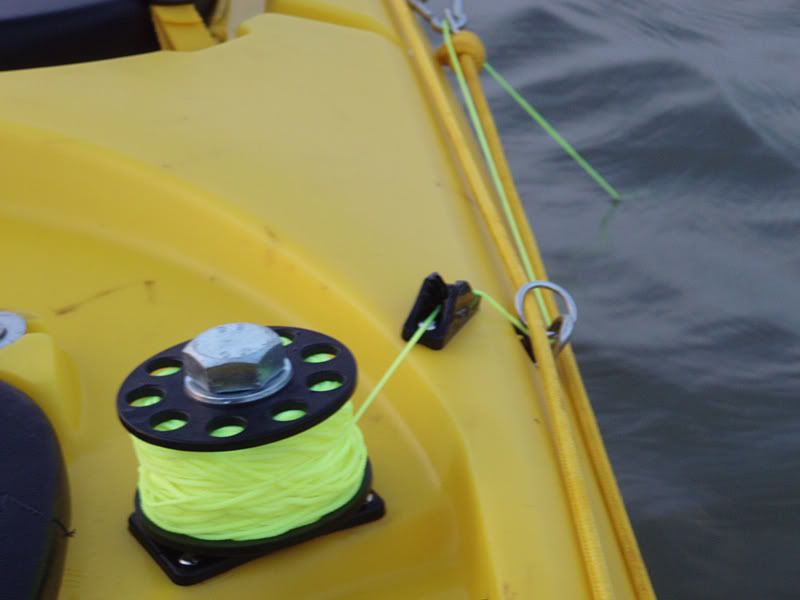
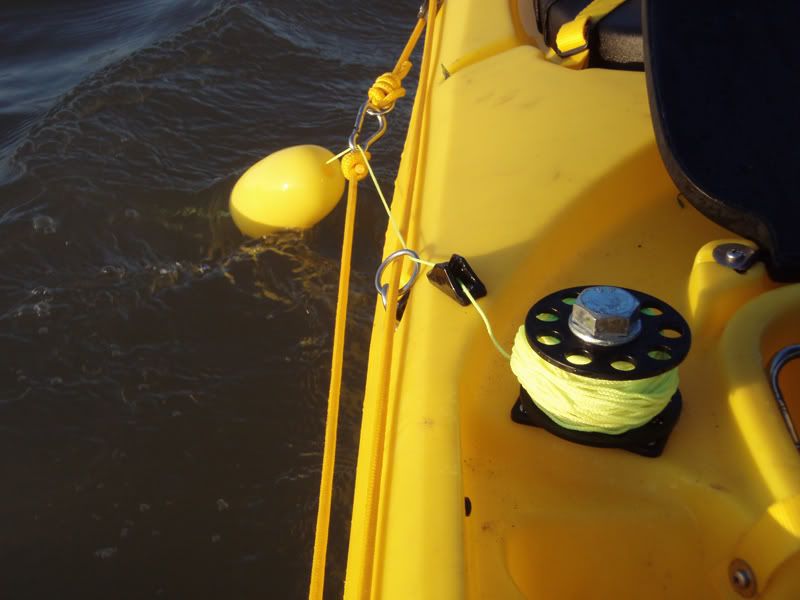
First job was to fit anchor trolley systems, on both sides to give me the choice when at sea. A visit to the local chandlers saw me sourcing what I needed and the photograph below shows the components for ONE trolley, everything being doubled and mirrored on the opposite side and I will write this from the point of view of a single trolley from herein to avoid confusion. Prices in Sterling, totalled for full quantity of each item.
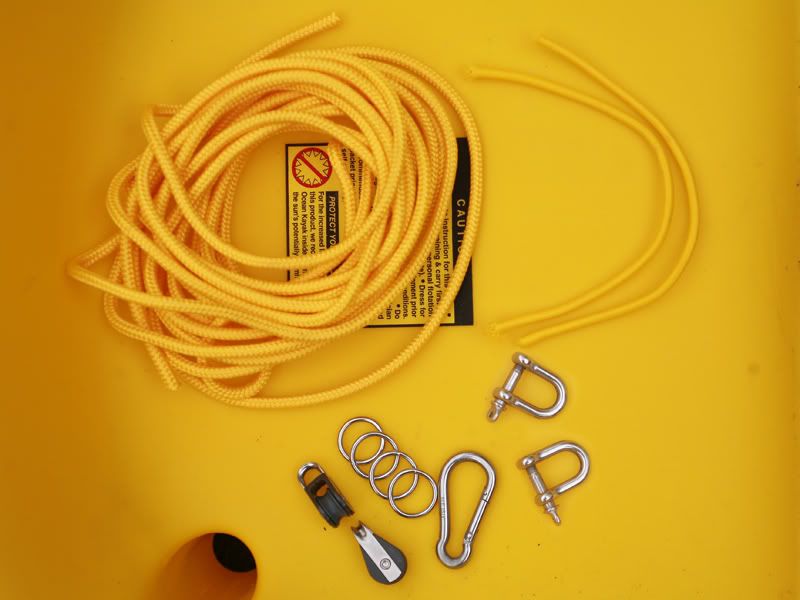
The components are as follows:
7m of 7mm Yellow nylon cord - £4.90
50cm of 4mm Yellow shock cord (cut into 2 pieces of 25 cm each) - £0.35
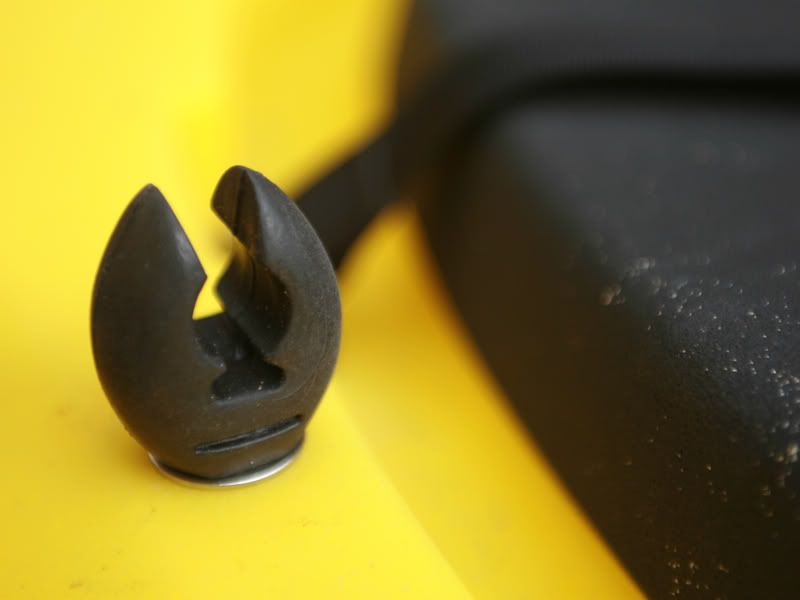
2x Rino Pulley Blocks - £7.00
4x 3x20 Stainless Steel O-Rings - £1.60
2x 5mm Stainless Steel Bow Shackles - £1.40
1x 8mm Stainless Steel Carabiner - £3.00
Total Price (one side) - £18.25.
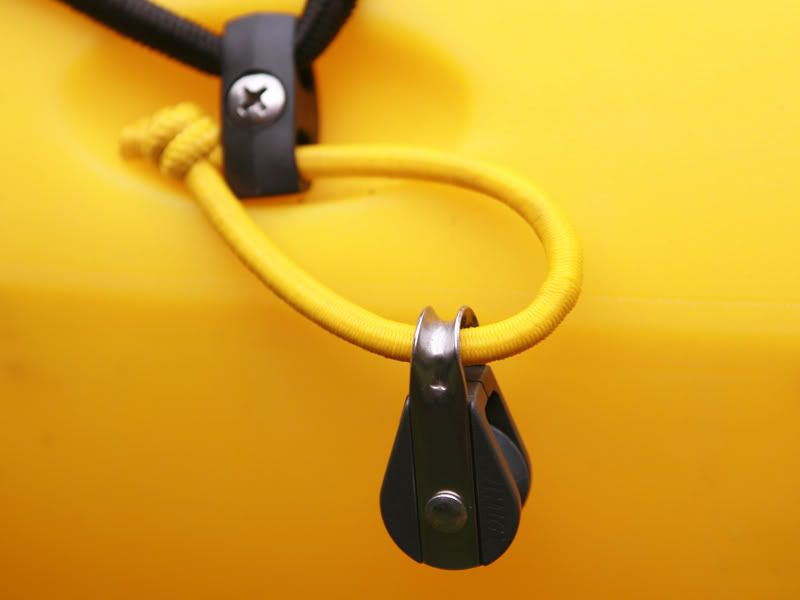
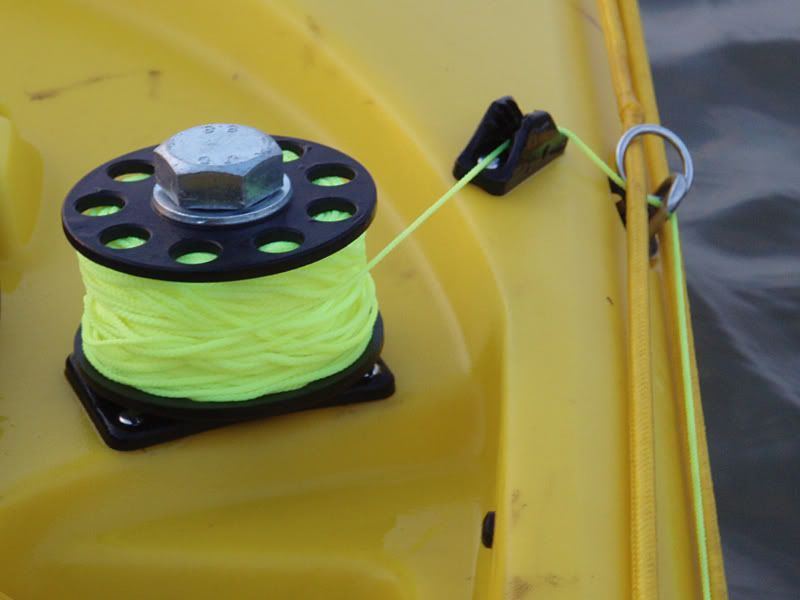
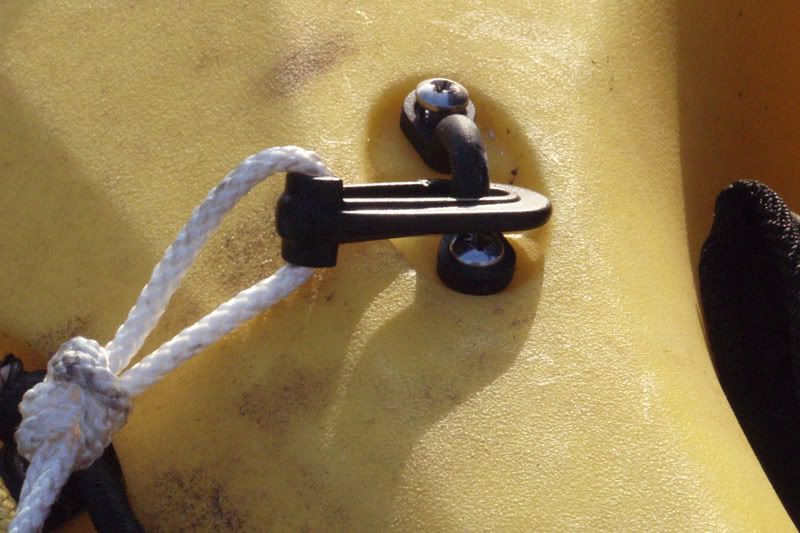
The trident is superbly designed for setting up an anchor trolley. There are rigging points all over the place and this allows for an easily self-manufactured full-length anchor trolley system. The first thing to do is remove the two pieces of cord running through these fittings and set aside for future use if required.
At the furthest rigging points fore and aft I tied a 25cm piece of shockcord into an overhand loop which holds at the end the pulley block. The shockcord gives slack when the swell raises the boat in the water and tightens the lines when not in use.
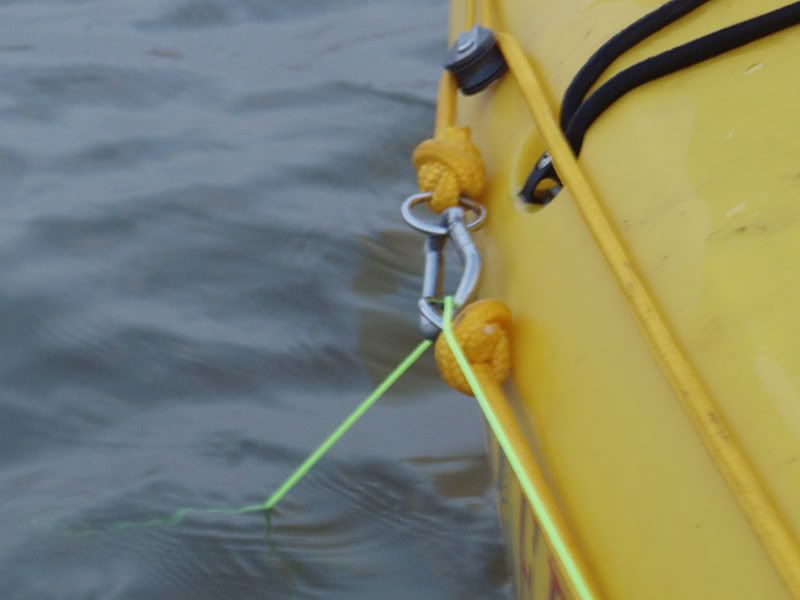
Next I chose points behind and in front of the seat area and attached Bow shackles and O-Rings to these to form running eyes for the side of the rope unused by the anchor carabiner. These allow free passage of the rope without any resistance on the rope but keep the lines below the level of the cockpit and therefore tidier and safer.
I then ran the cord through these eyes
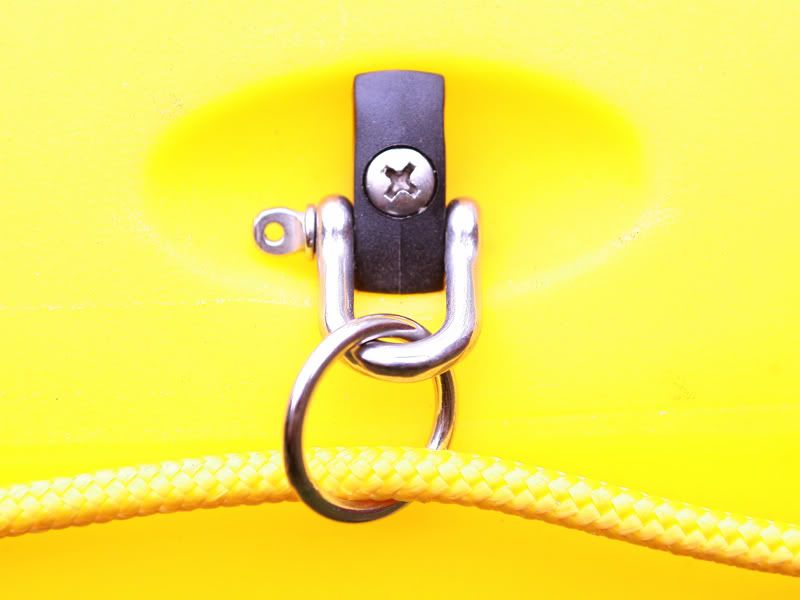
and through the pulley blocks
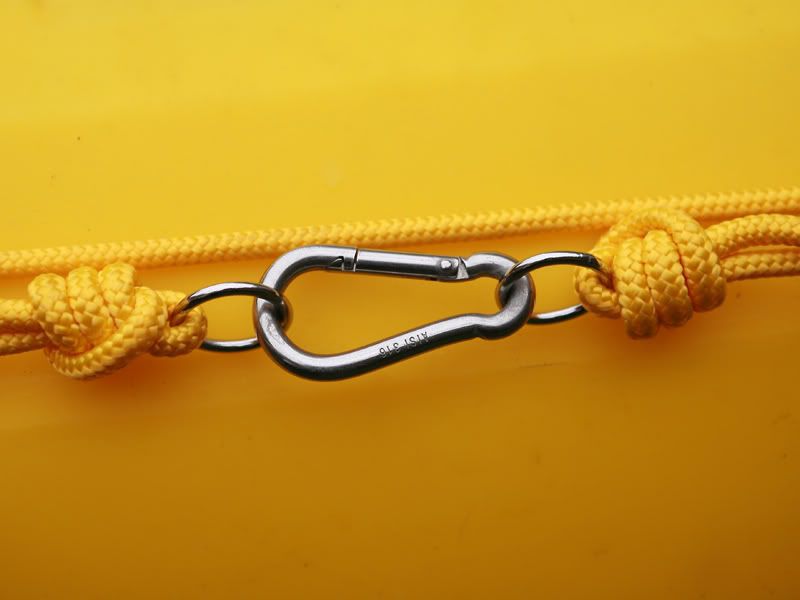
The final stage was to tighten the cord and tie off both ends of the rope to the remaining O-Rings and fit the carabiner between them.
The whole process took maybe 20 minutes and involved no drilling and no tools other than a screwdriver to loosen off the rigging points, scissors to trim loose ends, pliers to pull them really tight and a lighter to melt the frayed ends. Very simple and easy to do.
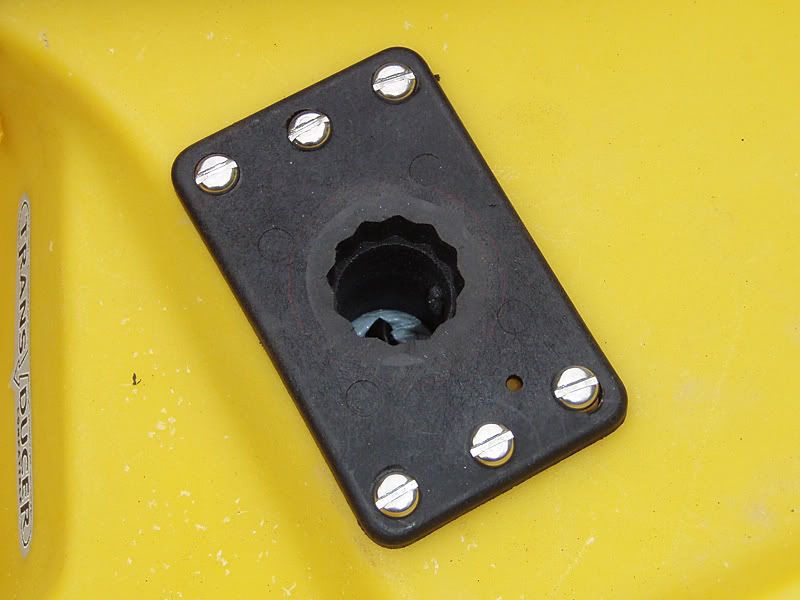
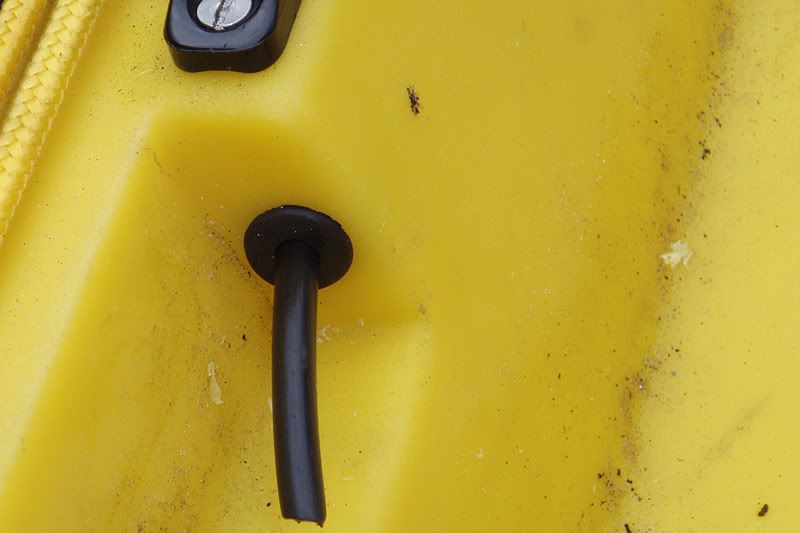
That done I turned my attention to the hatches, and those bits of string that held them once the clips had been released. First I tackled the bow hatch and after removing the thin line I tied an overhand loop into one end of a piece of shockcord and fitted it through a convenient pad eye.

I then widened the hole in the hatch and pushed the other end of the shockcord through, finishing with a double overhand knot.
With the hatch closed I know had a more substantial hatch keeper, and as it was tied in this way I can push the slack into the hatch through the hole, which is smaller than slack bungee.
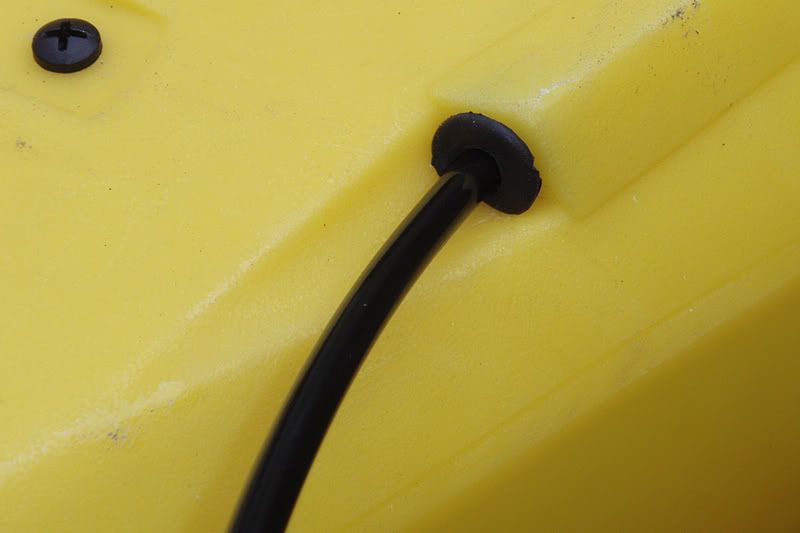
I did the same for the rod pod, but turned the hatch the other way around, cup holder away from me as I intend using it for something other than cups of coffee, which I pour and drink straight away so as too avoid missing bites or having it get cold. I again removed the small line and widened the hole enough to get the shockcord through, again tied into a double overhand knot, terminating on the outside of the hatch.
I then made a hole on the inside of the hatch lip which I threaded shockcord through – this lip being turned over and not actually having an ‘outside’ edge. The line had originally been tied to a strap.
Once again, a nice tidy and strong solution which could have all slack pushed out of the way.
Third job of the day was not really a normal consideration. I’m a tart and as such I don’t like the brass swivel clips fitted to the seat backs. On my 15’s I replaced these with stainless steel carabiners as they were smaller and looked neater, and didn’t tarnish. However, this time I decided to save weight and also make the yak quieter by using plastic clips, which should also reduce wear and tear on the pad eyes.
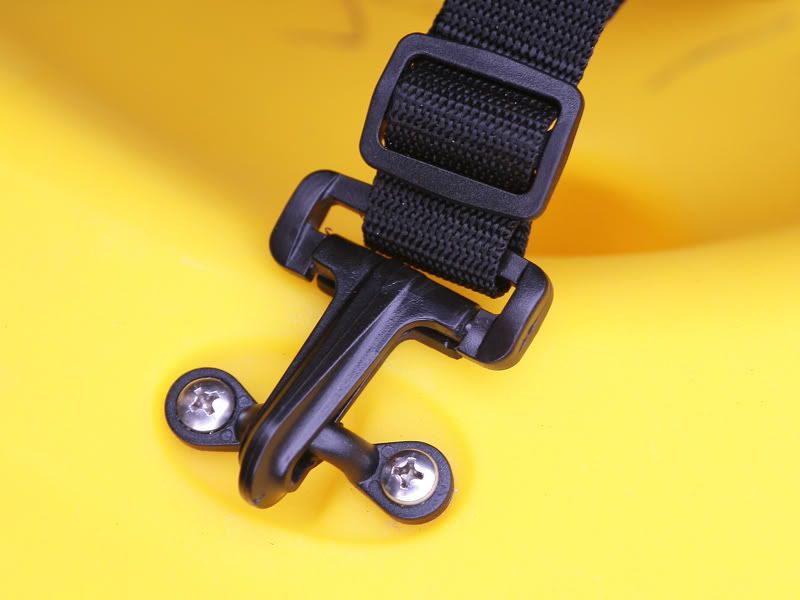
While fitting these it reminded me of something. With my Prowler 15 not handling the surf too well (it’s designed for something completely different) I had often considered buying thigh straps but not gotten around to it. However, I had two long straps with these clips at each end which were on lighting stand holdalls. Were as in past tense. They are now temporarily installed so I can finally see whether thigh straps would be a useful addition for my kayaking as anything that keeps me from getting wet at the end of a trip is surely worth having.
The trident, as I said, has plenty of attachment points and I assume that the ones I used were in fact designed in to take thigh straps.
A further note regarding the fittings on the Trident. Pad eyes have recesses underneath them now which gives more room to use behind them and this is a minor thought but major improvement. I am continually finding these clever little ideas on the Trident and it speaks volumes.
This morning I woke up early and took the Trident down to the water for a proper test paddle. According to Magic Seaweed the conditions were 4ft swell at 4 second spacing with a 17mph south westerly. The swell was like that past the breakwater, but the surf was mostly a couple of feet with just a few decent sets. It was warm outside and nice and bright and so I trolleyed up, pulled on a wetsuit, grabbed my PFD and cameras and wandered down to the beach.
First thing I did was take some photographs of the Trident as it looks now, just because the light was nice.
The next ones were those I’d missed on the first look at the kayak - the front hatch:
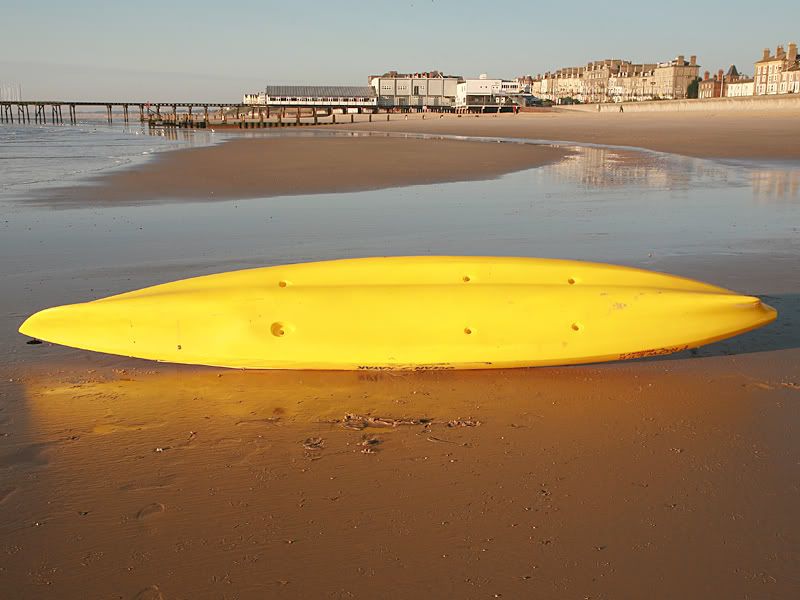
and the underside of the hull:
from the bow:
and from the stern:
The Rod Pod also has another safety use, ie that of storing a two piece paddle. I would suggest having some kind of securing feature for this as there is of course no bulkhead and it can end up at the stern, which is no use in the event of an emergency, maybe a Velcro leash on the inside.
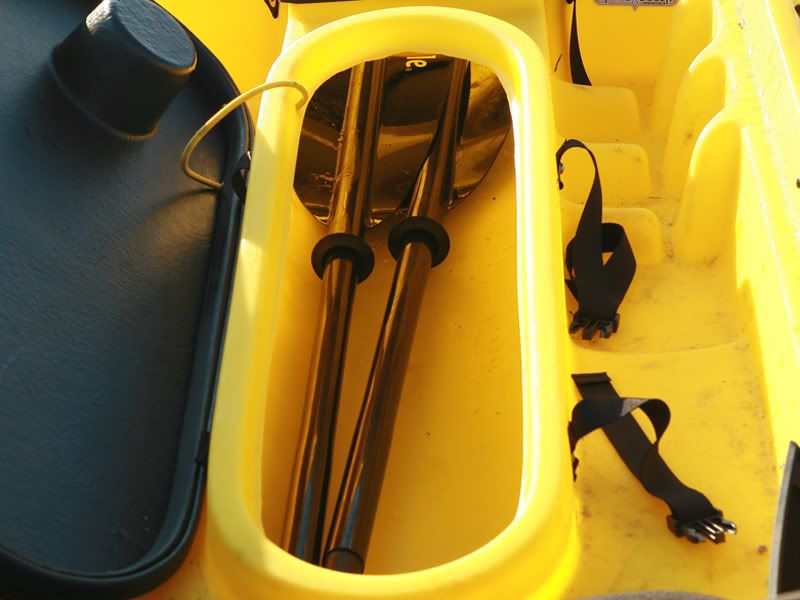
The main paddle was of course secured in the paddle keeper when not needed:
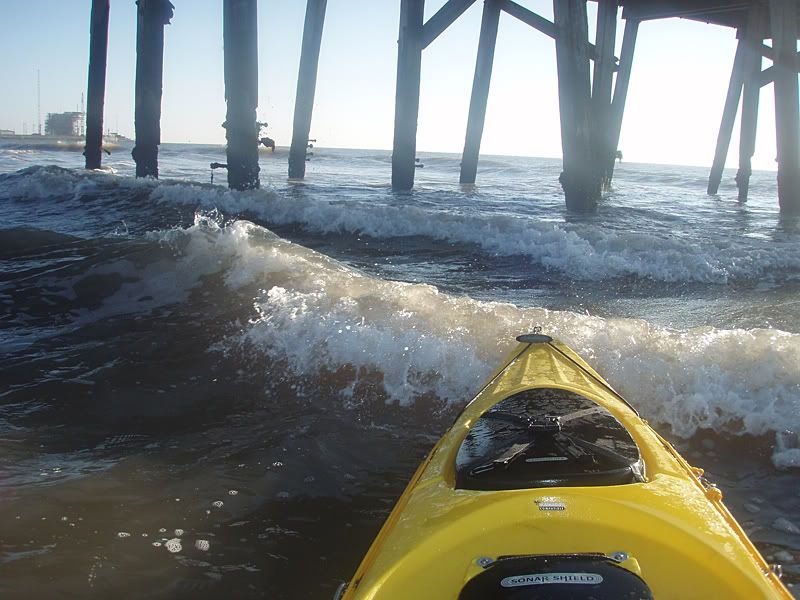
I had brought my usual paddle - a Carlisle Day Tripper cheapie - and the fancy one, to see what difference they made. Beginning with the cheapie I pulled the yak into the water and paddled slowly out straight through the surf. Again, it held a very straight track through this and I remained dry. I turned and went back in, again very straight and dry and repeated the exercise with the two-piece. I then repeated the exercise a further time but quicker and once again it handled it fine, riding straight over the waves and keeping me dry – basically unless you have one curl over just as you hit it you should stay pretty dry.
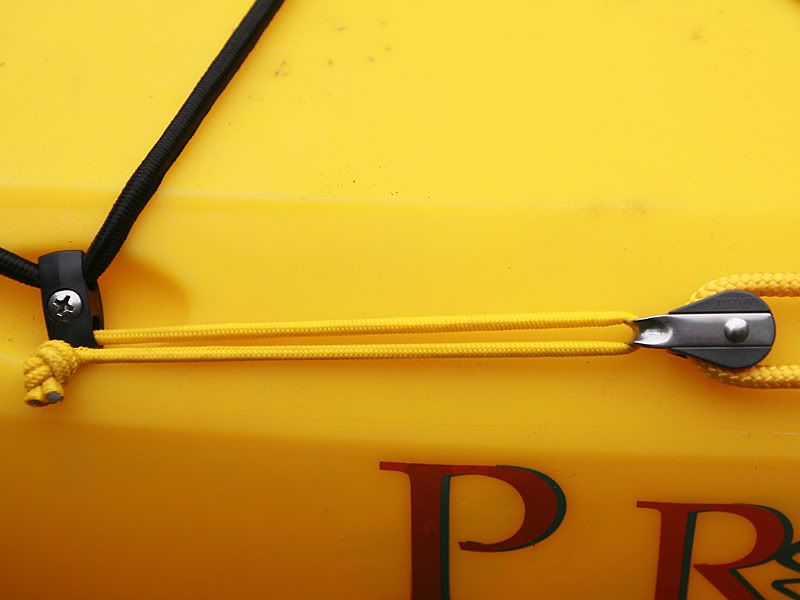
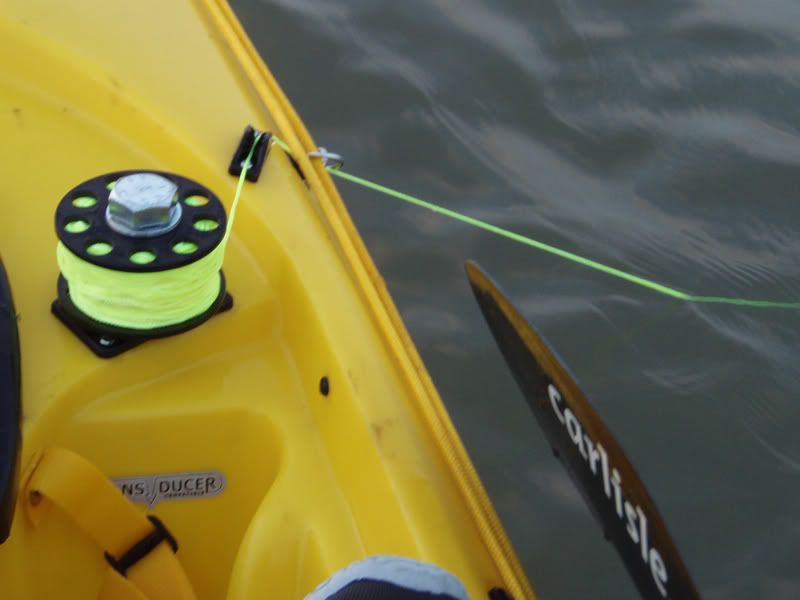
Once out, I removed my camera from the hatch and photographed the anchor trolley from the seat. First I pulled it so it was to the fore:
And then again to the aft:
It worked smoothly and well and the lines remained out of the cockpit. The only difficulty was where I had joined the two lengths of rope by re-melting having had them cut in two pieces by mistake, this was a bit bulkier and didn’t go smoothly through the block so will need to be shrunk slightly.
I then tried sitting side saddle, something I personally don’t tend to do, and it was fine. There is plenty of buoyancy so it doesn’t let a noticeable amount of water in but I didn’t feel too secure – the reason I don’t normally sit side saddle – as the kayak will weathercock and move with the swell and the high seating position does enhance the movement. It was fine though.
Reaching around to the back of the tankwell was also tried and this was easier than on the Prowler 15. I also went forward and opened and closed the bow hatch, again with no difficulty and the high, buoyant bow kept it clear of any ingress of water. Very stable kayak this.
I paddled over to an area where the surf is usually bigger and more uneven (getting broken up by the pier legs). Swell was 3-4ft but not really producing rideable surf, although the water was very broken. I pointed my nose at a groyne (down boy!) and sat there. And sat there. It stayed straight, just bobbing up and down with the swell. I may as well have been at anchor.
The tide was quite far out now and the water was shallow – between 1 and 3 feet and I sat side on to the surf for a good while, staying pretty dry (it was small surf by this point, maximum 2 feet) and not rolling over or being pushed around in direction. The following photograph was something I wouldn’t try in the P15 but which was fine with the Trident. I was in 12-18 inches of water, side on to the surf and paddled through the legs of the pier. The water is very messy here and runs fast; there are also banks around the pier so it does tend to be unpredictable. Spacing between the legs is I would say about 12 feet – not sure, but thereabouts. I went through easily and without being pushed much off course at all.
I paddled back to where I had launched and played some more in the surf. Although not designed as a surf boat this naughty little minx just wants to play! Well, play we did for a good half an hour. I couldn’t ride any of the waves today but I paddled into shore forwards, out forwards, in backwards, out backwards, in laying flat pointing forwards, out laying flat pointing forwards, in laying flat pointing backwards and out laying flat pointing backwards, the lying down ones repeated with my legs crossed as if having a kip. Now, there is no sane reason nor justification for most of those exercises, they were pointless and wouldn’t be used normally, but for the sake of doing them they were done. They were all VERY easy, the direction holding and mostly I kept dry, with the exception of some of the backwards ones on the way out, dependant on the breaking of the wave.
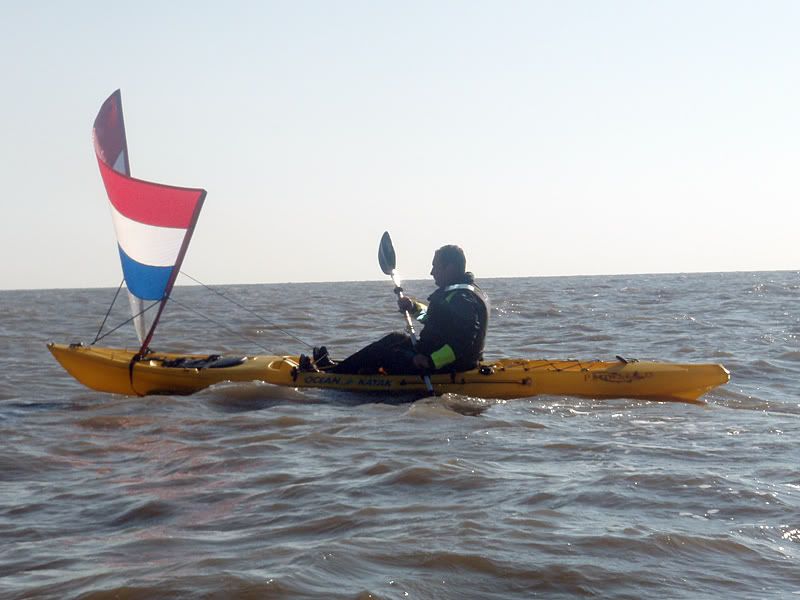
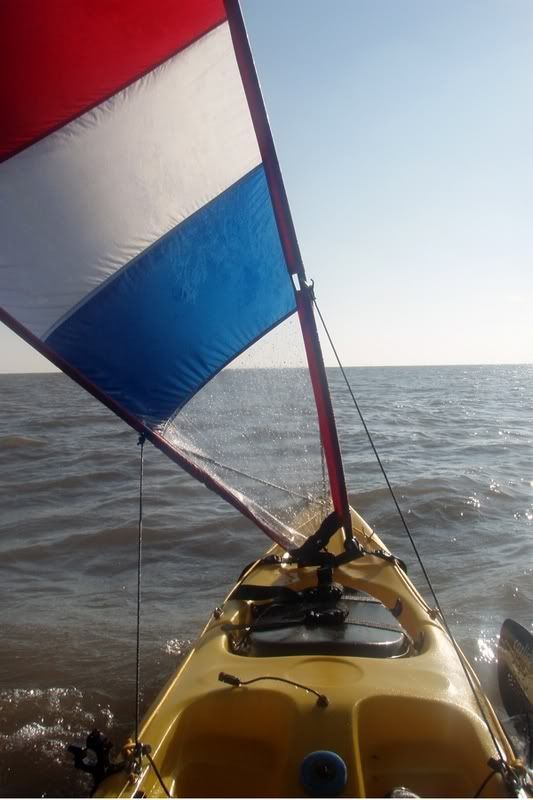
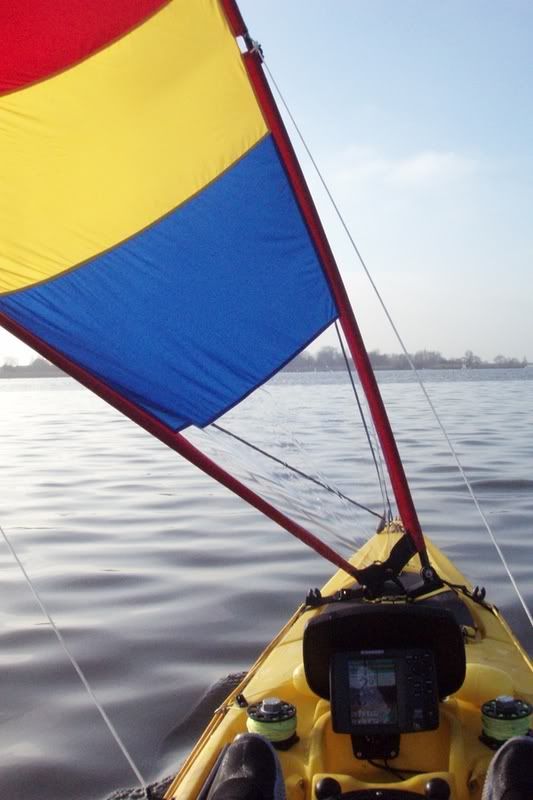
At this point Mike (Mb) arrived and so I handed over the Trident and went and fetched a Prowler 15, which I had fitted my Pacific Action sail to. Two reasons – Mike was enquiring about them the other day and the wind was strong. Coming back to the beach ten minutes later he looked dry (and resplendent in his new dry gear) and we went out again after I placed my C-Tug in the bow hatch of the Trident to try things with a bit more weight in. I also placed a paddle in the paddle keeper to make sailing easier and deployed it, trying to sail right off the beach. I couldn’t because of the position of the groyne so instead paddled out a little bit and then started to move quite quickly. Glancing back Mike was standing in the water, a wave having caught on the stowed paddle, knocking it up and hitting him. He stowed it again and launched with ease – but he couldn’t catch me, I was flying. I played around a bit doing a good rate of knots and then came back to where he was. I crossed the wind both times and having had a good successful sail (with virtually no effort on my part – in fact I was on the mobile for a few minutes of it to a mate who was too slow waking up to join us). I think I’ll put one on the Trident too; it certainly does make things a breeze (!)
Now Mike and I tested the weather-cocking. I felt the other day that it was slower to turn with the wind than the 15. I was wrong. We got parallel to each other but with a bit of space between us so as to not block the wind. We both pointed at a particular shore mark and called out as we turned to another. We then swapped boats and repeated the exercise as a control check to ensure it wasn’t dependant on the person in the saddle (shape, weight, wind resistance, lack of hair etc). That’s a story in itself and will follow in a moment. The verdict was unanimous – the Trident weathercocks quicker. Substantially quicker. I can’t say accurately but at a rough guesstimate I’d say between 20 and 40% faster than the Prowler 15.
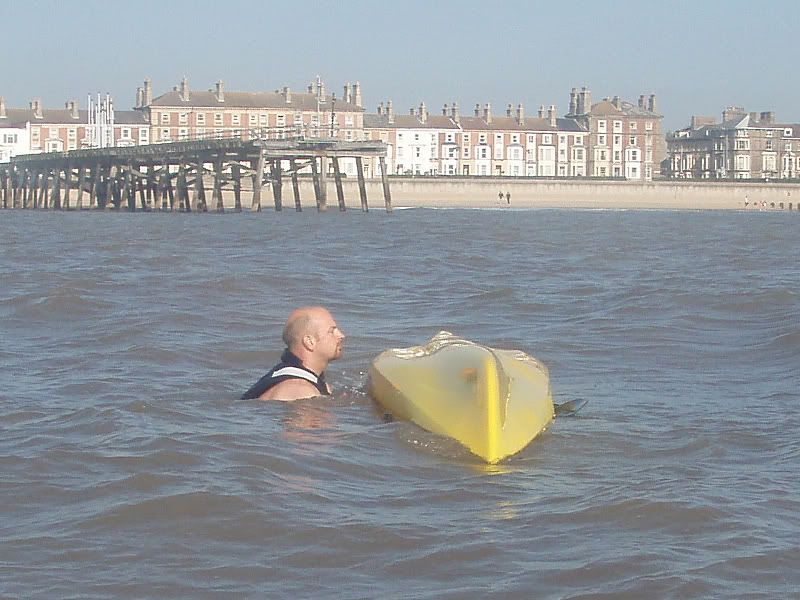
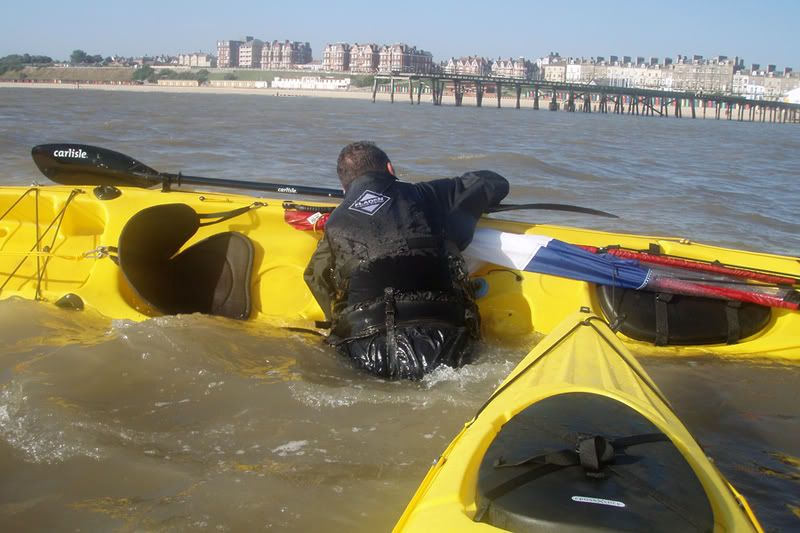
Swapping boats. Apart from the weather cocking we both wanted to do some capsize drills and I especially needed to test the Trident for this. Plus Mike wanted to try the sail. So, instead of doing things on dry land, or getting in the water and then into the other one we decided to cross-deck. Good idea that. I got out of the Prowler and across to the Trident. So for a while we had Mike and I both on it, me forward and him near the seat. It felt stable enough. However, when Mike went across to the Prowler we became unstuck – literally. The Prowler tipped on its side when the weight was put on it and try as he might Mike couldn’t get it to behave. I was my usual helpful self and took a photograph but I don’t think Mike will forgive me for posting it! Still, he tested his dry gear – custom made locally by Liquid Logic – just not when he was expecting to. He soon clambered back in and I retrieved my camera from the Rod Pod and hung it around his neck. This was the first time I’ve seen Mike look worried on the kayaks; I told him to be careful because that was £2k of camera. I then handed him my compact – which is waterproof and asked him to snap me doing the capsize drills with the Trident:
I got in on the leeward side and flipped her over:
Reaching over, I turned her right way up:
Kicked myself on:
And clambered aboard:
Simple. Now for the windward side.
Flipped her over:
Reached over and began hauling myself up:
Clambered in:
And made myself comfy.
It was like getting into bed. The buoyancy and shape I assume is what makes it so easy to right – it sits high (but not so high you can’t reach over) and can be flipped back over very easily – far easier than the P15. There is also more space to put your feet etc and the buoyant wide gunwhales give you plenty of stability. There was no tippiness, no effort to pull here over, nothing, on either side of the boat. VERY safe in that respect.
Then just for the sake of it, I decided to stand up. The first attempt I was trying to work out how to stand and went in. I got out and tried again:
Having worked it out I got up easily enough:
And stayed standing upright for a good 30 seconds I’d guess, the sea wasn’t flat either. More stable than the 15 which I’d have gone over the side in seconds on. I then started to get myself back down and went for a swim. I’ll stay seated when fishing I think.
Mike deployed the sail and got the hang of it as soon as he started. He was off and I was paddling as hard as I could to keep up.
This is the point when I start evaluating the paddling of the Trident, the important part and so I have kept it until last so that I can pull it all together.
First I must say that it was a practically empty boat. I had, in the hull, a camera weighing a couple of pounds, a fleece, a carbon fibre paddle and one (later two) C-Tugs. This kayak is designed as a fishing platform and thus to be carrying weight, so this paddle review is only half of the story, to be continued when I load it up. So please do bear that in mind. Everyone so far who I have spoken to that has paddled it says it is two different beasts dependant on what’s in/on it. Comments are ONLY valid for an empty kayak, strong wind and saltwater. I can’t stress this enough.
To begin, I paddled out trying to keep a straight line. I couldn’t. It veered off to the right (the wind was pretty much right to left), repeating the experience of the other day. This also happened with Mike. I must say that I have never used a rudder on a kayak but if what I understand of them is correct then this kayak definitely needs one.
You can’t use a short paddle effectively as you are up high. It will do the job, but it is more tiring. You can do close-in and reaching-out strokes with ease (I don’t know the technical terms) and can rudder/turn with the blade to the rear with no bother too. But it is a hard boat to paddle in open sea compared to the P15. It seems to wallow quite a lot and takes a lot of effort and a lot of time to get anywhere. That’s across the wind. Against the wind and before the wind it moves a lot more efficiently, being easier to physically move and keeping a better course. Some hull slap was evident at times, but not a lot and it was dependent on wind and wave direction and also speed. It wasn’t enough to be of concern but I did take note of it for the review.
Paddling in the surf is largely described earlier in the text but it paddles far easier than in open sea in these conditions. Surf was, in fact, the only time in which I’d say the Trident paddled better than the Prowler 15 – but it was a hundred times better.
Turning. It seems to turn a lot easier and in a smaller circle than the 15 even though it’s longer by ten centimetres or so. I need to do a proper comparison on a river during a calm day but that is my feeling for now.
It’s slower than the Prowler 15 too, doesn’t cut through the water half as well. The 15 doesn’t have the buoyancy of the Trident of course and is a lot lower and wetter to ride.
So, all in all an interesting couple of hours. I tried as many things as I could, including some that I would never dream of doing in normal situations. In many ways the Trident fell short, and in just as many others it excelled.
If I wanted to take a fly rod and go for bass, with just some sandwiches, I wouldn’t take a Trident. If I wanted to troll a few lures in the river with a couple of rods, I wouldn’t take a Trident. If I was out for a bit of float fishing on the river, I wouldn’t take the Trident. If I wanted to take out my lobster nets and drop them off the pier, I wouldn’t take a Trident. If I wanted to have a lazy afternoon paddle when on the beach I wouldn’t take a Trident. The Prowler 15 is the better boat for all of those. If that’s what you want to do with your kayak, then you need to be looking at the Elite 4.5 or Prowler 15 (depending on which country you are in) or something similar.
If I wanted to take a box full of pirks, weights, a few rods and some spare warm gear and go wrecking I’d take the Trident. If I wanted to spend the whole day on the sea fishing, I’d take the Trident. If I wanted to go in rough sea, I’d take a Trident. If I was in the habit of taking a load of gear with me, I’d take trident. If I had to face a tricky launch and beaching, I’d take the Trident. If I was hoping to bag up with mackerel, cod or what have you I’d take a Trident. If I was trying for Tope, conger or skate I’d take a trident. If I was to fish Protea Reef in South Africa (where I have experience from ski-boats) for yellowfin, yellowtail, musselcracker, sailfish, marlin or sharks I wouldn’t dream of taking any kayak other than a Trident!
This kayak is designed purely and simply as a fishing workhorse. It is designed to do the job and do it well. It is designed to keep you dry, in your seat, your tackle safe and bring home a freezerful of small fish or a tuna in the tankwell and if that is what you ask of it then you will not be disappointed.
I did a bit more rigging today. I began with a trip to the tackle shop where I bought a couple of Waterline Gripper Rests, these being a rubber rest for a rod tip fitted with a brass screw that would normally sit on a bankstick or buzzer bar set-up for coarse fishing. These rubber ones were the best I’d found as they were flexible and non-slip as well as having a strong base and a locking collar.
Next stop was the chandlers were I bought four Stainless Steel washers (to put either side of the hull to give a wider area to disperse pressure). I bouyght some more stuff as well while I was there - as one does – but this is not relevant yet as I didn’t fit any of them.
A couple of small pieces of neoprene finalised the parts list and I set to work.
Choosing a flat spot near the forward bow hatch I drilled my hole and screwed the rod rests through a washer, the hull, the neoprene, another washer and the locking collar.
I then did the other side, which resulted in both rests being fitted:
Tightened up, the job was done except for the Sikaflex which will go on at a later date when I’ve finished the basic rigging and plug all the holes. I had previously checked that the rods would be comfortably sited and easily reached from the seated position and also that I would be able to easily see bites.
A simple, cheap and effective addition, and the rod tips are held snug yet easily ‘strikable’. I will try them in the sea but imagine that they are really only suitable for use on sheltered water in their intended role, although they would have a use just as a rod ‘steady’ and also for keeping the rod tips tucked away for launching if already rigged depending on where they are situated (I have used them effectively on my P15 for this.)
2x Waterline Gripper Rest - £5.98
4x Stainless Steel Washers - £0.28
2x neoprene Offcuts - £0.00
Total Cost - £6.26
Not being one to leave stuff alone I then added some spare parts from around the house to neaten things up a bit. Now, I hate having loose straps laying about, so I added some 25mm ladder lock buckles to stow the ends neatly. A quick and easy job that just makes things so much neater.
I did the same on the Sonar shield
and the Rod Pod will follow when I get some more buckles. These only cost 25p each.
While on the subject of the webbing, I noticed the other day that the buckles did seem to work loose on the supplied webbing which is thinner than the usual stuff (better quality, but thinner). I may find myself replacing this soon if this is actually happening as I like things to stay put.
Other things added were another shackle on each side with O ring, which will have the anchor trolley fed through and also be useful as an attachment point and a trial ‘fish sack’. This I’ll keep under wraps for now as it’s a temporary prototype using a dry bag (Lidl) attached by gaffer tape and falling inside the Rod Pod and extending towards the stern. I don’t want a yak that stinks of dead fish and this, if it works, will be a good addition. I am thinking to use Velcro in order to be able to attach and remove easily but even better would be a collar of some sort, like a bucket rim, that will go over the shaped rim of the pod but have a low enough profile to not allow water ingress.
I find the rear flushmounts ideal personally, but I do have a long back so perhaps it's easier for me to twist around to them. Besides.i get so excited when I hear the reel screaming...
Following mention of a modification already being made in the States I got the drill out again today. It had been suggested that launching in surf sometimes caused water to get in through the front of the Rod Pod when waves crashed onto the bow and thus straps were being added to the front of this pod. This presumably is similar to that found on my Prowler 15 and as I almost always get a wave over the bow and as I intend using the Trident later this week in predicted big swells and surf I decided to make this modification myself. It seems like a good idea and apart from anything else it means that the Rod Pod lid is securely attached and also completely removable if required.
Parts for this were very few. As a matter of fact I already had them all laying around here and there, but will put a price on them for future reference:
25mm Black Nylon Webbing, half a metre. £0.35
25mm Quick Release Buckle. £0.95
25mm Triglide Buckle. £0.24
2x Well Nuts and Stainless Steel Screws. £1.20
2x Stainless Steel washers. £0.14
I cut and sewed the webbing into a loop with a triglide buckle and the female end of the QR Buckle. This was to go at the Rod Pod end and I duly drilled a hole into the cup holder area (which now sits at the front on my Trident). I then pushed the well nut through and then pushed the screw through the washer and the webbing into the well Nut and tightened it up. I then attached the other end of the buckle and drilled a hole in the Sonar Shield area, attaching the strap in the same manner but with one end loose for tightening/slackening.
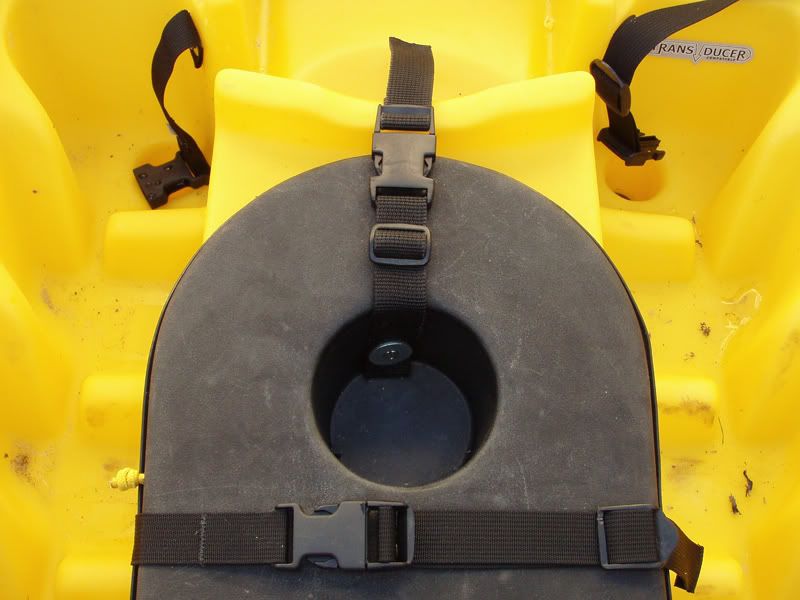
It’s secure, its strong and it’s neat (or would be if I hadn’t drilled the hole in the cup off centre). I do need to alter the length of the cup holder end of the strap though as it is slightly too long and the QR buckle catches on the sonar shield if fully tightened (which is the whole point of the job) so save yourself ten minutes sewing by checking that first…
So, how does the Trident handle for me when rigged for a fishing trip? Today I finally finished the initial part of my trials with a 4 hour paddle with fishing gear under conditions that represent those I usually face.
And it handled brilliantly!
Load it up, they said, and then it’ll impress. Well, I didn’t have to load it much – a couple of rods, a box of lures and other tackle (more than I usually take though I must admit) and that was it.
I took it down to the Broad and launched into a stiff breeze and slight chop and paddled straight into it.
Immediately I could feel the weight and solidity of the kayak, no flexing, less slap and equal tracking to the Prowler 15. This was also the case later heading downwind and even across the wind it held the direction fine. At this point I shall revise my feeling that the Trident definitely needs a rudder. It doesn’t. It would, I feel, benefit from one but I now suspect that the veering off-track of the other day was through a combination of strong wind AND strong current while going crosswind and therefore not an accurate statement overall.
Was it still slower than the P15? Yes and no. The best analogy I can think of is a bicycle gear. Imagine that the P15 is say 3rd gear, a good combination of movement for effort. Trident is 4th gear, harder to get shifting initially but once going it’s there. The glide is great on it, it carries on steadily and once going requires no more input than the 15. Coupled with the tracking that’s a good trolling yak.
I paddled pretty much all of the 4 hours I was out today. The standard seat was fine for back support, I had my changing mat underneath though so can’t comment on the padding down below. I used the Carlisle two-piece carbon fibre paddle for at least 3 hours of that and although it is a little short for me I have got used to it and have found it to be a good bit of kit. Brilliant for controlling the yak too. Getting used to the higher seating position is also part of that.
Drifting: It goes nice and slow. Weathercocks round and then kind of sits there, hardly moving. Sure, a drogue will slow you down more but I’d be happy drifting baits down at the leisurely pace I was going today.
Dryness: I had bungs in, and then took them out. It made no real difference – the water in the cockpit was from paddle drips. Nothing over the side either.
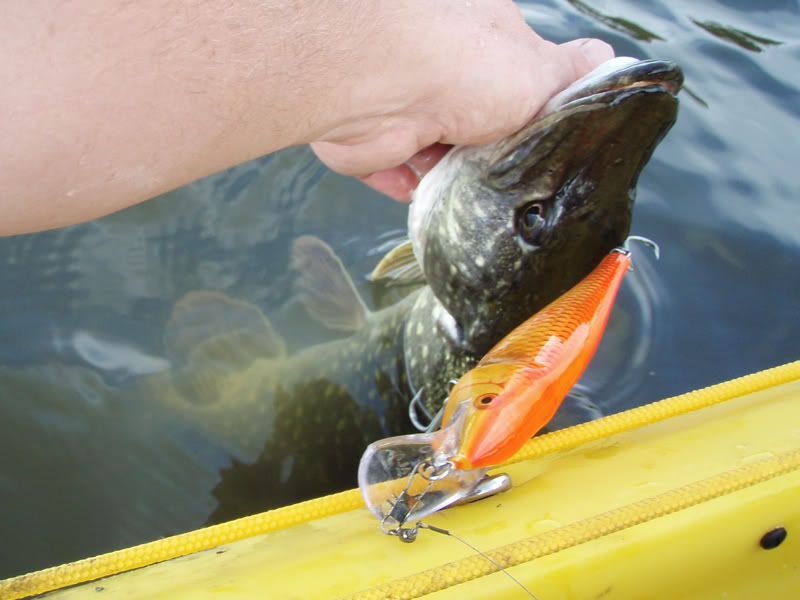
Playing fish from it: Doesn’t pull around as quickly when bringing a lure in which is an improvement but is still responsive enough to aid the angler. I good, steady fishing platform. The only negative is the slightly raised position, making it a bit harder to hold a pike in the water to get its strength back after the fight – but that’s a minor criticism.
Yep, bloody good kayak to paddle after pike. And it catches too:
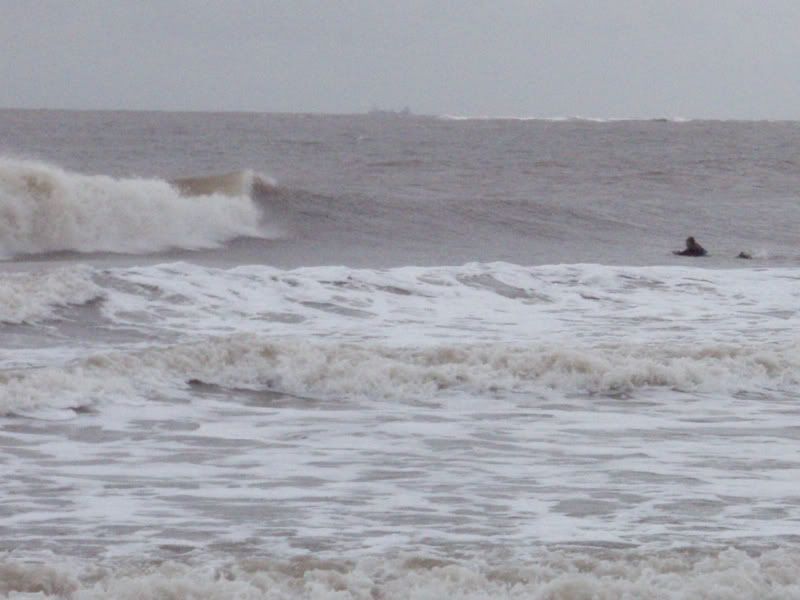
I had the opportunity this week to face heavy surf off the beach and try the Trident in it to see how it would fare. Being a long kayak it is clearly not ideally suited for surfing – it isn’t designed for it as a Yak or Frenzy isn’t designed for all day paddling and fishing. The swell was 7 feet or so and the shallow sandy bottom gave long, powerful waves that look deceptively small from the beach. A beach that had suddenly shrunk in size and become stony, the tide being up and the sand being washed away.
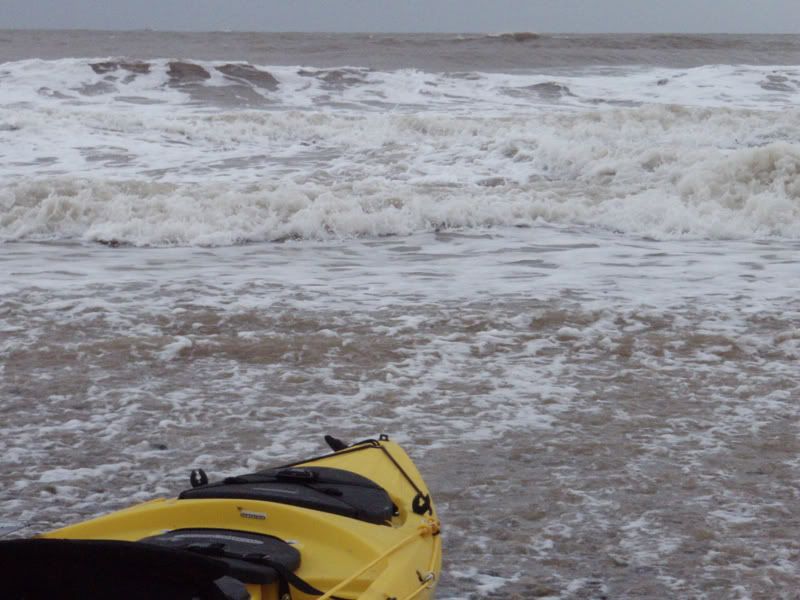
I got everything stowed, all straps tightened and the yak launched, paddling through a lot of big foaming patches. Big foam, 1-2ft, didn’t phase it at all; it kept on straight even with the bow getting hidden from view regularly. So I got the camera out and tried to show the scale of the waves – which as usual doesn’t work. I sat there a good while trying to catch the picture I wanted, staying straight and nose on, drifting slowly to starboard with the current and plenty of water beneath me and not that much into the cockpit.

Trouble is, there were surfers on MY beach (cheeky bastards) so I was on the next bit along as I didn’t want to either get in their way or send the yak careering into them.
This unfortunately meant I was the wrong side of the groyne for the bit of beach I’ve got to know and I didn’t want to head further along as there are some concrete ridges which could do me some damage if I went onto them. It was really pumping too, great to watch and it kind of kept the attention.
So, I drifted to starboard more than I thought. I started to paddle out into the waves at a slight angle to try and get further from them and not be broadside and also to try and run out of the surfzone into the swell to see if I could – I wouldn’t have even taken the P15 down to the beach as it was too rough. It was Frenzy weather.
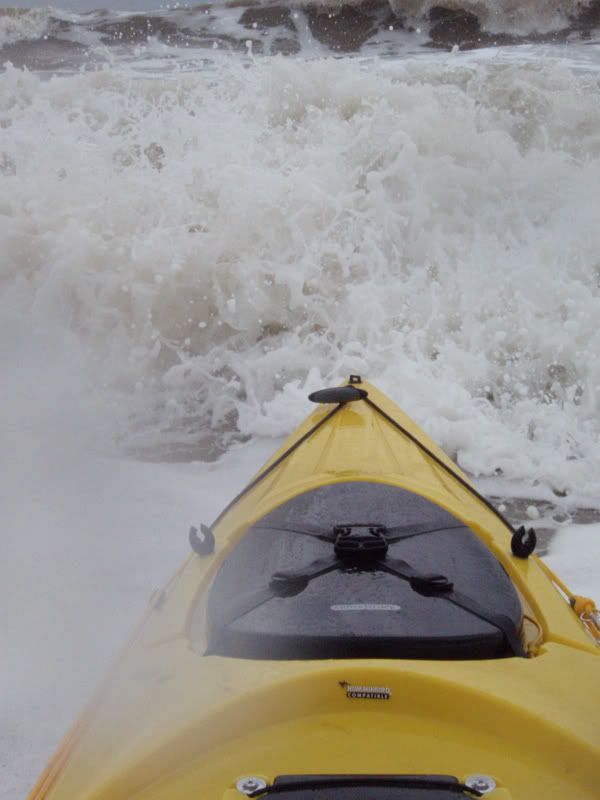
Big waves were going under me without a problem – lean back, ride up and over – big foam as said before was going under as well. Trouble is, nothing is actually going to get me through a large wave curling onto the bow; even the Frenzy’s have dumped me like this when I tried them in the big stuff. I got dumped. The Trident took a big one right on the bow and tipped over to the right, capsizing and dunking me. I actually managed to keep hold of the paddle though, which was tied on, so it didn’t get away from me.
Anyway, sorted things out, got back on and sat in the waves a bit longer but couldn’t get out. The surfers started crowding me as I had the best waves and they were sitting around in the swells rather than riding anything (I was now the other side of the groyne where I would normally have launched) so I went back onto the beach and home (it was only intended as a quick try for the review, 2 launches and 2 beachings being hoped for).
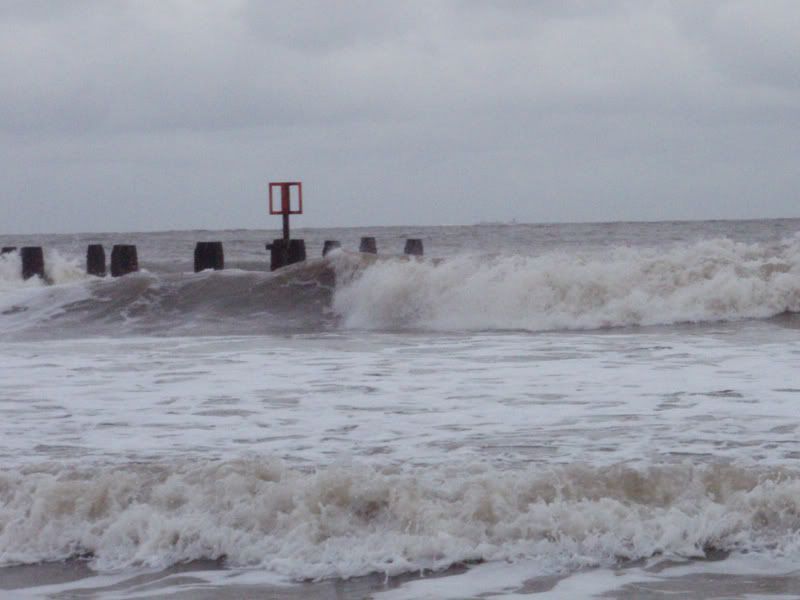
Upshot is that the Trident can’t fulfil a role it wasn’t designed for as a surf yak as far as getting out in big waves is concerned. You can probably get out if you read things right and time things right (which was not what my purpose was, I wanted it rough and difficult) as it goes over large waves and foam and keeps direction well. As I didn’t get out I can’t say how it comes in but imagine it’ll be fine unless a wave crashes on the stern – but the extra buoyancy in the bow will at least keep the nose higher than the P15 which was prone to tipping even in small stuff if you weren’t paying attention.
Criticism time (that wasn’t, that was wrong conditions purposely used for testing). The webbing on the straps is too thin, as I already thought – the straps worked loose and thus the hatches worked loose too. Not massively so, but when I rolled and had a yak upside down in the foam for a while I did take in a fair amount of water. By which I mean at least a bucketful. This is easily dealt with though by the replacement with thicker webbing so that the buckles grip tighter. I am also intending to add front and rear straps to the forward hatch (I have no reason at all to access it at sea now) and perhaps a rear one to the Rod Pod (purely for launching and beaching as I do intend carrying my SLR on occasion, and I have already done a front one).
Please note, however, that I am not as experienced a kayaker as most on here and was deliberately trying to face something I wouldn’t dream to fish in. It’s no surprise I got my arse kicked! I left the surfers too it:


A bit more rigging.
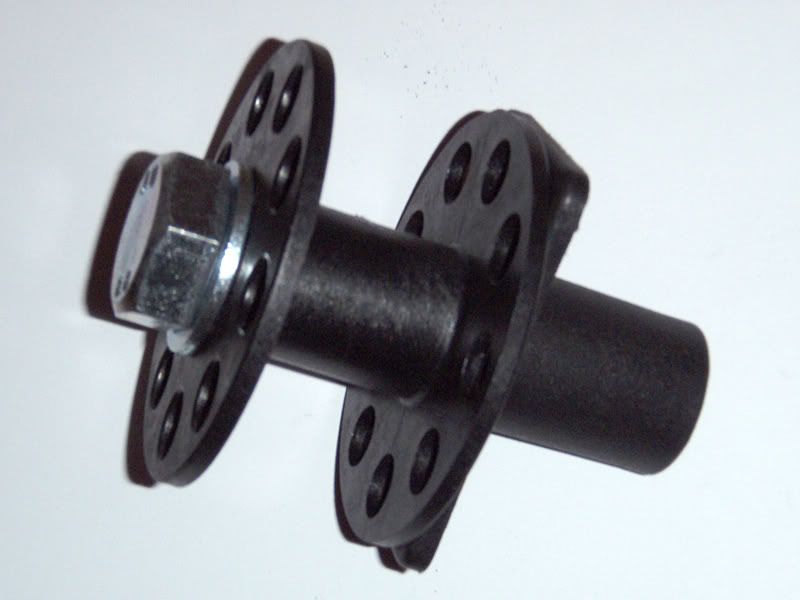
I decided that I want to put two anchor reels on the Trident. I’ve done a lot of thinking and looking and have come up with a way to design something to do so. The reason for two is that I have two anchor trolleys and can thus use either side depending on the prevailing conditions, and also so that I have a spare anchor system. I had to do some head scratching to figure out the best way of fabricating a mount for it and as I didn’t want wood and felt stainless would be too heavy I ended up running with my original idea of a bolt and washers. So, here it is (one side and one mount only):
2x Large Galvanised Steel Bolts and 4x Washers (and 2x unused Nuts) - £3.00
4x Plastic Flushmounts (leftovers from Danica Rod Holders) - £?.??
2x SMB Finger Reels (50m cord) - £27.30
1x Stainless Steel ring - £0.40
1x Stainless Steel Carabiner - £2.00
Looks like this put together:
I wound on enough line to get past the carabiner on the anchor trolley at its furthest reach, and some more for safety, then tied off to a carabiner. The rest of the line had a Stainless O-Ring to connect to the Carabiner (that’s the quick release) and another piece of line which will have the anchor float attached when it arrives from the States.
Wound up it looks like this:

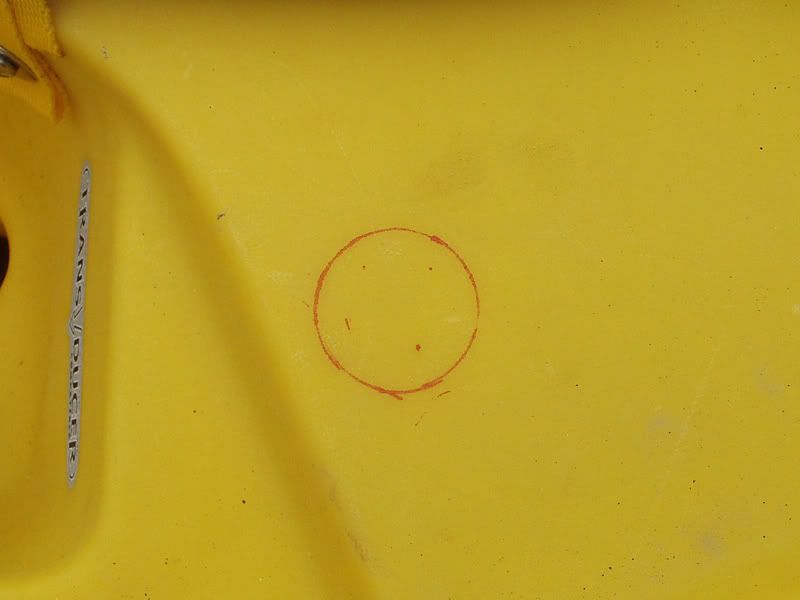
With the reels put together I was ready to add them to the Trident. I chose a spot next to the sonar shield, and marked the hole I wanted to make. I then went inside and had a sit down and a large drink.
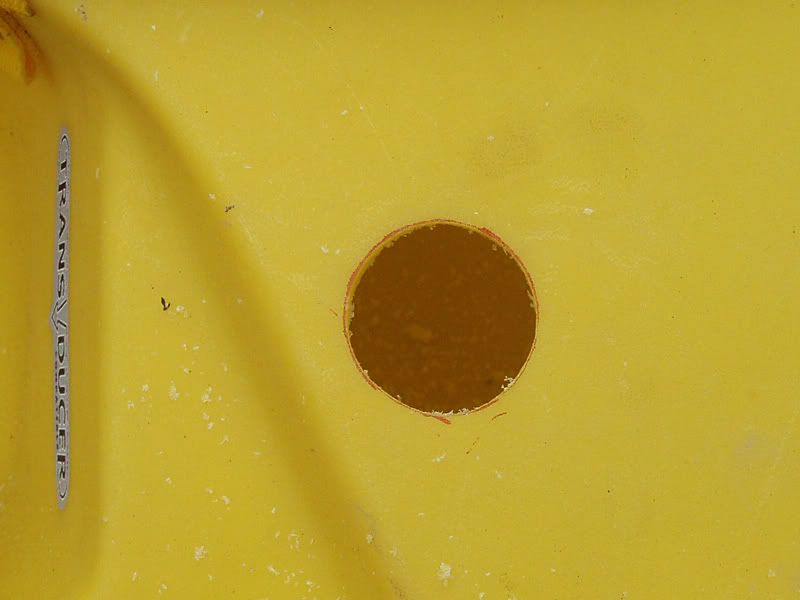
This was duly cut out with a Stanley knife and filed smooth, slightly small to give some strength when inserted.
The flushmount was pushed in as far as it would go
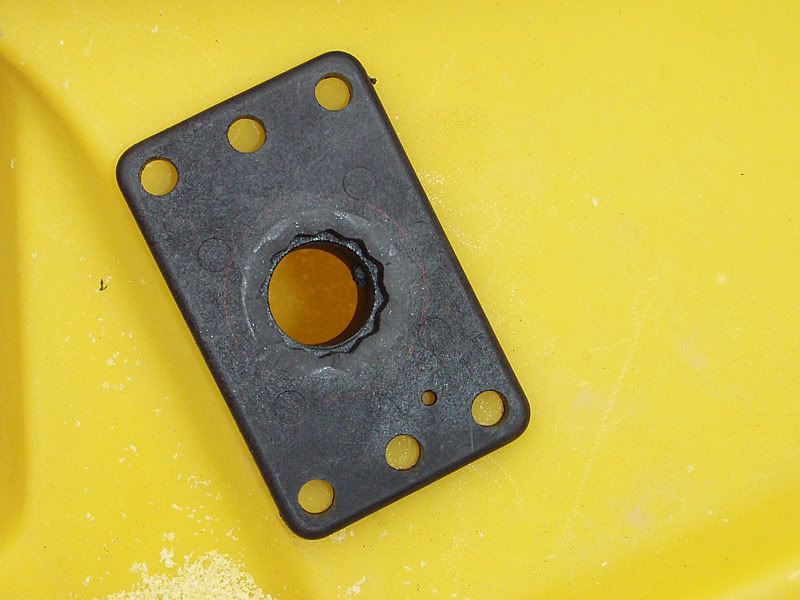
and I duly put a stainless screw in each of the 6 holes – these will probably get replaced with well nuts at a later stage for added strength and tightness.
I then screwed the bolt down into the flushmount, cutting its own thread (after capping the bottom with gaffer tape until a suitable plug is acquired) and threaded the line through the shackle the anchor trolley runs through. A clam cleat was added in line to lock off the anchor and I was ready to try it out. As the floats haven’t yet arrived they were left off for the time being.
Sunday morning dawned fine and the swell was minor (2ft) once out past the surf zone (3-4ft).
My mate was coming along to join me so I had ample opportunity to just wait around for him doing nothing, so I paddled out to about 5-6 metre depth and dropped down around 10-15 metres of line with a 1.5kg anchor on the end.

After ten minutes I shifted the anchor trolley position so that the line was heading out forward. And sat there for ten more minutes.
And rearward, for another ten minutes until I saw Liam start paddling out in a beat-up fibreglass orange sit in.
Now for an important test – recovery of the anchor. I must confess that the current was pretty light so I didn’t have much strain on the anchor reels at this time. Anyway, I loosened off the bolt and slipped the line out of the cleat. I’d already made my way along the top of the rod pod and started turning the reel in by hand – it wasn’t difficult and the line went on pretty well, not slipping around the spindle or anything. The only time it became a bit more heavy was when I was hauling chain and anchor straight up for the last few feet – but there is no reason why the line shouldn’t be brought in and then wound up, which is what I did. A rudimentary handle would be a welcome bonus but it’s just a case of working out how best to do it.
So, was it a good mod? It certainly seemed fine on this occasion with a slow swell and pretty easy current. I need to try it in more trying conditions but it went down and came up smoothly and easily. The planning had worked to a degree that made me happy to do the same on the other side – giving me a spare and also allowing me to anchor from either side without lines crossing the deck.
This was also the first occasion that I’d taken the Trident out in calmish conditions with little wind, so I took the opportunity of going for a paddle. Liam and I headed south from Lowestoft and down to Pakefield where a lot of suckers were sitting on the bank waiting for cod. Turns out one of them was the hubby of a colleague of Liam, and when I met his wife at a party later in the day I discovered that he was still fishing and apparently had thought about getting a fishing yak. Another woman also said her hubby wanted one. So there you go – the latest chat up lines are involve mentioning the fun to be had using long pieces of polyurethane. I am such a fascinating person to get stuck in a corner with at parties. Still, might have a couple more people up this way recruited. Deciding not to phone a friend and ask for coffee and cake to be delivered to us on the beach we carried on down past the cliffs to Crazy Mary’s Hole. Not as rude as it sounds, Crazy Mary apparently used to wait here for her fisherman hubby to return from sea, long ago in the past. One day he failed to return like so many of the locals. She continued to come every day no matter how many people told her he was gone, and still comes now long after her death. She is said to still appear and haunt the Hole. Typical woman, never listens. Turning back we paddled the two miles back.
The yak paddled smoothly, straight and well. Reasonably fast and stable. Now, I had placed the C-Tug in the rear tankwell instead of the front bow hatch and it seems tat this was enough weight to compensate and give a smoother and better paddling experience. I’m getting the hang of things. I am now pretty much decided on fitting the finder battery (1.2kg) in the stern when it arrives as this will sort all the issues out hopefully and mean I can still travel light. Thinking about it, a 6” hatch in the upper rear wall of the tankwell should do the trick nicely, allowing me to take the battery in and out for charging, placing it well to the rear and keeping it away from anything important. As for the power cables, I intend to run them inside a black plastic tube up the length of the hull – avoiding loose cables etc which can get snagged by rods, spare paddles etc inside the hull. More on that when I do the mod.
Oh, you may have noticed the natty yellow webbing I replaced the black standard stuff with. Okay, so I’m a tart but this honestly came up accidentally! I swear. I was searching ebay for 25mm webbing, intending on black, as I wanted thicker stuff that wouldn’t slip in the buckles. 25 metres of yellow 25mm webbing Sir? For a good price Sir? Oooh! Suits you Sir! Suits You! I mean, how could I resist? Then, I got enough QR buckles, triglide buckles, snap hooks and D-Rings to do some playing with and hey presto – I have tight straps with loose ends secured away. I have made additional straps to fit the bow hatch, front and back, and the rear of the Rod Pod too, just in case I have a rough sea come up (won’t keep them done up all the time on the rod pod as it would drive me insane.
It’s been a while since I last updated this – various reasons, the chief ones being lack of time to sit down and write about it and also delays in waiting for stuff to arrive and be fitted. Therefore, I may be less detailed than previously.
Anchor System – following the previous incarnation, after much head scratching and the arrival of my buoys (yellow!) I worked it out in minutes: The line comes off the reel, through the clam cleat and through the stainless ring – the next size up from the one fitted towards the end of the line and wound onto the reel (this ring, squashed oval, and a small carabiner forming the quick release portion of the system). The float runs freely on the line, down as far as the carabiner attached to the chain attached to the anchor. It works, and works very well. It’s also neat, stowable, light and secure.
Compass – GPS is excellent until the battery dies or something else goes wrong and so a compass is a wise accessory. I have a compass in my PFD which has lasted me twenty years or so. It is a Suunto RA69 NATO, orienteering style compass graduated in both mils and degrees – it’s designed for military use and therefore bloody good. ) or rather it would be if it gave bearings such as ‘head down Belgravia and instruct one’s chauffeur to head for Sloane Square’ as compasses are generally the property of Hooray Henrys holding commissions which is why the best compass design in the world still results in lost squaddies!). I digress. I have therefore a lot of faith in Suunto compasses and decided that having found a yellow (!) compass made by this company I need think no further and so The Suunto Orca compass was ordered.
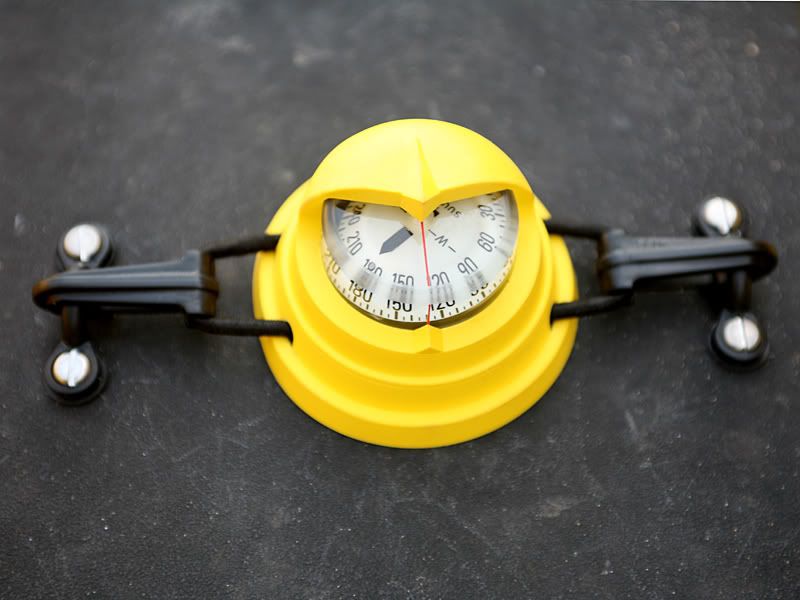
Fitting was easy. Initially shipped with two dog clips on a long length of shockcord it only really went on my front hatch and this meant a problem getting a secure seal on closing. So, I well-nutted a couple of pad eyes onto the rod pod, shortened the shock cord and clipped them with lower profile clips. It’s easily viewable, away from electronics, secure and out of the way.
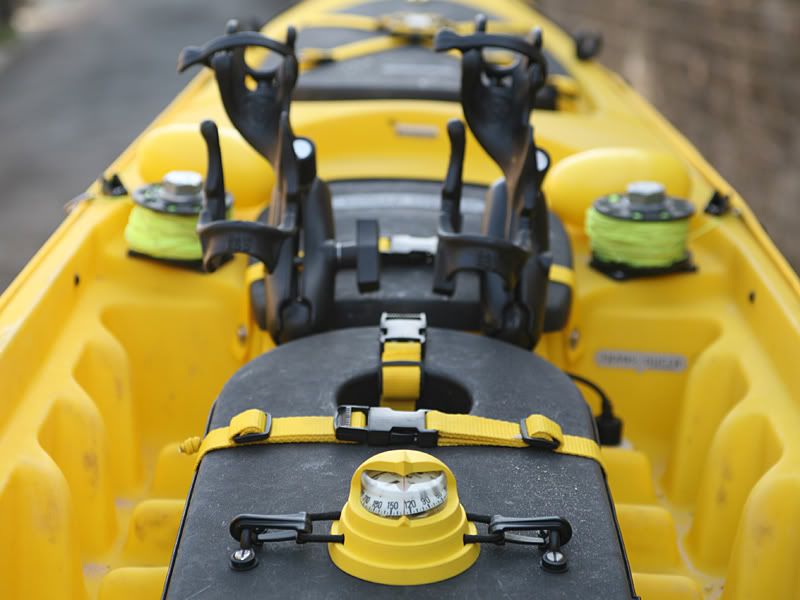
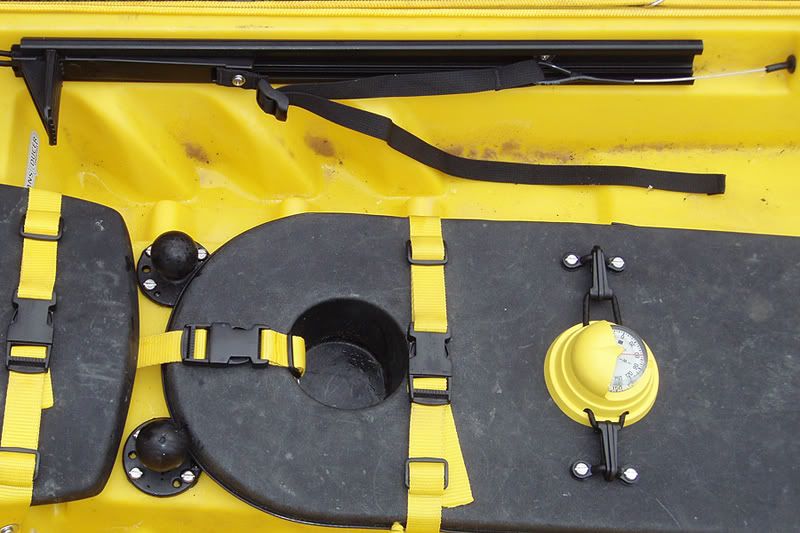
Now, as you can see, forward of the compass are some rod mounts. I thought long and hard about the rod mounts I wanted having had cheapo Fladens before. I decided then that I wanted maximum flexibility, height and width in my holders and chose RAM. I ordered two RAM-117 rod holder systems and an extra two RAM-240 ball mounts. Two ball mounts were fitted on the plastic just in front of the rod pod and two more beneath the paddle keepers by the seat.
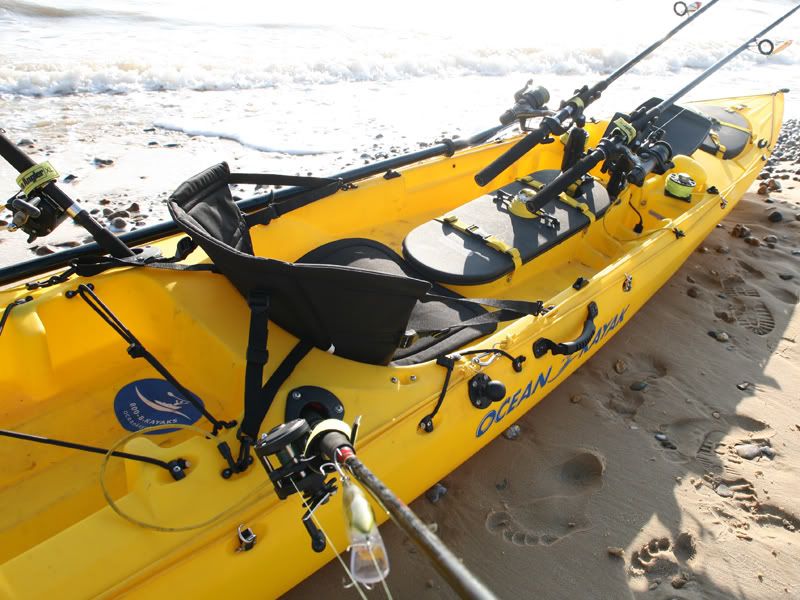
And they are everything I had hoped for! Placed forward, they are high enough to angle nicely while being close enough to strike and remove easily as well as being out of the way.
They can be adjusted to the sides so they don’t obscure the screen of the finder, they can be positioned forward for paddling and I dare say – though I haven’t tried it yet – I could troll with my rod forward and keep an eye on the tips.
Placed on the side mounts by the seat I can lay back at anchor with my feet up and the rods easily to hand, again being quick to strike and remove as well as being secure.
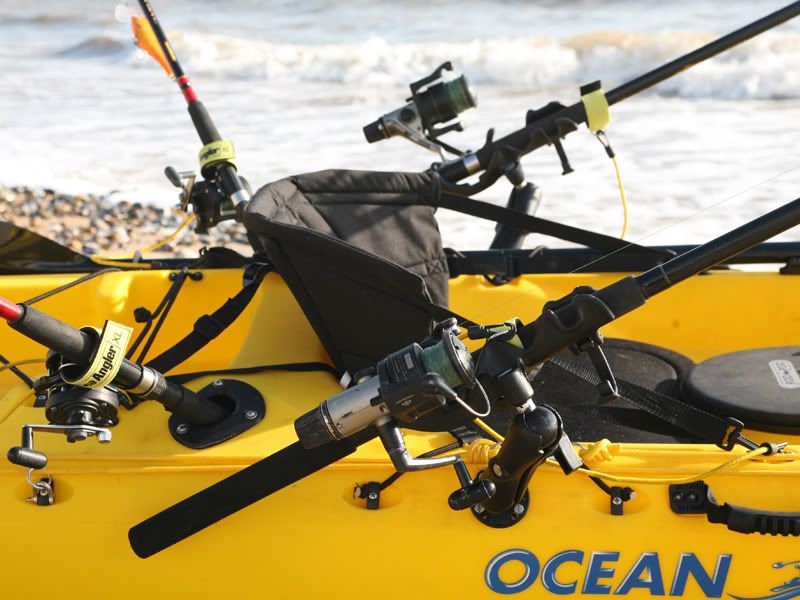
Indeed, they are good enough for freshwater use too, where a quicker strike is necessary than in the sea. They can also be folded backwards and thus out of my paddle arc. I am really pleased with them and made the right choice.
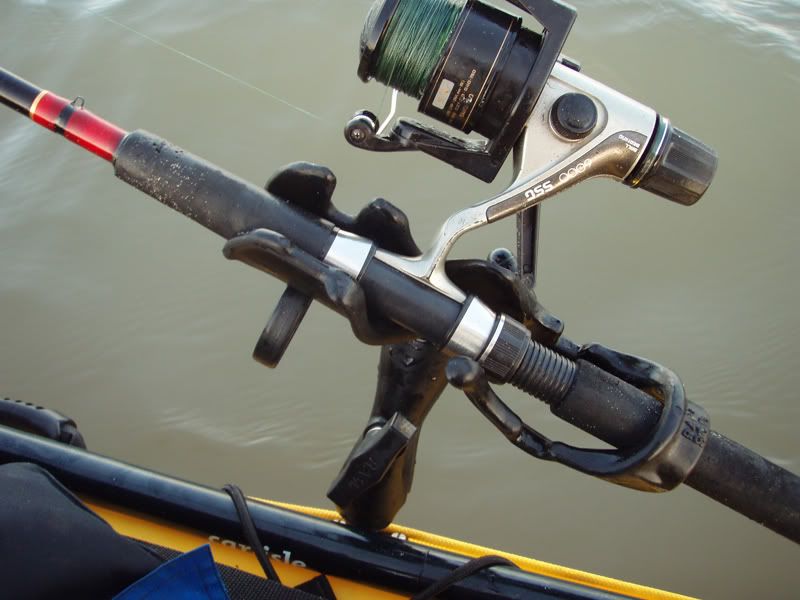
They were simple to install, merely requiring me to place the balls onto the plastic, mark the holes and drill the holes for the well nuts I used. They are simple to use and move about and very solid, so far the rods haven’t slipped at all when tightened up. The only criticism I have is that although quality is superb the finish is dire. Those of you with experience of making Airfix kits will well remember the flash that you used to get, ie excess plastic from the mould joins, and the RAM holders I received had this in abundance in both plastic and metal. There were also rough areas and quite honestly it did look like the excellent craftsmanship of the designers had been let down by the workers in the factories. But this is a minor point really as a bit of trimming and rubbing down sorted it out in no time. They work well with both fixed spool and multiplier reels and have a wide gape too so generally speaking they are suitable for pretty much anything you would want to throw at them. I’d say the multipliers were held more snug but that’s cosmetic.
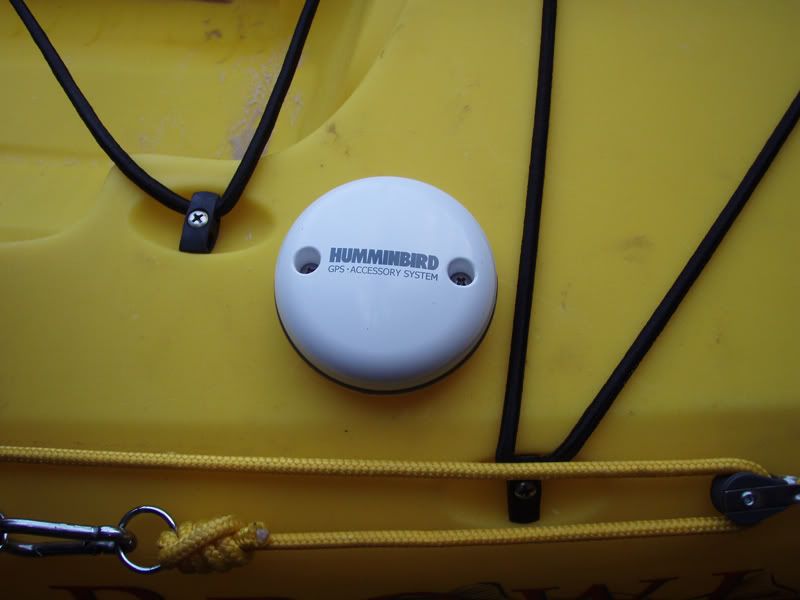
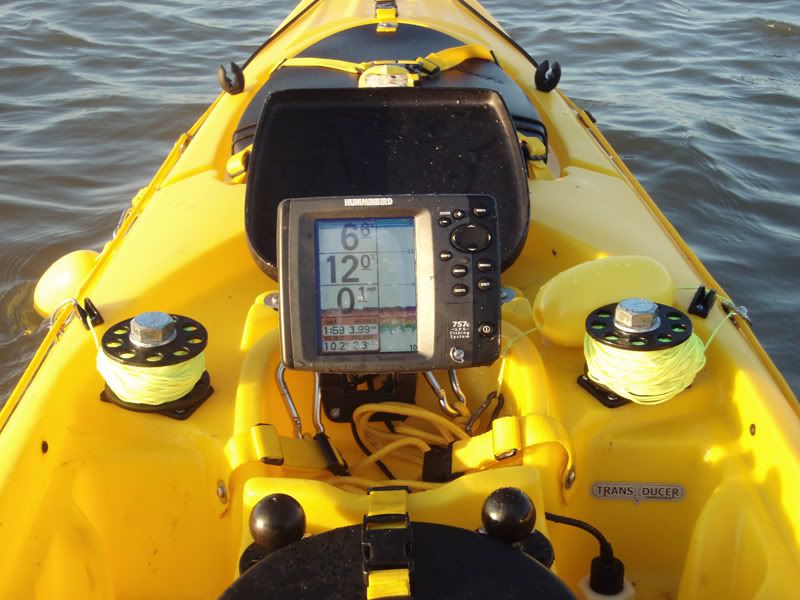
The observant amongst you will have also noticed the electronics. Looking through the range of Humminbird’s I considered what would be best suited for me. My main requirements were a large screen, colour display and inbuilt GPS. Chartplotter would be nice but wasn’t essential. Now, I had a play with various demo ones and it always seemed to come back to a couple of models – the one I went for and the one Richi chose. Now, the main difference between the two is in the software available to put in it, and as someone who would be very unlikely to get much benefit from the Navionics software I decided to go for the lesser model. (It is upgradeable if need be though). I looked at the Matrix 3D finders too but felt that they would be far too confusing for me and they weren’t available in colour either. The screen was a nice size and things were well laid out so I plumped for the Humminbird 757C combo. It’s nice kit, but I can’t tell you how it performs because I haven’t got to grips with it yet.
Installation. To quote Lulu: We-ee-ee-eeeeeelllllllllllllll…..it tok me 24 hours to understand all the wires and leads and cables and bits and…..I’m crap with electrics. The next night I sat down again and realised my mistake – I’d got the Stephen Tapp inline fuse wiring stuff as well but hadn’t thought to discard the wires it was replacing. That’s why it didn’t make sense!! I sorted it out in no time after that – cables from and too finder, GPS puck, Transducer and battery, and dry-fitted the lot. Then it was out to the yak with the Stanley knife and drill with all the bits:
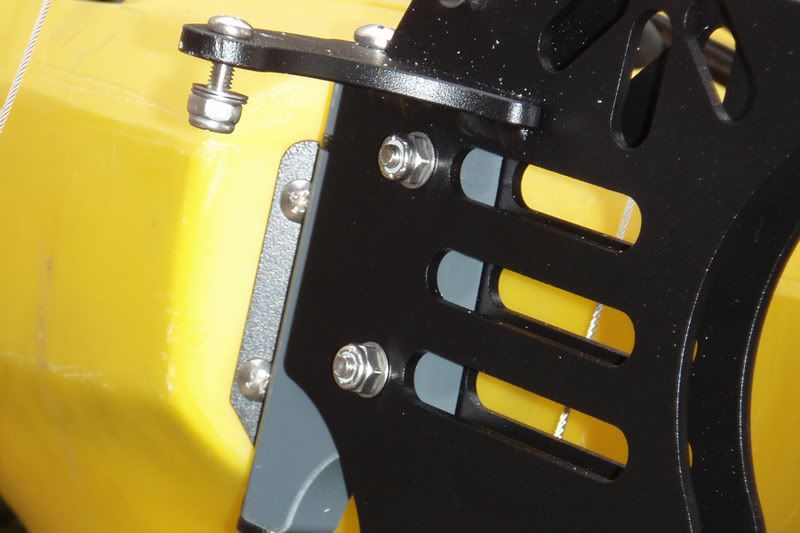
The Finder mount is not central on the unit, so you need to bear in mind that the position needs offsetting before mounting. Also, as the unit is to be folded down and the sonar shield comes down on top you need to mount on the front wall rather than the base and all these positioning criteria need to be met before you make the holes. My holes were drilled out and the base well-nutted in.
This allowed the finder to be positioned upright
And folded down
I then mounted the transducer (not the supplied one which would require sikaflexing inside the hull but instead the optional thru-hull transducer, XTH-9-20-P) into the transducer scupper hole
and coiled up the large amount of cabling.
I subsequently cut a hole large enough for the largest plug to go through and fed all the wires through, with the transducer cable being fed from the middle as neither end was needing to go into the hull. I then placed all the cables into a bag as much as possible and fixed everything back together. The cable from the GPS puck was run from the stern as that was, I felt, the best place for me to position it. It has to have a clear view and if I’d gone for the bow apart from being more subject to waves it may have been blocked by my sail when I fit it. So, I drilled a hole and fed the cable in and up to the front where it exited the cable hole and fed into the finder unit.
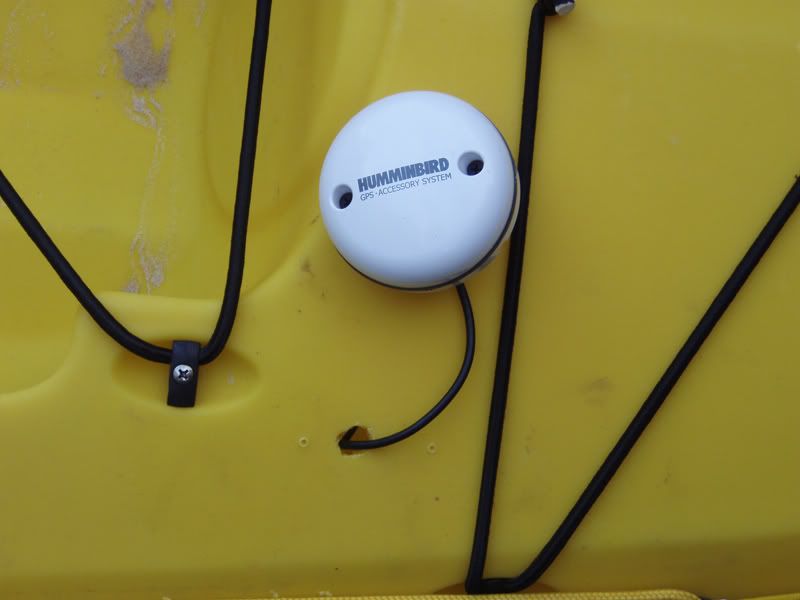
I then screwed it down and another job was finished.
I took it out on the water and…it worked!
It’s all working really well now and is almost complete. I have yet to attach my sail (waiting for some yellow ripstop nylon to arrive, replacing the current red/white/blue so that it matches the yak and some more pad eyes to fit to the bow) and am also awaiting a rudder as I think it would be of great benefit when heading into or across a decent wind. I have added straps to both front and rear of the bow hatch and the rod pod for security and will do a few more minor things after that and then I reckon it’ll be done. She’s sweeeeeeeeeetttttttttttt!
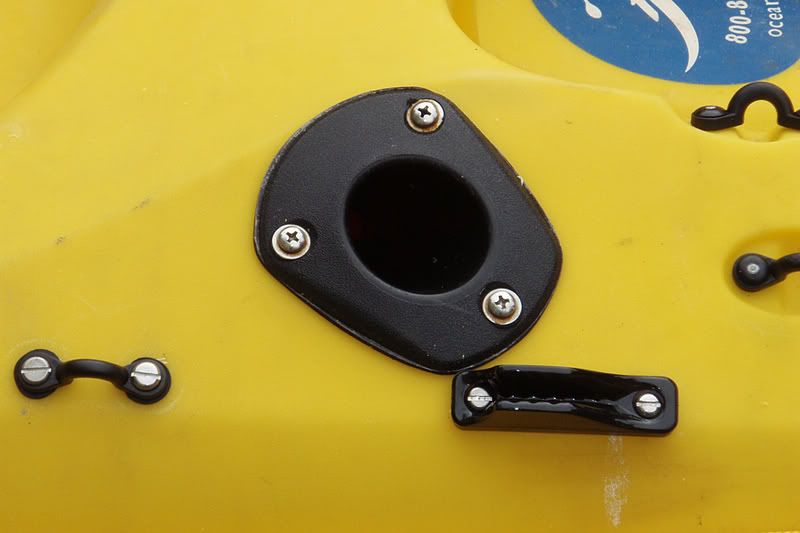
I’ve been busy since I last added to this thread. I’ll begin with a minor modification found online by Richi – the fitting of a hatch to the Rod Pod.
Rod Pod Hatch
I had a real Black & Decker day with this, getting out the Workmate and Jigsaw and cutting a hole that was filed down to a smooth circle. An 8” hatch with catbag was attached with the self-adhesive backing and a goodly selection of stainless bolts screwed into well nuts. The bag is large enough to hold a fleece, the hatch is large enough to provide access to the rod pod without exposing a large area to waves and the ease of keeping things secure and the way and out of the water but easily accessible is a definite advantage. Such a useful mod that I’m going to add another one or two so I have them at each end – one for the fleece and one to attach a bait bowl to.
Rudder System
Next I decided that it might make things easier with the Trident if I fitted a rudder onto it. I decided that I really should give it a try after paddling for a long way with strokes almost exclusively on one side due to the direction I wanted to go and the conditions at the time regarding current. Granted my Prowler 15 would probably also have reacted the same way but with the raised height on the Trident from the extra buoyancy I imagine the wind was also having an affect. I was in two minds whether I wanted a rudder as the extra weight and length might make it less manageable on land (my garden isn’t very big and the access is quite tight through the rear gate and alleyway behind) and also because it creates drag if down and wind resistance if up. Against this, the added weight would help overcome excess buoyancy on the stern and allow easier directional paddling on those occasions when I wanted to go a different way to the yak itself. Furthermore I felt it would be very useful when coupled with the Pacific Action sail – something I proposed to make more use of than previously.
Opening the packet up I was struck by how many bits and pieces there were.
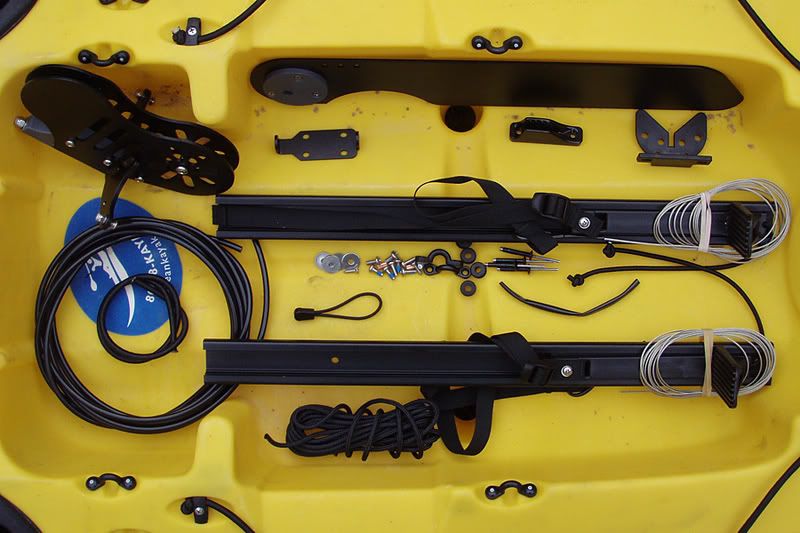
I mean, it’s not like I’m Mr Handyman naturally or anything so I could see myself having a few problems with this if not careful. What I really needed was to take my time, dry-fit things first and do it all step by step as per the instructions. And give myself as much time as needed without any of the family about.
I laid out all the pieces. I was struck at how beautifully engineered the rudder body was. I like solid pieces of well-fitted ‘bits’ and this felt substantial and trustworthy. It was one of those Volkswagen moments, you know the one: the bloke doing and undoing the door locks…anyway, I practiced putting the rudder body, blade and bracket assembly together to get an idea of how it would look, laid out the other pieces as they should go and then got to work with the fitting instructions being referred to constantly.
First thing to do was get the drill out and make some holes. There is a groove let into the side of the footwell area that takes the rudder rails

and another notched area on the stern.
The steering lines run through these and so they must be opened up and have rubber grommets pushed into the holes, through which some tubing is pushed.
Now, it appears that like me everyone manages to push the bloody grommets through into the hull. Try to keep a hold of them if you can because it’s a pain otherwise as you need to fiddle or start again.
So, holes drilled and tube fed through it was time to fit the foot rails.
There is a right way up and wrong way up for these, get the bungee knot at the bottom and then screw them into place.
Now you need to feed the steering cables through the tubing in the hull and attach one looped end to the webbing that goes through the tri-glide buckle. The loose ends come out through the stern, which is where you want to attach the rudder bracket:
That done, you need to attach the rudder body to it via the nuts and bolts attached
and attach the blade to the rudder body. These stages are self-explanatory.
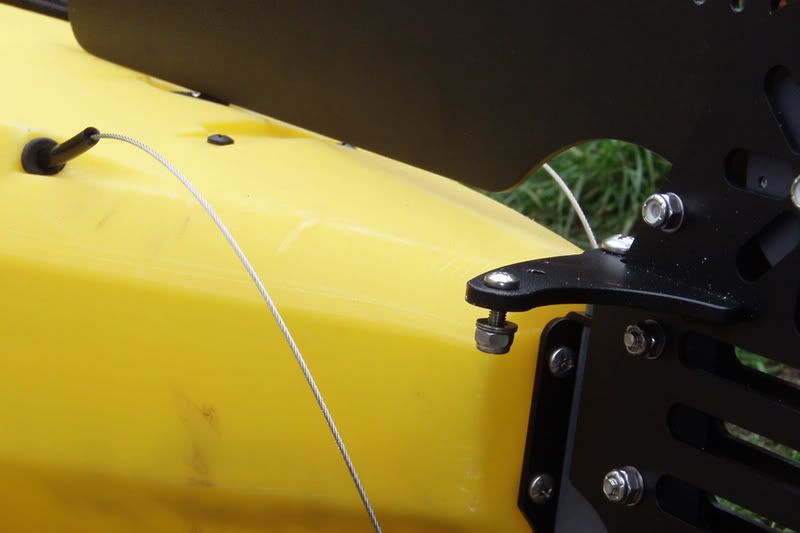
Now you have to start thinking and drilling. Strap eye and clam cleat need fitting to your rear port-side:
followed by a strap eye for use as a line guide and the rudder catcher
Now, this causes a slight difficulty that I have yet to surmount – the stern carrying handle is now in a really poor position (was never a great location in the first place) as it is effectively blocked by catcher and rudder blade. The additional weight makes it more desirable than before as well so I need to think of a way around this. For now I have removed it and just make sure I get a good hold of the stern when carrying it with two people. I can’t tow it backwards on the C-Tug though and that is an issue with the alleyway behind the house – I must go to the bottom and turn when walking it to the beach.
The next stage is where I had a few head-scratching moments. You must feed bits of cord and bungee here and there, around this and that and tie them off just-so. My description is intentionally vague as there is no easy way to describe it – just follow the photographs on the instruction sheet and you’ll find the way. Be aware also that as you move the rudder blade so changes the position of the line – which is why it looks all wrong when you do it.
Knot the line and bungee together, using the strap eyes you installed, and check that they are as they should be.
I would suggest leaving the line uncut until you have tested it on the water and ensured that they are correctly done. To be honest I found this to be the worst part of the rudder installation. It looks untidy and a bit of a liability for catching with hooks or yourself, especially when combined with the rigging lines already fitted and the anchor trolley if you have them on the port (or both) sides (like I do). There is the need for a simplification and modification here and I will set my mind to it at some point in the future. As it is I find that deploying/retracting the rudder needs a disproportionate amount of effort so I’m keen to fiddle here.
Now for the last bit. The metal steering cables need to be looped at the stern end and attached to the rudder body via the nuts provided so it can do this:
Easy enough and crimping these, melting the shrink tubing around them and cutting off the loose ends completes the job. As long as you ensure you cut the LOOSE end of the cable and NOT the piece that carries on through the hull the job is complete…
So, installation complete, using the rudder was the next stage. First attempt was aborted. I was on the Broad and after fishing for a while decided to deploy the rudder – only to notice that the bungee retainer had not been removed and so I’d have to land or clamber over the tankwell to undo it. No matter, conditions didn’t warrant the rudder any way and a lesson was learned. I waited until I went offshore a few days later to try it under normal sea conditions but encountered a couple of obstructions to my plan. First of all the sea was running ideally – I had no need to deploy the rudder on either leg of the days fishing. I did have a play with it to get used to the feel of things and to position the pedals where I wanted them but the rudder itself served no purpose on this day.
In fact I was stalled for quite a while as for various reasons I was land-bound for weeks. But then the day came when things all came together to provide the perfect opportunity to put it through its paces on the Broad. It was windy, it was choppy, there was a current (it’s tidal) and, more importantly, I had fitted my new Pacific Action sail (of which more later).
I launched and spent the first hour paddling around without either sail or rudder deployed, getting used to how things were on the water in order to better make the comparison. Then it came time to deploy the rudder. First thing I found was that you have to keep it centrally positioned so with feet on the pedals I began pulling on the cord. Hard graft that turned out to be. I tried again, still no joy – just raising the rudder off the catcher slightly. It actually took both hands to pull the rudder blade up over the rudder body and down into water. It takes just as much effort to raise it again too (landing on the catcher with a hefty thump!). Now, it’s possible that I have things tightened up too much or a cord running incorrectly and this I need to check but I am also trying to come up with an easier system of deploying and retracting it as it would be no fun turning half around and tugging with both hands over one side in a heavy swell.
Deployed, I discovered that the Trident turned as tightly, it seemed, as a Frenzy which is half the length and has a different hull shape. For some of the inland waters I fish this is of great benefit as not only are they at times fairly narrow but also rather congested for the summer months. It was a very tangible difference and one which had me sold on the idea immediately regardless of its effects on general paddling. Had I tried this in the sea it would not have made such an impact nor would I deem it as important as I only need that manoeuvrability when in the surf zone or when going through the harbour mouth in swell. Definitely a small water benefit!
It was actually quite easy to get used to as well – left foot down turns the kayak left and vice versa so it soon became instinctive allowing me to steer subconsciously, paddle subconsciously and spend more time checking rod tips for the signs of snags.
I took things further. I usually fish quite close to the margins but when the water is as low as it was on that day and the wind is up I tend to stay further out as I cannot control my drifting accurately enough. I tried doing that with the rudder, following the slight contours in the margins on the finder and although it really was too shallow to not snag the lures I was able to trace a precise route with far more accuracy and ease than previously. Again, an inland benefit rather than one I’d use on open sea around here but if coming through an area of sub-surface rocks it would be of benefit.
As to general steering – and this was backed up a few days later on the sea when I did indeed need to deploy it because of my nose turning – it made a vast difference. I could paddle equally on both sides (more energy efficient and faster) and keep on my course heading with ease. Threading my way between moored boats and mooring buoys was a doddle too and traversing the broad above the narrow (slightly) deeper gulley was simplicity itself.
The rudder really came into its own when I deployed the sail though but I will describe those together in the sail section. Suffice to say it really makes the Trident a superior paddle without question. As a side note all attachment points were fitted in my usual choice of well nuts rather than rivets, screws etc as I find them a very good way of fitting things to the hull.
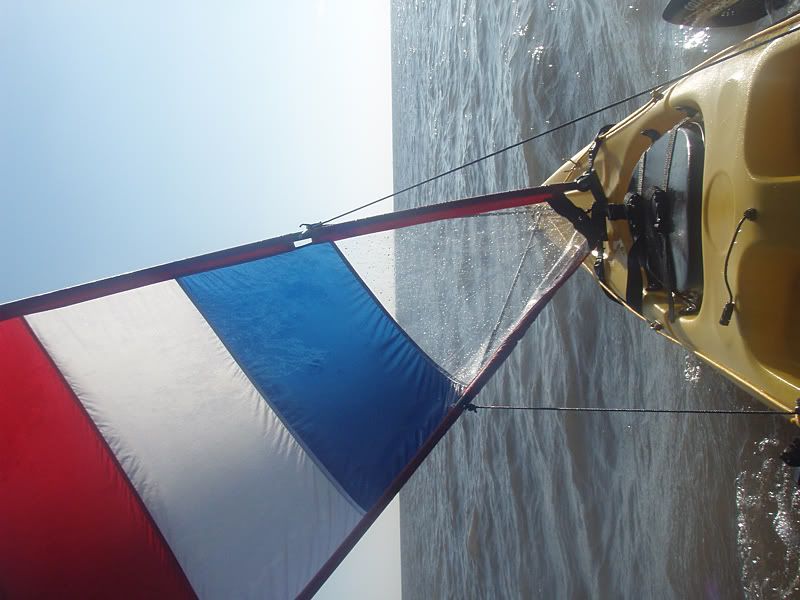
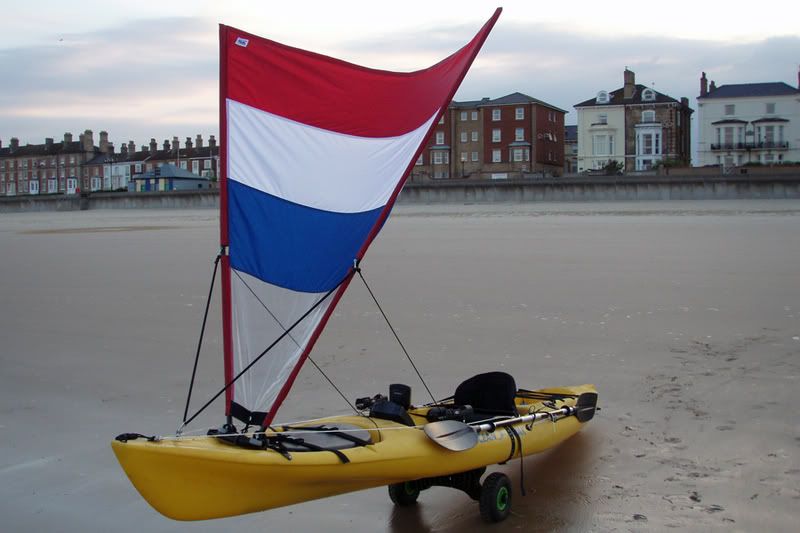
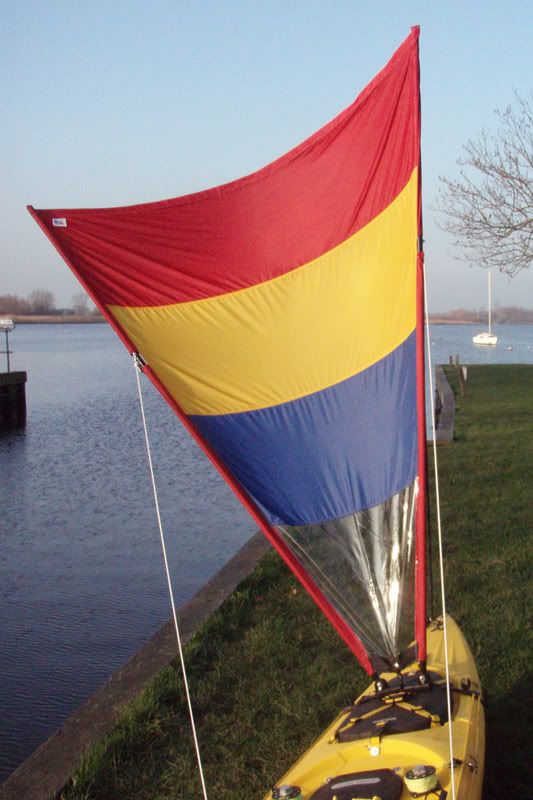
Pacific Action Sail.
About six months ago I got myself a 1.5 square metre Pacific Action Sail as Richi had made it look like a great and useful accessory. I must confess that my initial acquaintance with it was somewhat overshadowed by a lack of decent wind and a lifeboat being scrambled to ‘rescue’ me as it was presumed that I was in distress. Granted, the sail wasn’t doing anything and the fish weren’t biting but I was hardly distressed about it! I’d fitted it largely as per the instructions onto my Prowler 15 and it all fit quite well:
The next time I tried it was a bit windier and I got a mate (experienced kayaker and windsurfer who incidentally works for CEFAS as an oceanographer and is amazed at my fishfinder) to show me how to use it a bit more effectively. He popped the sail up:
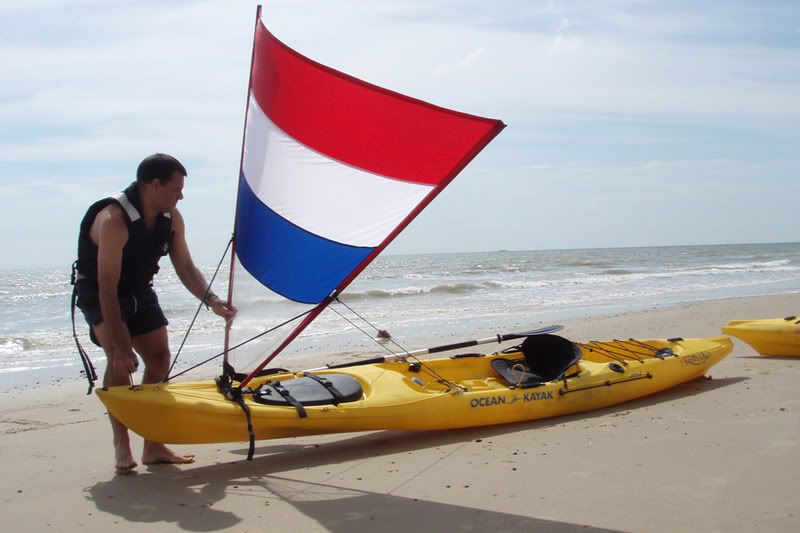
manoeuvred it into the sea
got afloat
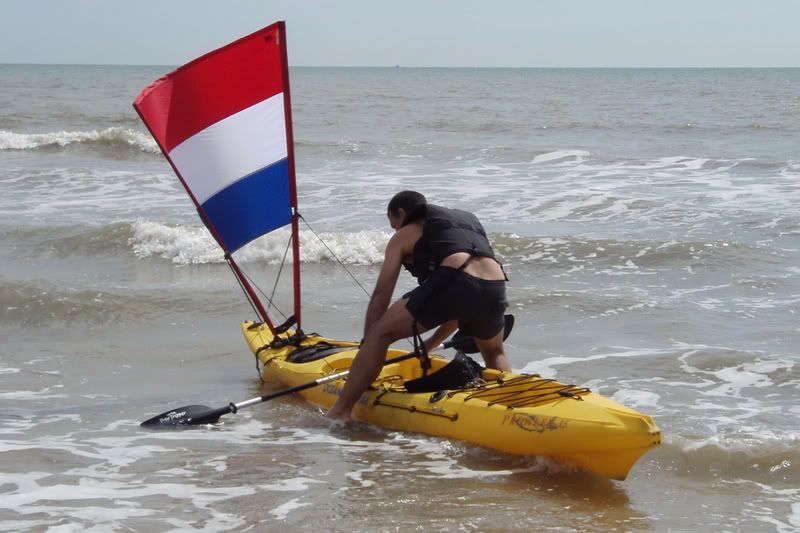
and sailed right off the beach, a few hundred yards downwind, across a few hundred yards and back again, sailing a triangle off the beach. For a downwind sail I found it surprising and had a go under his direction finding myself able to do it. I figured I’d cracked it – but sadly I was mistaken. Yes, I had been taught the rudiments of sailing with a PA sail (it’s dead easy by the way) but hadn’t actually had a problem beforehand – with the wind’s power large being blocked from the land and quite gusty because of it throughout most of the summer I just wasn’t getting enough power to get a steam up. I did, however, stick with it and when conditions were favourable I was able to do quite well, shifting at a nice speed and enjoying the experience:
but I didn’t like some of the rigging on it. Mostly only minor things; the small jam cleats I found almost impossible to deal with; I fitted carabiners instead of the supplied snap clips as they were easier to use on the attachment points I fitted to the hull and the trimming line crossed the deck where my feet were which could prove an obstruction in a capsize (incidentally, recovery when the mast is stowed is no more difficult than without)
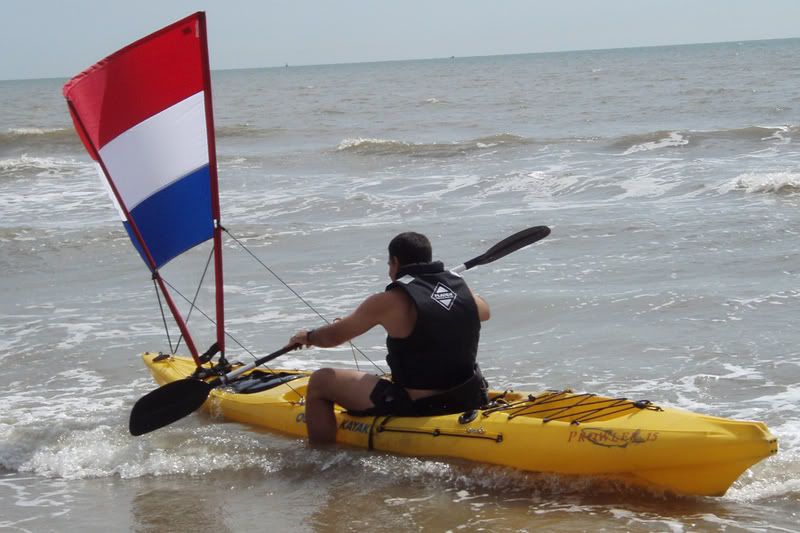
but when the wind was usable it worked, and it worked well even with people new to kayaking and sailing:
and speed-wise I had to paddle flat-out to keep up:
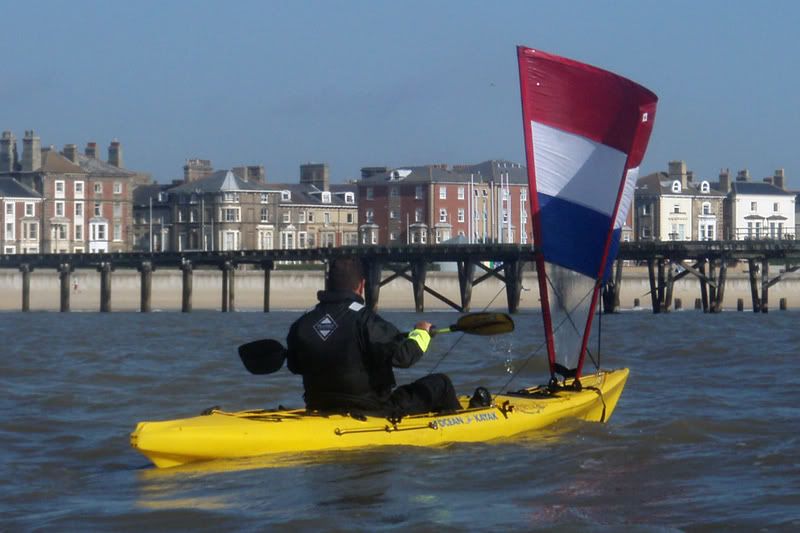
That was the 1.5 square metre sail on the Prowler 15. A faster and lighter boat, and bearing in mind the wind here, I figured I’d need something a bit more powerful to increase the times I could use it and so decided to sell the smaller one and upgrade to a 2.2 square metre version (Pacific Action model PA_LO22). I’d already rigged the Trident to take the old sail but sold it before the wind came up enough to play with it. Thus I was able to make my first sail on the Trident with the larger one.
Putting together the pieces was simple – a five minute job if that. It involves attaching mast sections to each other, sliding them though channels on the sail, shackling them into position and adjusting bits, like putting up a tent almost. I dare say you could do it afloat.
Installation was simple. I screwed a pad eye to the fore deck just behind the carrying handle and put a carabiner through the front shock cord. I chose to use this instead of the clip as it was a bit easier to attach one-handed
I also screwed pad eyes either side of the bow
and placed the sail feet on the front hatch.
I felt that this would not flex the hull itself whilst sailing and would also pull the hatch cover tighter. Bear in mind that along with beefier webbing I had also added front and rear straps to the hatch so it was held more securely than standard.
I then ran the control lines down the side of the kayak and through a plastic dog clip attached to an existing pad eye.
The next step deviated from the recommended fitting by actually cutting the control line halfway and not fitting the inline jam-cleats. I instead fitted clam cleats to the hull and fed the lines directly onto these.
I’d found this on another forum and Richi had by now tried it out, giving the thumbs up. I did it to get rid of the lines crossing my feet but it was to prove even better in practice. The other way works but this improved upon it.
I then terminated the control line with another dog clip that fitted to another existing pad eye. Thus I could release the sail from the cleats in an emergency but still have the lines reachable by hand.
All set up on the bank it was ready to give it a whirl.
I didn’t use it straight away as mentioned earlier (this was the day I gave the rudder a good testing). Instead I did some fishing and rudder usage until I ended up at the bottom of Oulton Broad by the lock gates. This gave me a clear run right up to the dyke exiting the top of the Broad onto the River Waveney. So, without further ado and with the rudder out of the water I unfurled the sail and off I went.
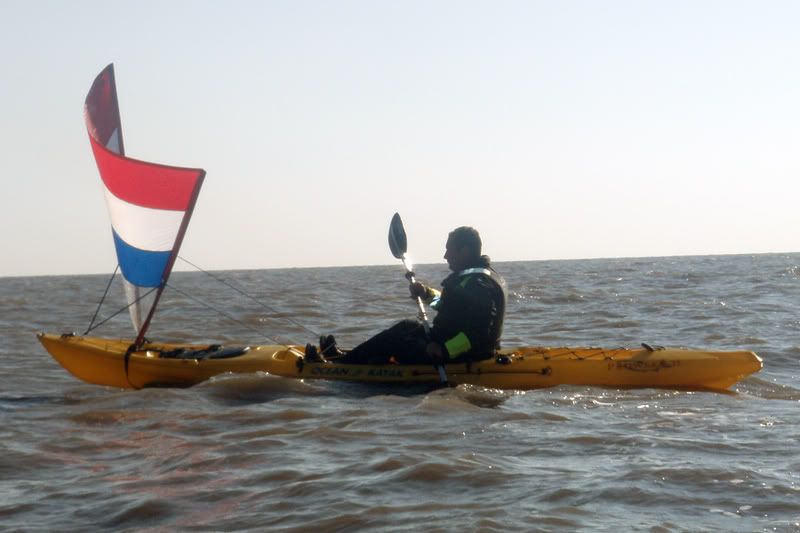
I was up to 3+ mph in no time and the cleats were working brilliantly allowing me to position the sail just so and with careful manipulation when necessary I could stay hands off most of the time. Easy. Then I deployed the rudder.
What a difference – I could stay on the wind precisely or point to where I wanted to go. I could go at angles, get my speed up or down by deviating slightly and all kinds of stuff without any real effort. It was an absolute pleasure and I got up to 4.5 mph at one point without fuss. It was so easy that I sat there sending a text message on my phone whilst crossing the broad. Bear in mind I also had two rods out and optimum trolling speed that day was around 3-3.5 mph which is also optimum for the lures I had out.
The only drawback I have found so far between my old and new sails is length. Being longer it encroaches more on cockpit space when laid down to the side. With the rudder attached, this really narrows the space for your left foot and makes it less than comfortable (and it also presses down on the sonar shield). I got around this by way of the cleats by actually paddling a round today with the sail furled but pointing up at a 45 degree angle and although it catches the wind slightly it proved to be a superior way of carrying an unused sail.
Anyway, I carried on sailing along and then…oh…blimey…
Zzzzzzzzzzzzz! Fish on!
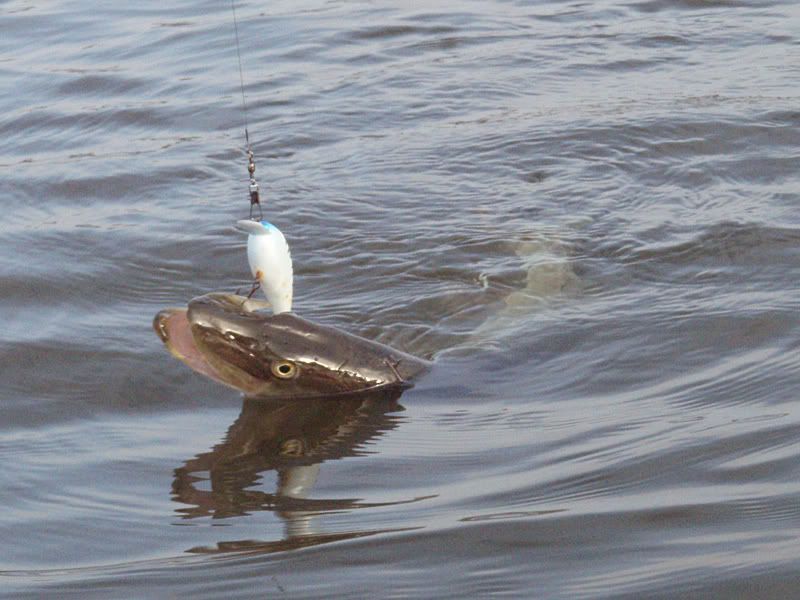
Making me I believe the first person in the UK to catch a pike on a lure whilst under sail in a kayak.
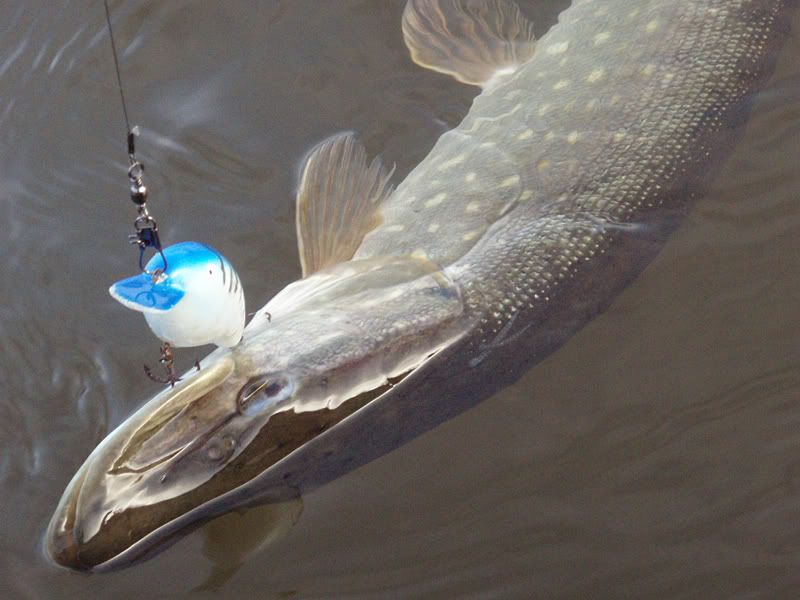
Blue Mackerel Big S and a nice fighting fit 3lb’er…the sail was furled in seconds, pulled down to the paddle keeper (quickest option) and I brought it in. Beauty, nice and sleek but solid and well toned too.
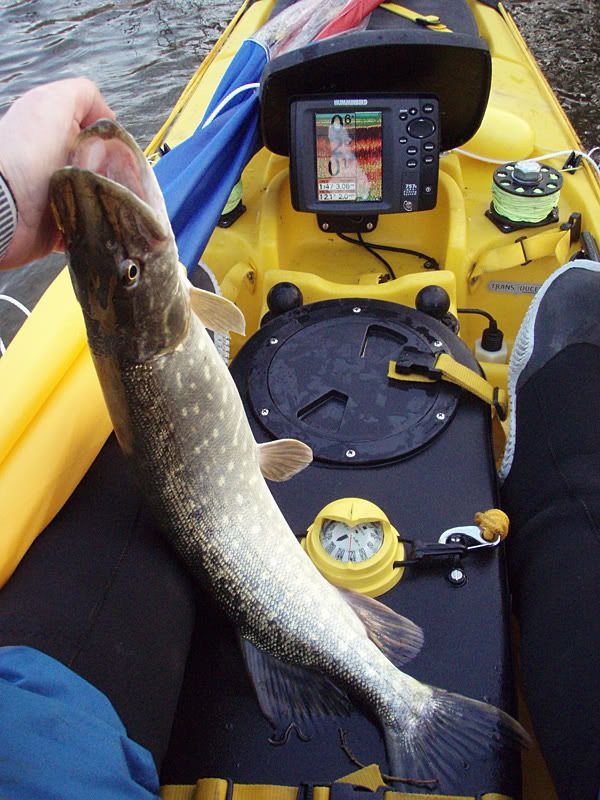
Sail unfurled and I headed back up the side of the broad and onto the dyke again. For a kayak angler I can’t think of a more suitable test than that!
As yet I have still to test it on the sea but I certainly get the impression that I am going to have an increased amount of opportunities to use it with its larger sail area. It would be interesting to compare side by side with another Trident with the smaller sail fitted so when those of you who already have sails fancy a race…..
Oh, a further addition. I got up to warpspeed with it today in strong winds (around 30mph). Not reccommended for those pregnant or with heart trouble as they say at the theme parks. A white knuckle ride if ever there was one. I didn't have the GPS connected up properly so couldn't get an accurate speed but I estimate 8mph+! The paddle back was a lot slower...
I thoroughly enjoyed and appreciated your review of the OK Prowler T. I've decided to order one for fishing here in Alaska and I'm very excited at the thought of catching some salmon this summer. Trout are beginning to spawn in the lakes right now, so I'll be out after them as well. Thank you for all the great information!
ReplyDeleteLoved your page!
ReplyDeleteJust bought a Ocean Torque and wanted inputs on how I should rig it.
Enjoyed reading your Blog. Ordered my Trident Prowler 15 before finding your Blog, I'm pleased to say it appears I have made to right choice for the work I intend to use it for. Your modifications are really well presented, even I can follow them, and certainly will be applying a few over winter. Will be returning here with interest to look for more mods and tips.
ReplyDeleteThank you, excellent.
thanks for sharing,your pics ideas no how and tips,an excellent read aswel
ReplyDeletegreat information pics ,tips and ideas
ReplyDeleteGreat Blog just took delivery of my T15 and will be incorporating some of your excellent ideas, your blog answer a lot of question I had.
ReplyDeleteWow nice post. I really like your post, thanks for sharing this pics, tips and about kayak.
ReplyDeleteWaterski Shop | Wakeboard Shop | http://www.discountskitubesandgear.com.au/
Realy good post just cant get my head around how the quick release on the anchor system works?
ReplyDeleteYou sir are a great reviewer! I wish someone like you would review the Ultra 4.7!!!!!!!!!!!!!!!!!!
ReplyDeleteGreat review and even better pictures!
ReplyDeleteIt's a really old blog but I love it. I'm having a hard time transporting my Prowler Trident 14.5 safely on long trips. It really starts to slide in the J Thule and Malone c carriers I have. Any suggestions are welcome.
ReplyDeleteDifficult to say really. You do need to strap them down really tight. Perhaps some rubber at the contact points might help? Don't be afraid to bend the hull a little, it won't damage it really.
DeleteI am impressed. I don't think Ive met anyone who knows as much about this subject as you do. You are truly well informed and very intelligent. You wrote something that people could understand and made the subject intriguing for everyone. Really, great blog you have got here. trident yacht charters
ReplyDeleteAn In-line Waterproof Blade Fuse Holder protects electrical circuits from overload while keeping connections safe from moisture and corrosion.
ReplyDelete