My New Ride...DAG MidWay Angler I’ve been aware of the RTM Tempo for years, it’s the only currently available (from new) plastic kayak comparable to my faithful, filthy, battered Scupper Pro. Having left the Ocean Kayak UK Fishing Team a couple of years back I’d had my eye on them for a while but had not got around to doing anything about approaching RTM (Rotomod) – or rather Totaloption, the UK distributor – for various reasons. In the meantime Terry, who many know as Izzetafox, had got involved with them and done some reviews of selected kayaks from the range before joining the Jackson Kayak Team. I chatted with Terry and he introduced me to Marcus at Totaloption. Emails and phonecalls followed and a mutually beneficial partnership was discussed at length, beginning with me getting a couple of kayaks on loan. You see I was not interested in paddling any boats that weren’t as good or better or might not be able to stand up to my own barbaric treatment. Wait a minute. Did I say a couple? Isn’t this about the Tempo? Let me rewind. I’d also come across something else. RTM, you see, also own DAG. DAG, another French manufacturer, and they make the MidWay. I came across this too and immediately saw something that could hopefully allow me to take things to the next level. Sleeker, quicker, same weight – both are light, I only want light – this kayak combined sit on top kayaks with sea kayaks more closely than any other plastic yak I’ve yet seen. This is that stage we are all familiar with when we see someone beautiful walk into a room. This stage is lust. You know that film ‘Excalibur’? There’s a line in there that sprang straight, unbidden, into my mind; “I want her. I must have her.” I spent a whole shift online researching and reading and lusting…that tipped the balance. I asked around too, on forums. I asked dealers. I emailed foreigners. I phoned Totaloption. I’ll cut to the chase. This background information is pure editorial but this kayak does not have the greatest stage presence in the world. There’s little information out there in reality. There’s nothing on how it anchors, nothing detailed on how it’s built and fitted and kitted and how it can be modified to suit and fished from in the UK style. It was just my luck that there was one available and this was promised to be with me as soon as everyone was back to normality after the Christmas break. Christmas, as you can imagine, passed slowly. Delivery was due Friday morning. Traffic and other issues delayed the driver but finally he arrived and pulled up outside. Paul arrived around the same time, he’d offered to get a couple of photos of us together because he wanted to feast his eyes too! We set her down on the road.
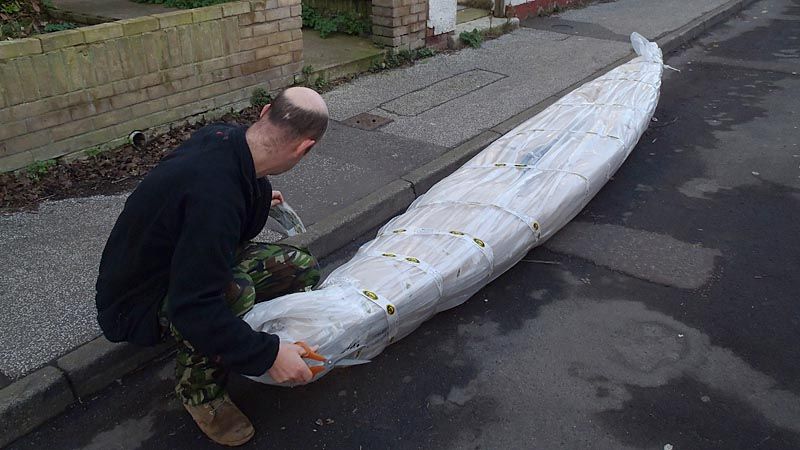
So with paperwork signed and driver away I fetched the scissors and got to work removing my new ladies’ coverings…I can honestly say that I have not been this excited by a new kayak since 2007 when I was given the first Trident 15 Angler in the UK. This promised to be ‘the chosen one’.
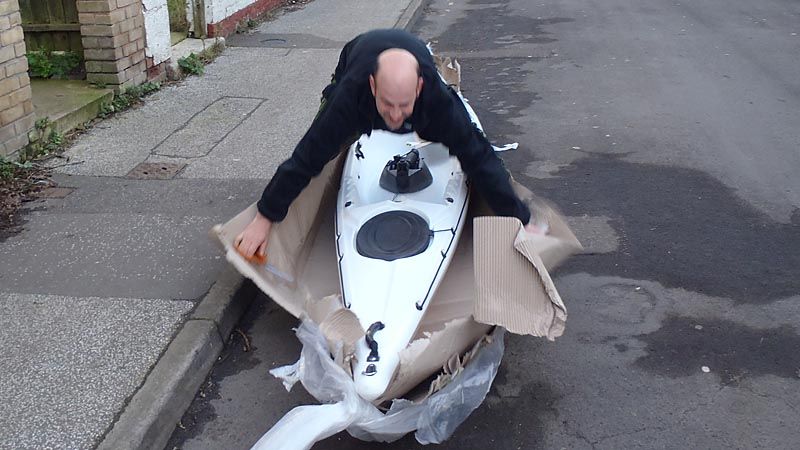
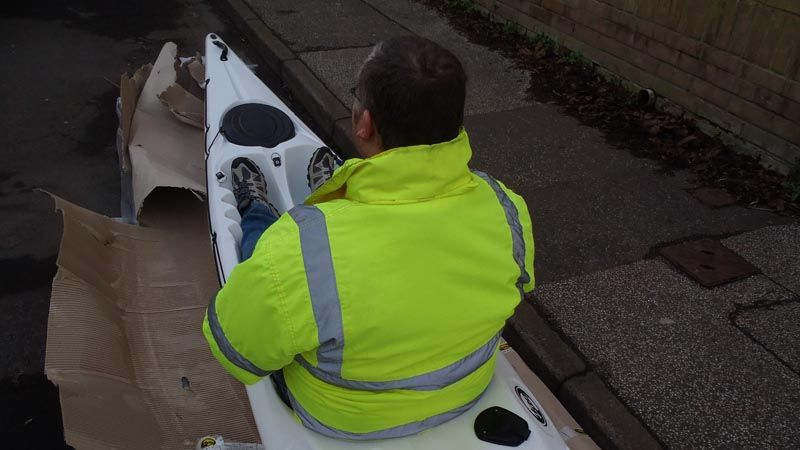
Now Paul isn’t known for outright athleticism but he sure can shift when he needs to and like a squirrel chasing nuts he was in a still-warm seat.
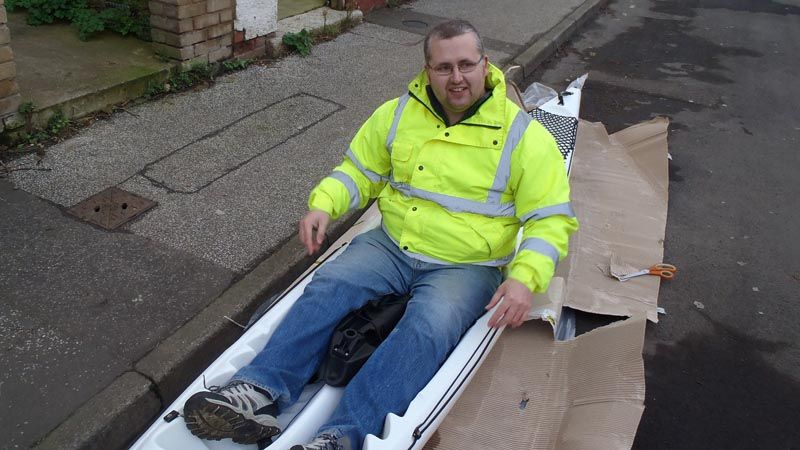
Jobs for the boys? Actually, not just that. You see I’m as racing snake as it gets for a forty year old without a drug habit. Paul is more average sized. It’s handy to know how a larger paddler fits in a slimmer kayak than my current one which is known as being snug. It was snug, but easily snug. Paul was as comfortable as I.
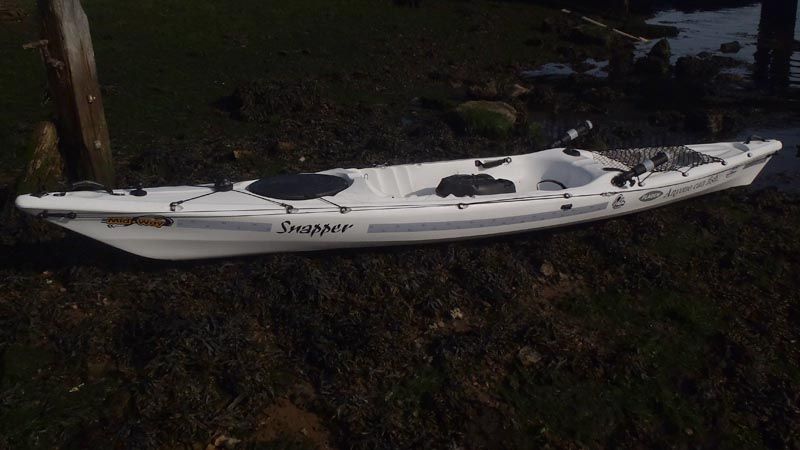
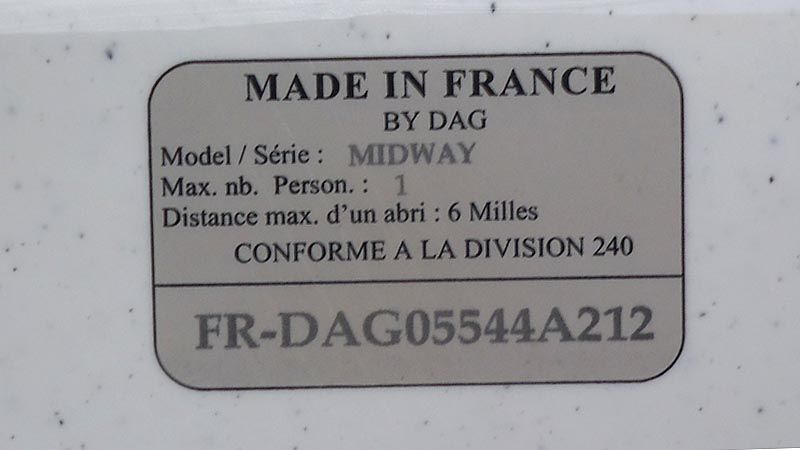
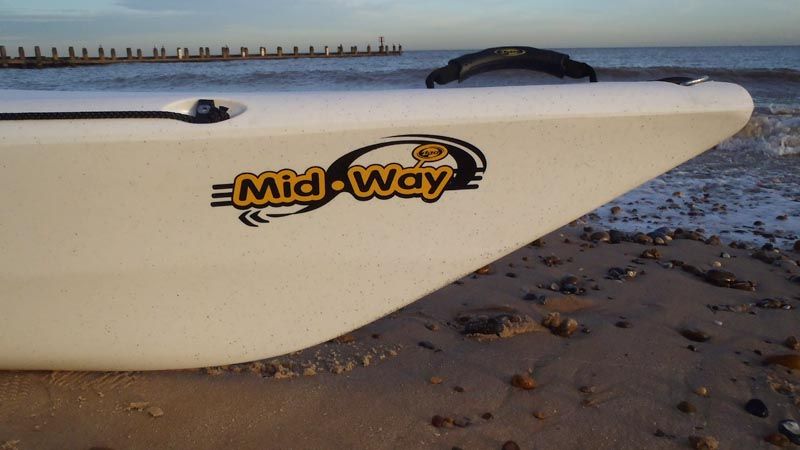
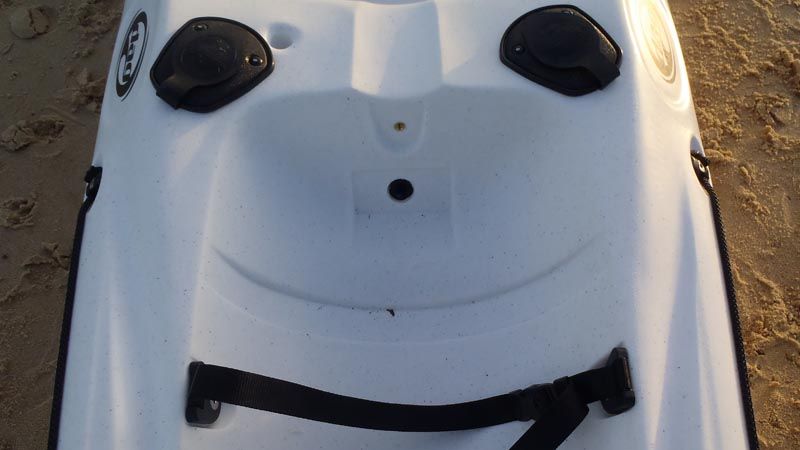
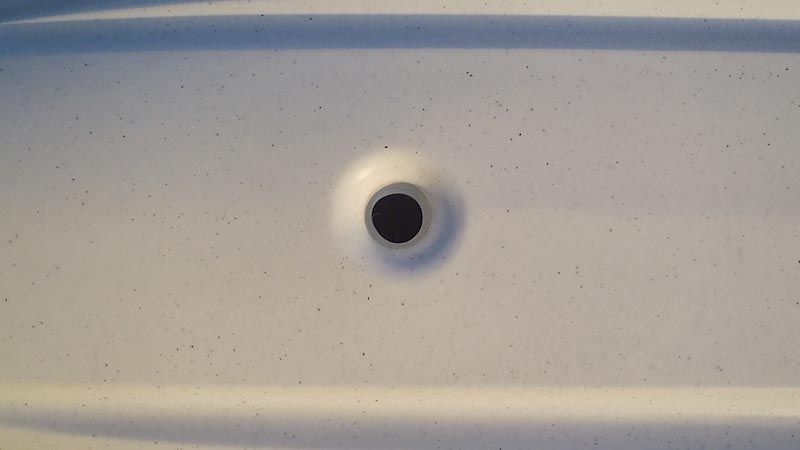
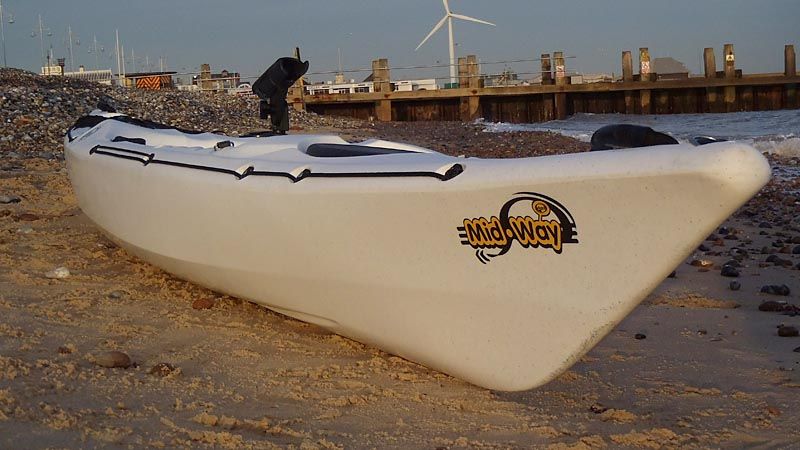
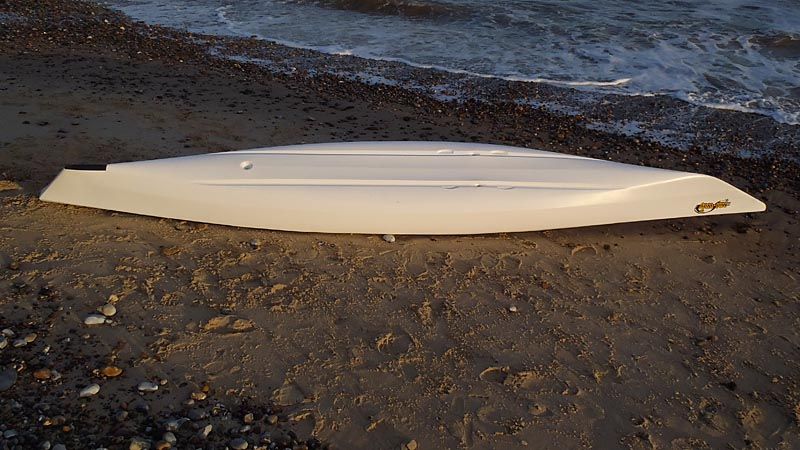
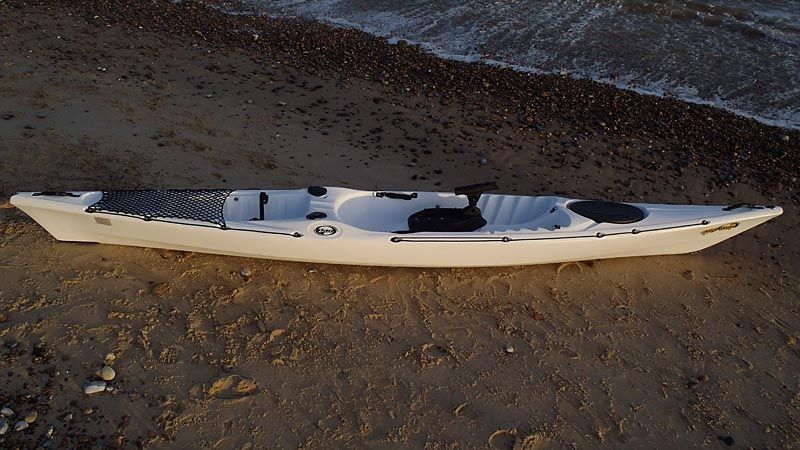
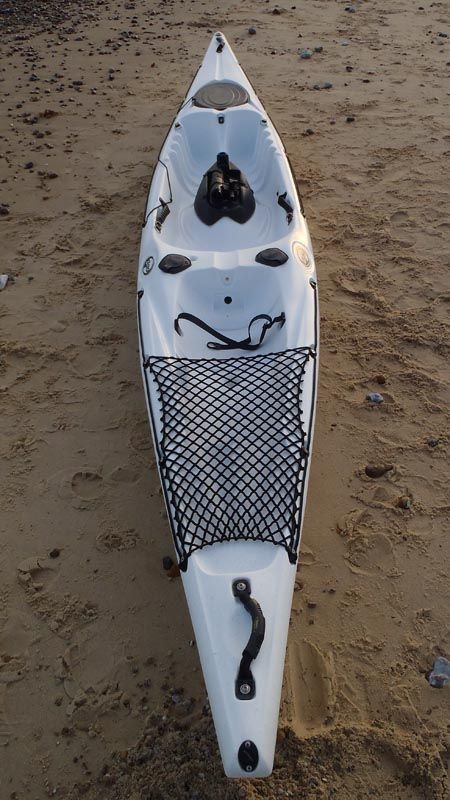
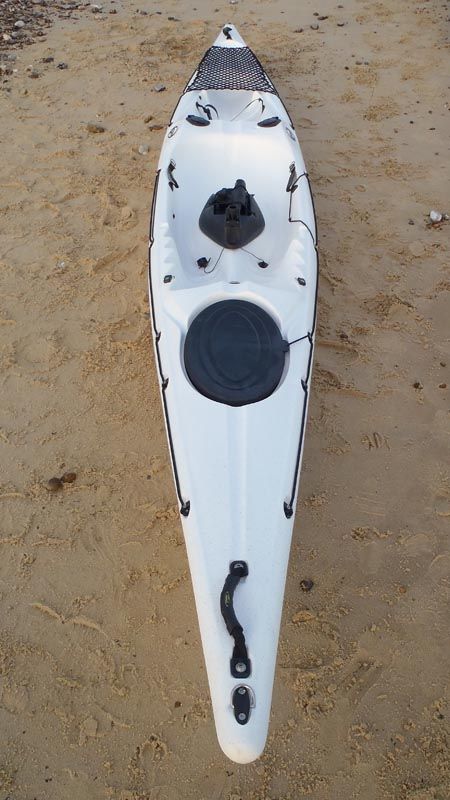
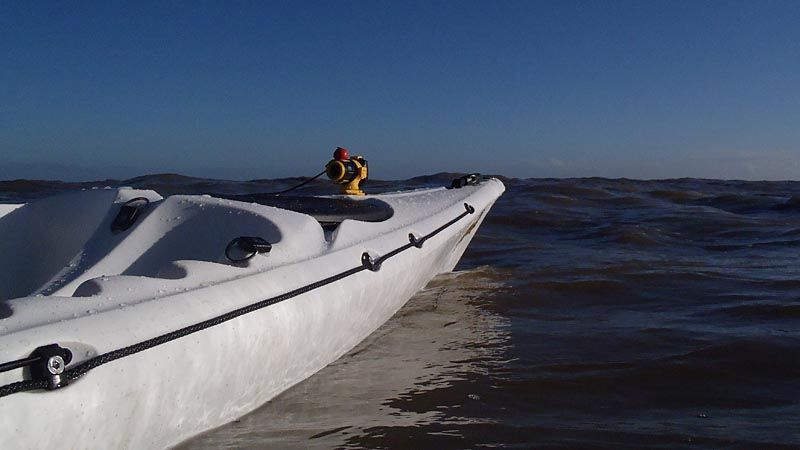
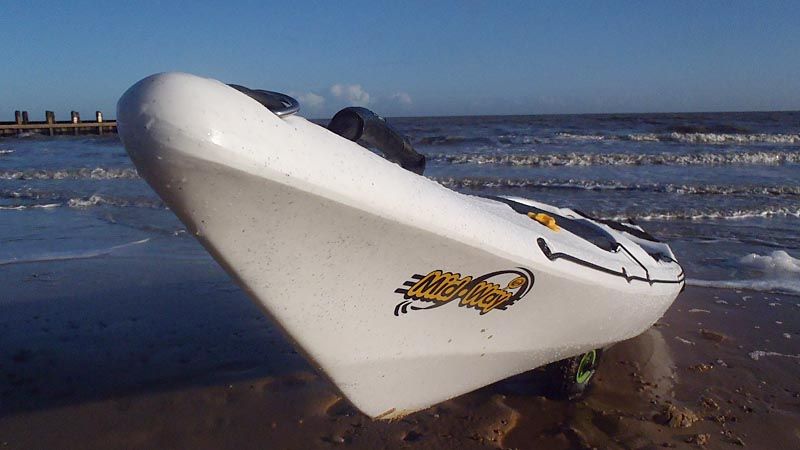
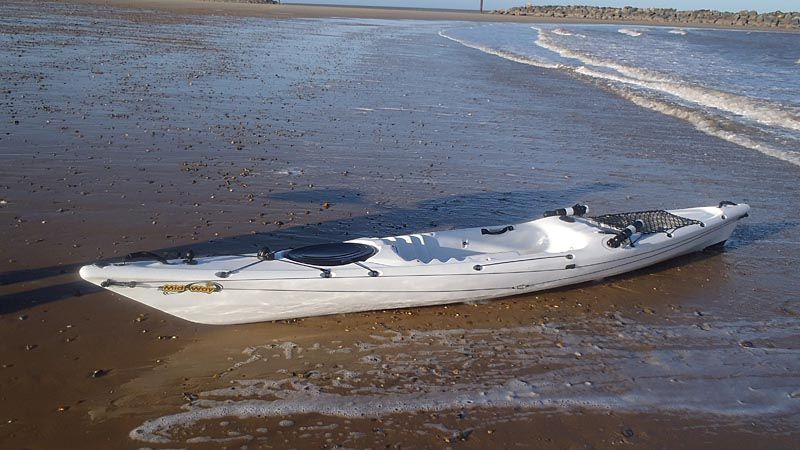
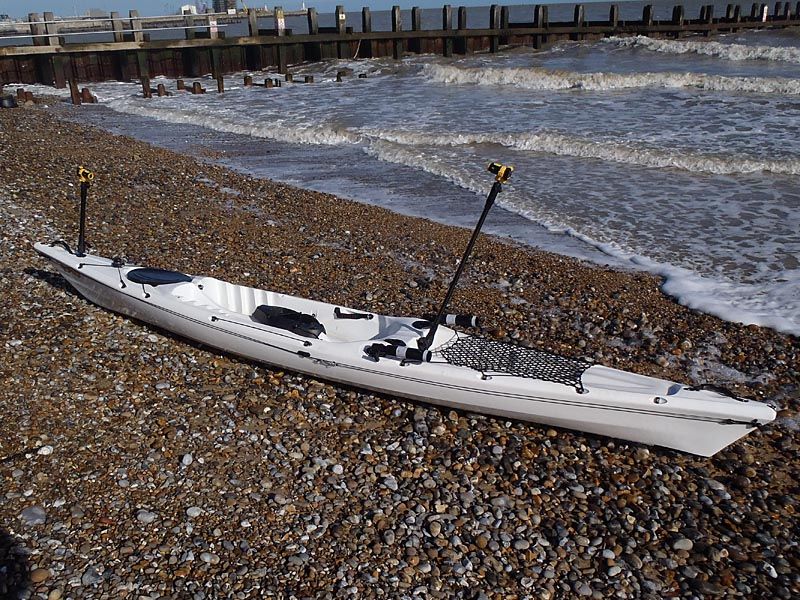
Enough messing around. We went straight down to the beach; picture time for all you folks who, like Bono or Star Wars Stormtroopers can’t find what you’re looking for. Everything needs photographing while she’s still clean and in stock condition. First the specifications: MidWay Angler quoted specifications (inches and pounds rounded up) Length 440cm / 14ft 5in (maximum, dropping to 380cm / 12ft 6in at the minimum, waterline length will fall between the two dependant on weight of paddler, kit and fish of course.) Width 65cm / 2ft 2in) Weight 25kg / 56lb Capacity 140kg / 309lb Also the hull is a smooth rather than grained finish. The colour is Antarctic White; it has black specks. The bottom is a straight line, not rockered like my Scupper. It's hard chined (there are two chines) which should aid secondary stability. So then, time for a walkie-talkie. A French kayak so there has to be a data plate.
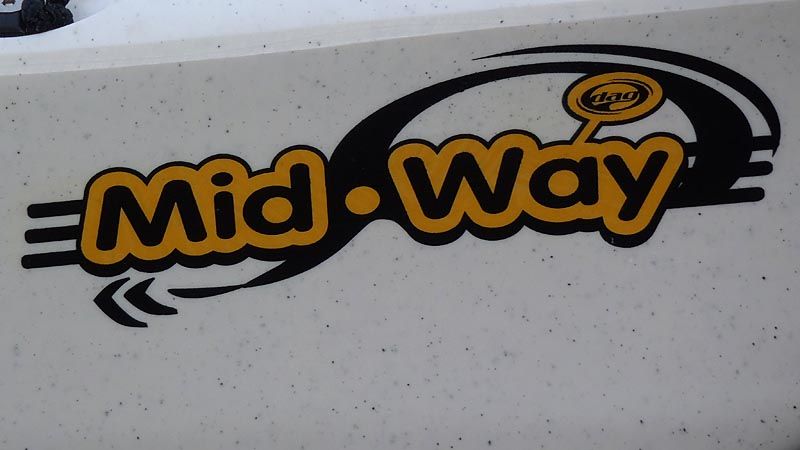
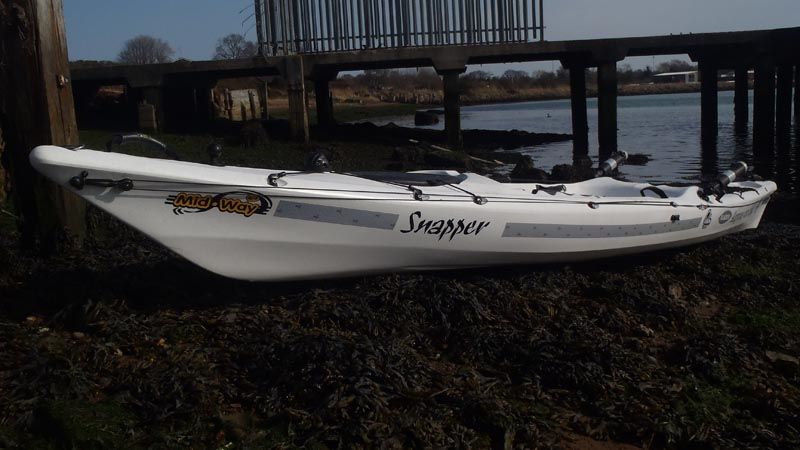
And there has to be a name; sadly in the most prominent position so my name stickers will have to go elsewhere!
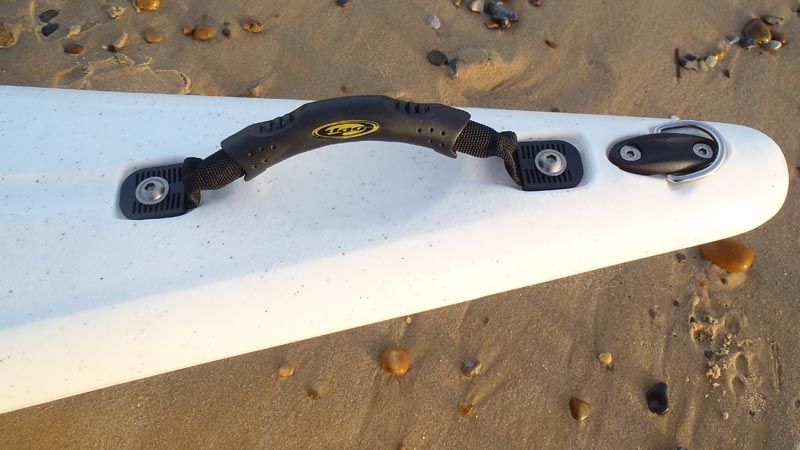
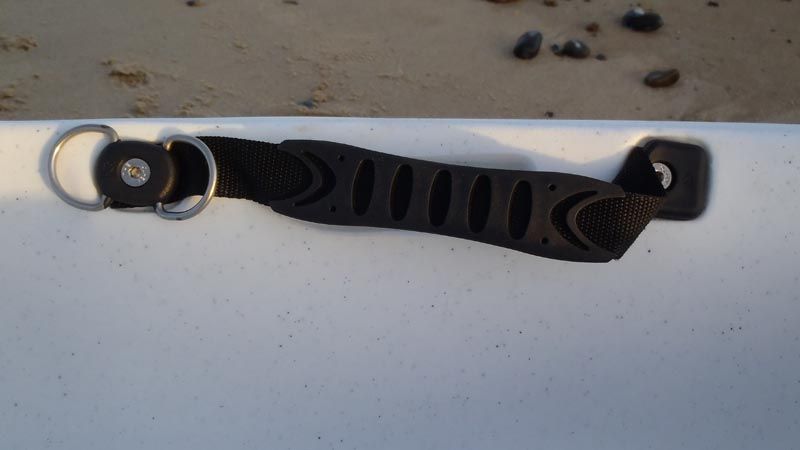
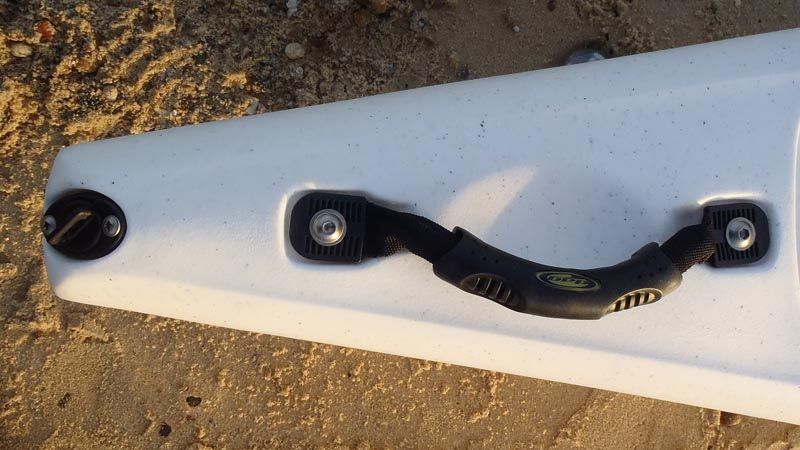
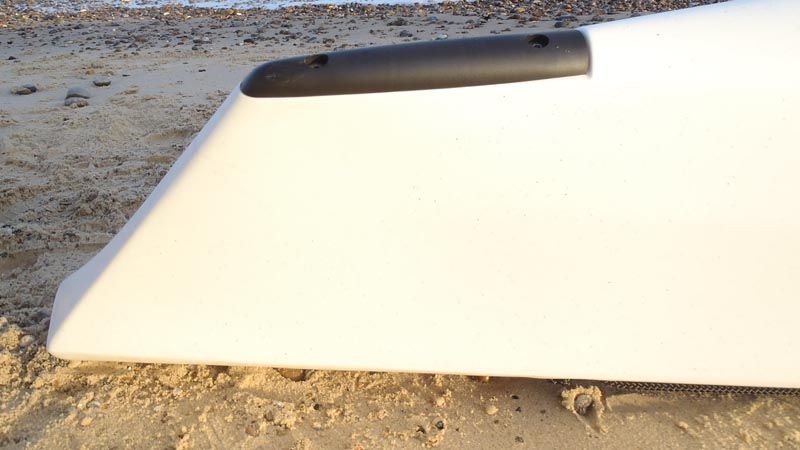
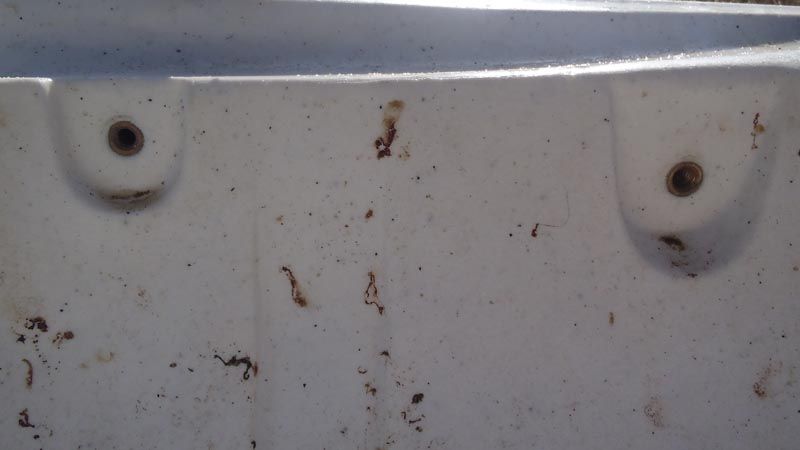
But you don’t want to know about that. You want to know the important stuff, like the quality of the carry handle at the bow. Nylon webbing, hard rubber, shaped and contoured; and look at that ahead, a double option – a D-Ring for a toggle handle, tow or tie-down…or in my case a sail rig. Well thought out. A pity about the stainless hex screws though, screwdrivers to suit are not always instantly available and they aren’t that easy to remove with bait knives and assorted incorrect tooling. Pedantry.
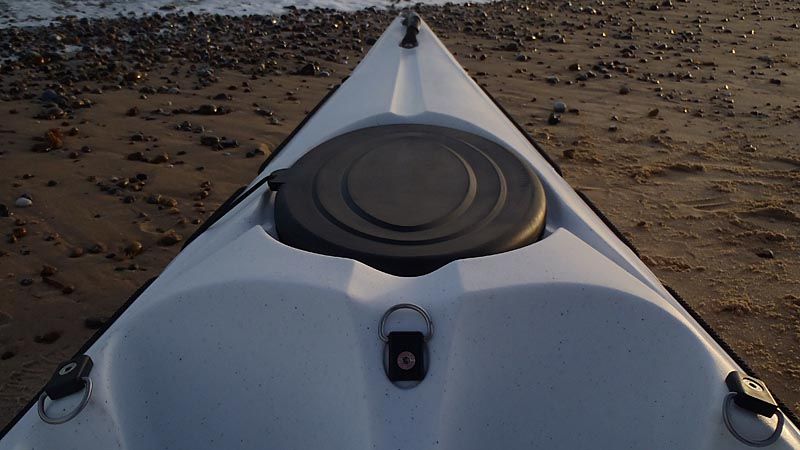
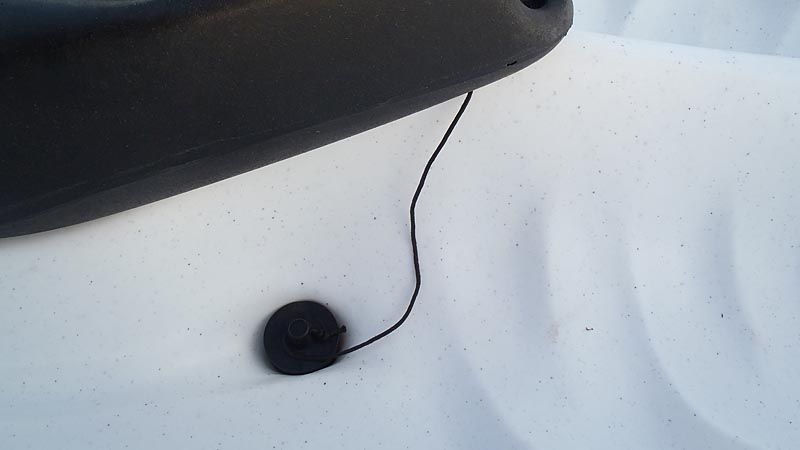
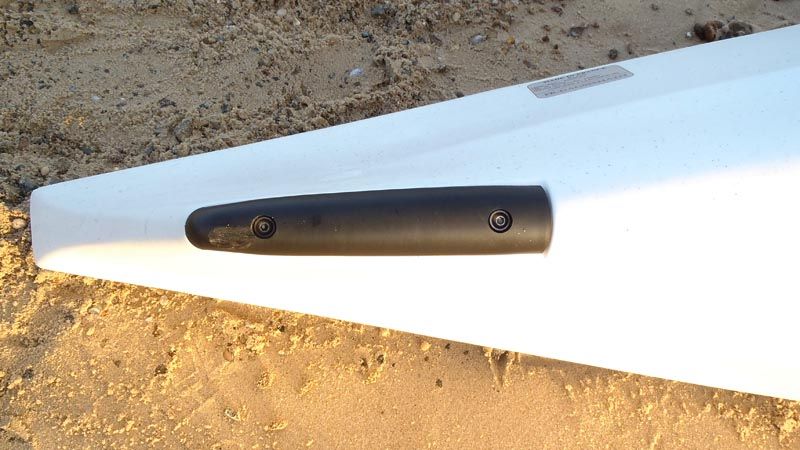
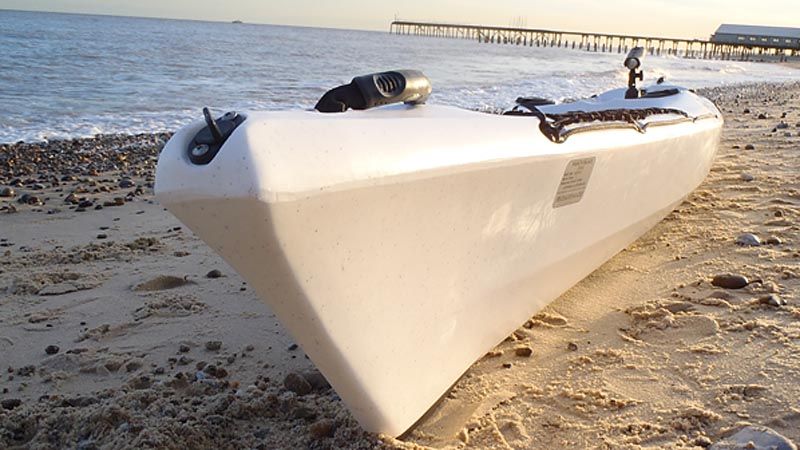
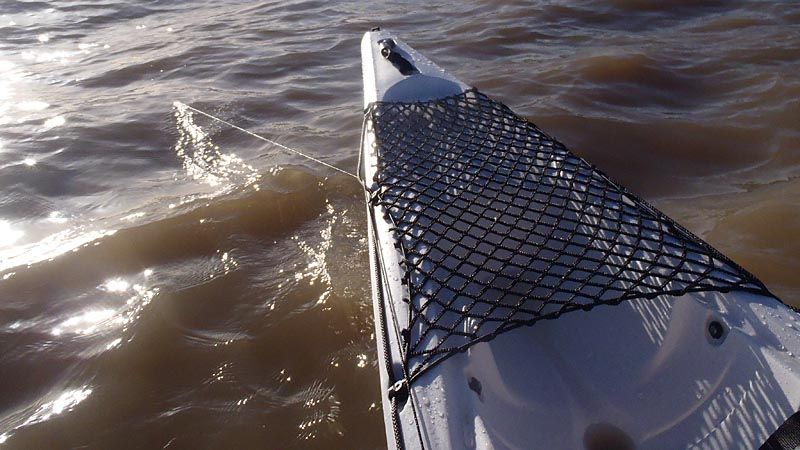
The bow profile next…oh, notice the grabline? Perfect for stock kayaks but short-lived for me as an anchor trolley system will replace these - reducing weight and potential snags by removing them is the first and perhaps easiest modification to come. Shaped like a sea kayak, fine entry, a bit of overhang but without losing too much waterline length.
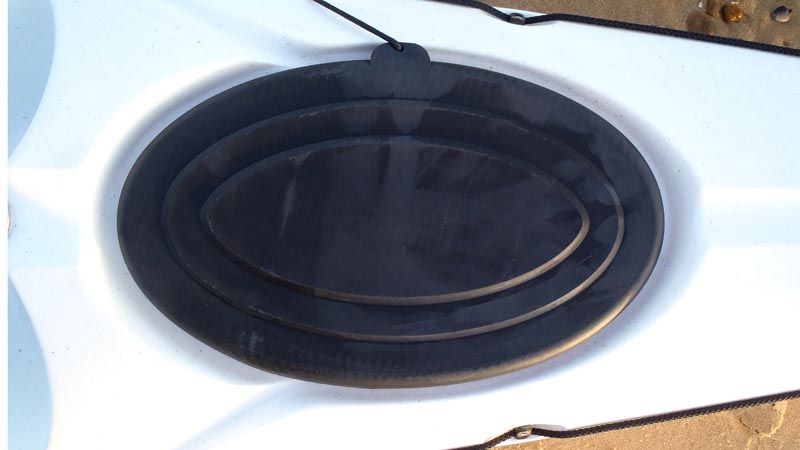
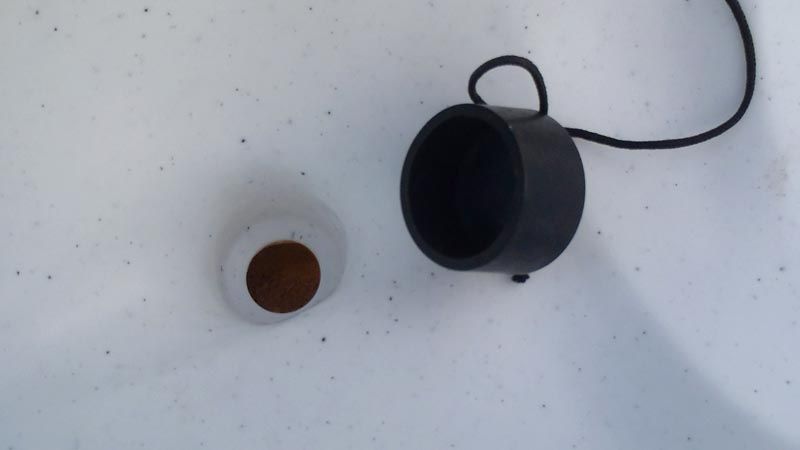
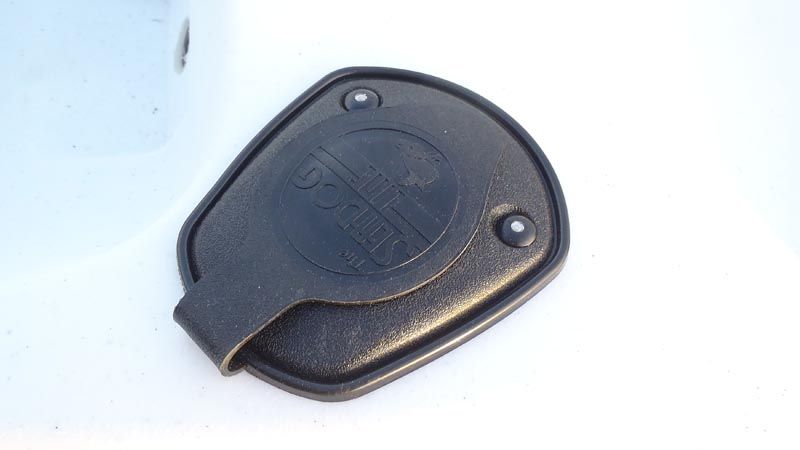
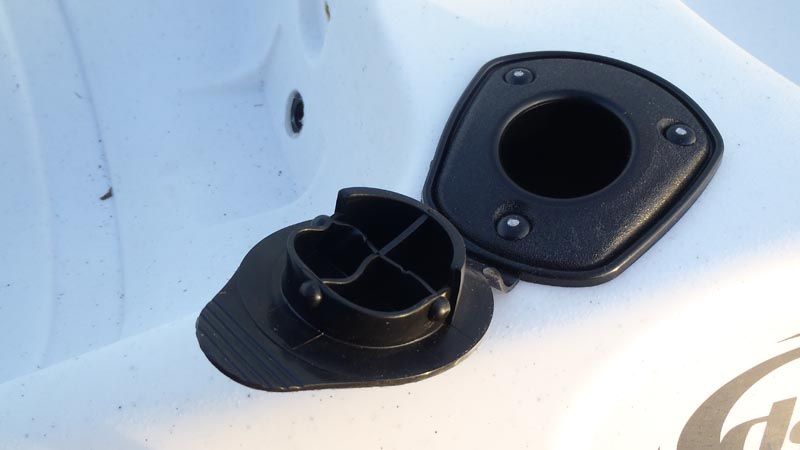
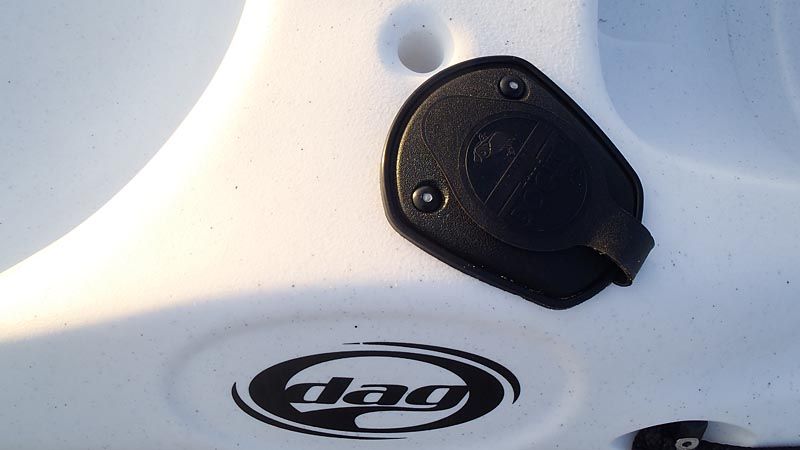
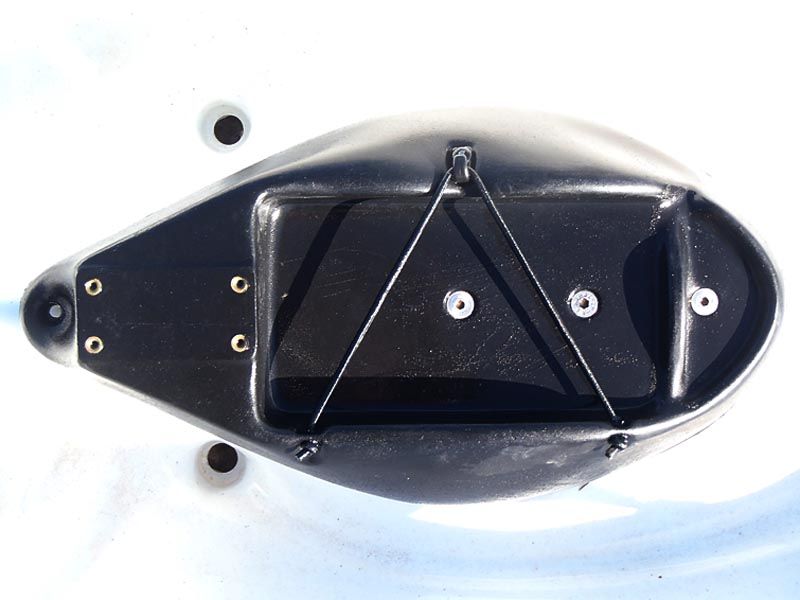
Back up top, a tightly sealed rubber bow hatch cover, attached by a nice, tight bit of shockcord. It has drainage channels too so water shouldn’t collect there.
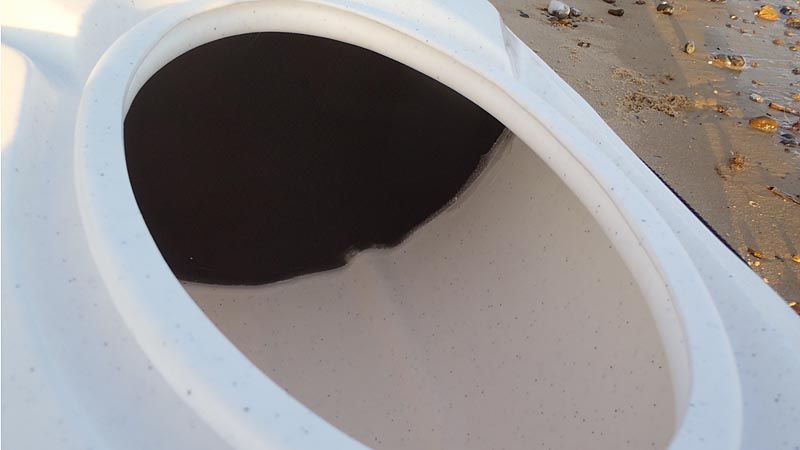
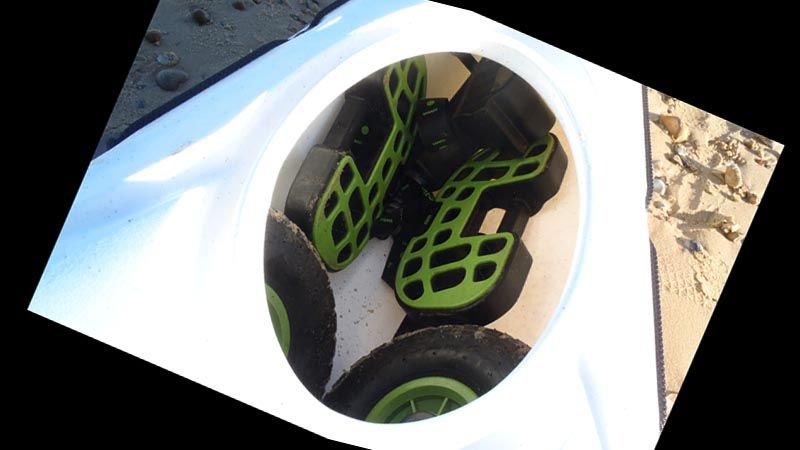
Inside…well, the French like this. Sealed bulkhead. I have two choices – leave it in and maintain two buoyant areas or remove and have the option to store rods in the hull for surf launch and landing. I’ll leave them, I nearly sunk last summer. Great to have the additional security and to be honest most people don’t open the front hatch at sea anyway, even when it’s flat…and with that bow it may not be all that easy anyhow. It adds strength and rigidity too. A C-Tug trolley will fit in there by the way.
So…view from the seat…really shows the spearhead I’ll be following!
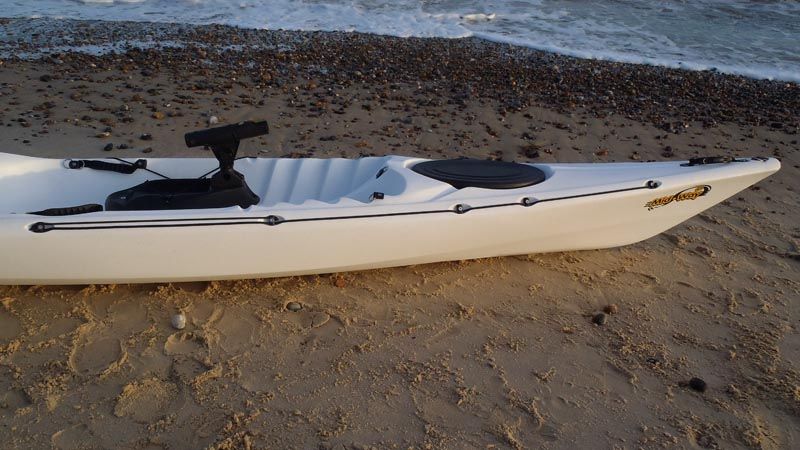
Right, moving back, moulded footrests. I like these though not everyone does. I hate flat footwells, I get footache and pedals make the balls of my feet ache (though they improve forward paddling). The ridge between feet and thighs narrows a lot which might make fishfinder fitment tricky but will allow plenty of space for extra socks and thick boots in winter. Loads of space though, might suit the longer-limbed paddlers. It’s quite deep, both in legs and seat, which really aids stability and performance but of course that makes it a wetter ride. On flat water it’s not such an issue as the attached scupper bungs push into place which should negate much more than paddle drips getting into the cockpit. Of course the sea is an altogether different mistress and so they are quickly flicked out for draining. They’re not the largest holes in the world so won’t drain rapidly but the shaping on the underside looks like it will suck water out efficiently and of course small holes let less IN too.
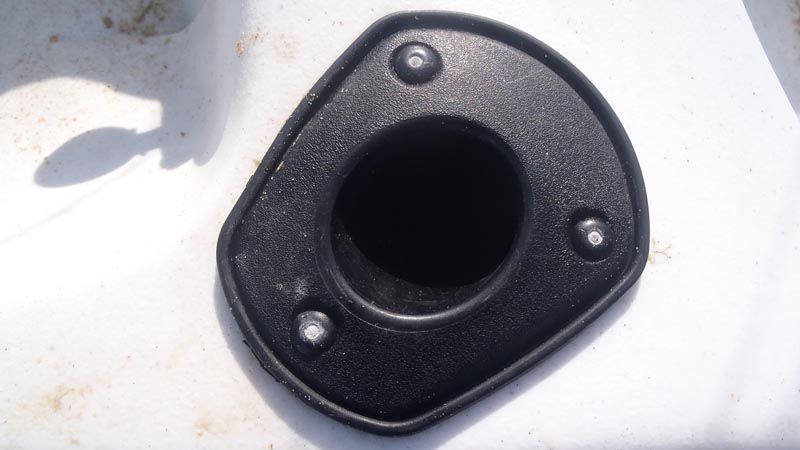
There’s also a recess and a keeper button, this being for the paddle keep. This is fitted to both sides – so simple and so important – and features a longer piece of shock cord than I’ve seen on other kayaks. It’s quite high up and will place the paddle up on the gunwhale which might prove slightly more obtrusive but this will decrease the amount of blade that dips into the water when anchored. More importantly, remember that sealed bulkhead? Well, I strap my rods tight to the top of the hull for the paddle in if the need arises.
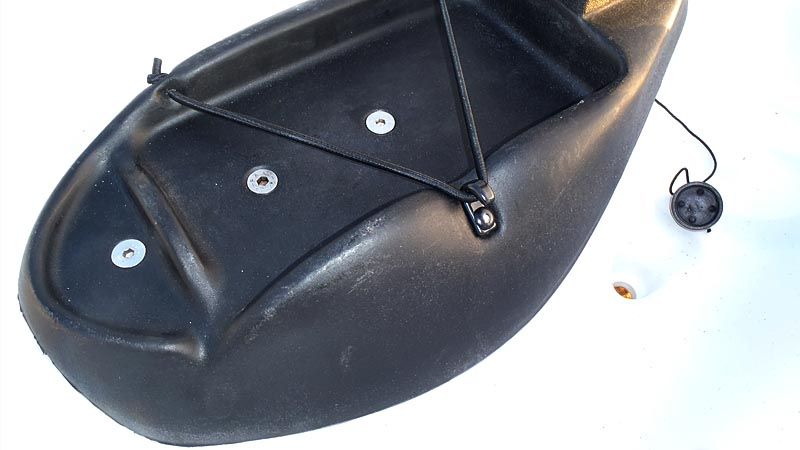
Anyway, between the knees there’s a bracing system which, in this case, doubles as a tackle box holder and has a Scotty mount and proprietary rod holder fitted.
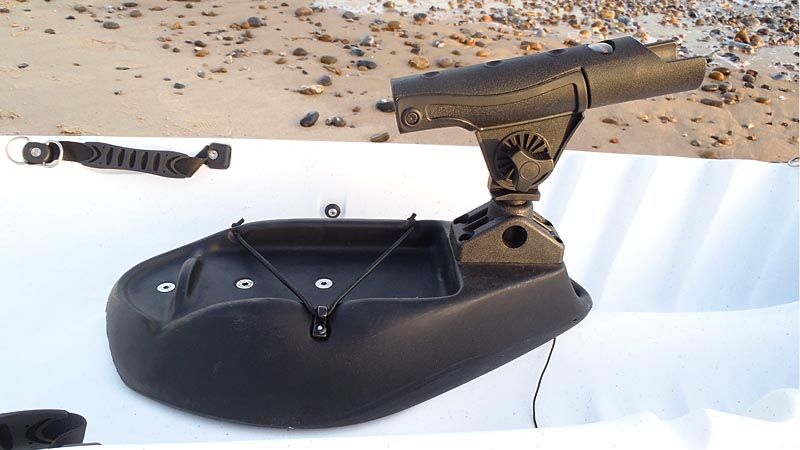
Of course you can remove this if you like.
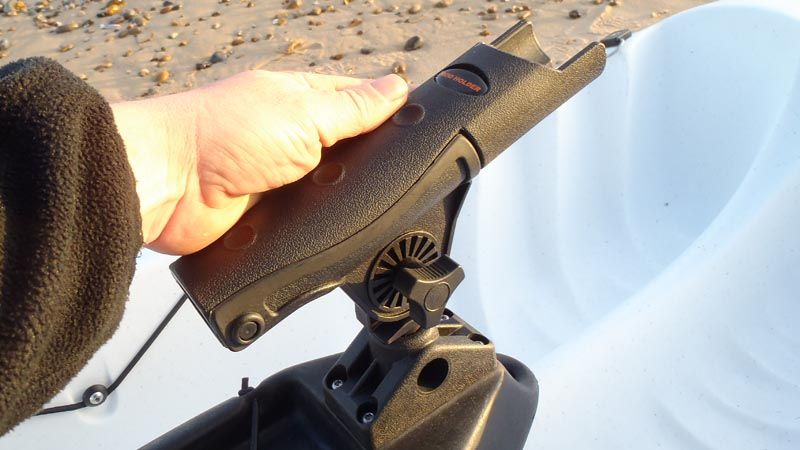
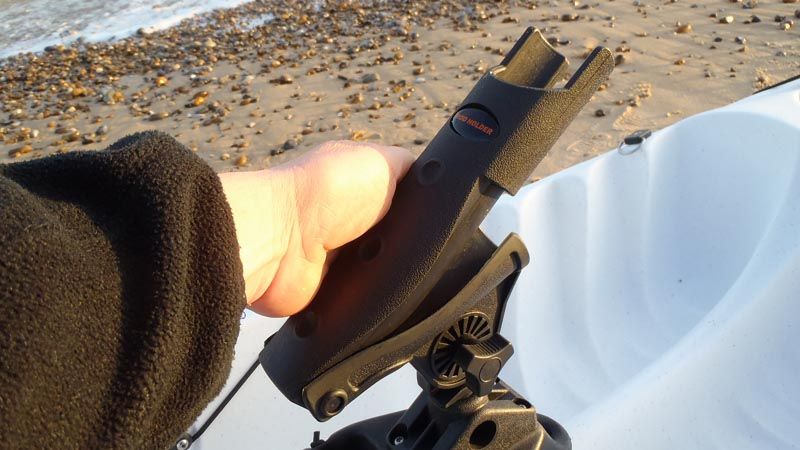
Interesting rod holder this, quick-strike? Easy rigging? Dunno, but it’s been thought about…
Oh… did you see them? Yep, more handles, central ones, with scoops behind them. Comfortable and strong again, with D-Ring attachment points.
That takes me to the seating area now; it’s somewhere to sit, nice and deep, no scupper holes beneath the cheeks and so on. You can fit a whole Paul in there, in jeans but in truth there’s little to show in a photograph and the review side will tell so much more. So we’ll skip back an inch or two and look at what’s next… It’s an angling kayak. That means the first thing to fit is rod holders and as always the ubiquitous flush mounts behind the seat. Some don’t like these, I love them. They’re good for carrying rods and great for trolling with. The first thing that becomes apparent is that they’re further inboard than I’m used to. So I’ll need to reach further around than normal when I get a take. However, there’s less likelihood of catching the other rod while casting and it’ll be easier to brace and stern rudder when coming in with the clearer reach. It also allows more clearance for fitting my forward-facing holders (there’s a lovely flat space here, ideal it is, unfortunately it has the DAG logo… Anyway, they’re quality fittings with excellent flanges at the base and covers over the holes. There’s a narrow hole next to the port one too into which a flag or light fitting could push.
This leads on into the tankwell; the tankwell is relatively shallow which will give the rear buoyancy of course and won’t lead to it being full of water like my current kayak. It’s large enough though. It is, however, round-bottomed which doesn’t really suit my flat coolbox (for carrying bait and leads) but will still be useable. This is due to the French use of watertight barrels for stowing equipment, for which there is a securing strap.
There’s a larger scupper hole to drain this area as ingress isn’t an issue.
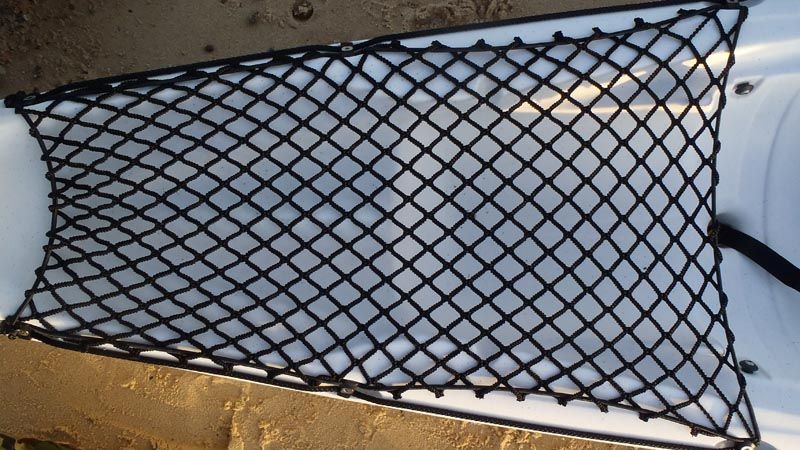
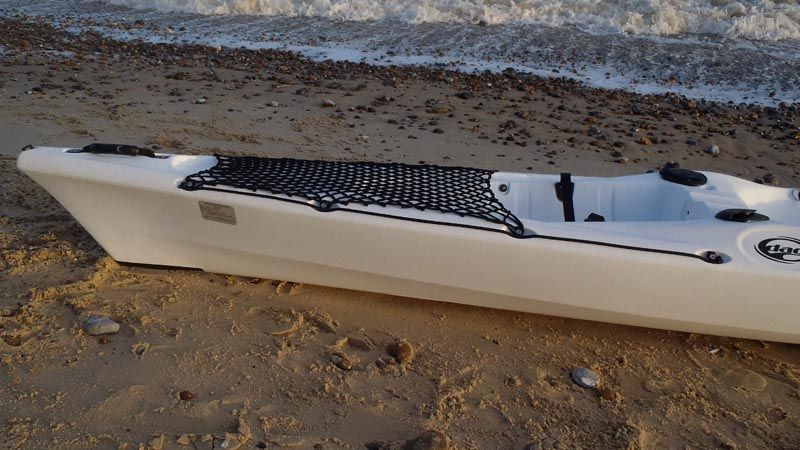
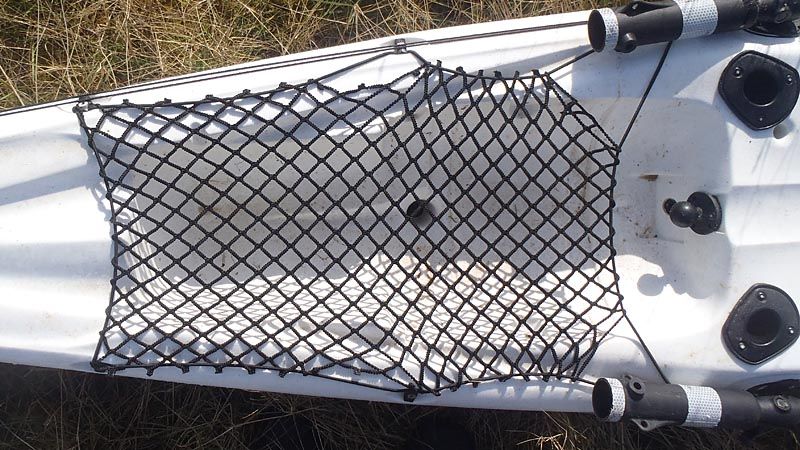
Now there’s one thing I’ve always liked the look of and that’s the tankwell cargo net that RTM have; it’s on this too and covers the rear tankwell to halfway up; it can however be repositioned and will be to come right up as the very rear is pretty much deck height; I now have somewhere to throw fish reasonably securely and more hygienically than into the hull. Gives her an ideal name too. Annette.
Right, the stern. Another one of those tasty carry handles and, right at the stern, a drain plug. Obviously a sponge would be needed for the limited space (all in easy reach) of the bow hatch if water got in but the main compartment will drain from here. Best I don’t leave it open when anchored in a following sea!
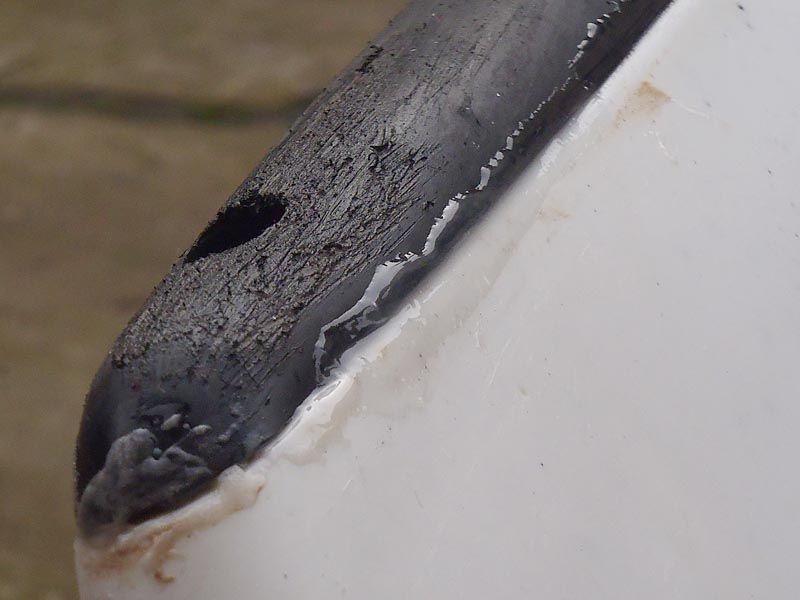
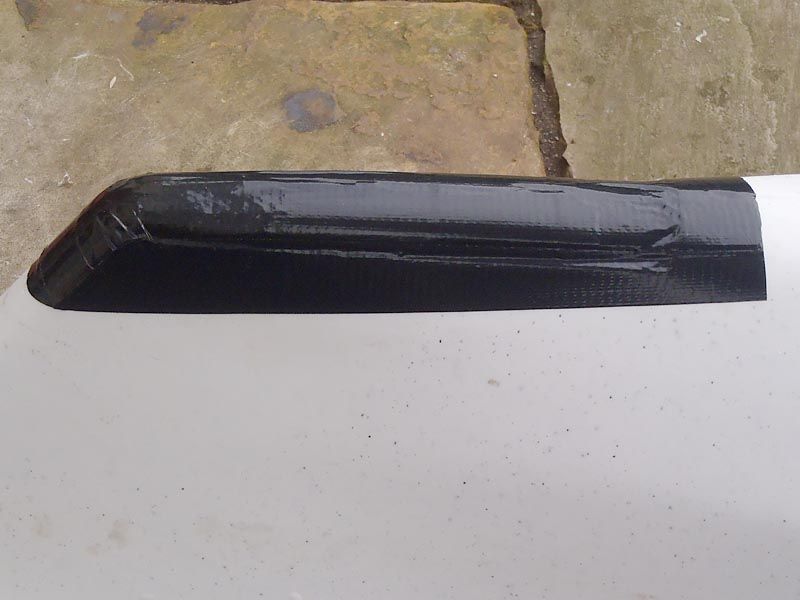
Flipping her over, still at the stern, there is a removable wear strip in place. These are great for draggers but can cause issues when fishing at anchor in weak tides as the boat can swing onto the warp, force its way under and get trapped. I’ve had it twice on two different boats from two different brands. It’s an easy fix – sealant and tape – and the starting point is better this time around as the joints match far better. They are still a better option than straight moulding as this is one area that does get worn badly.
So, to recap…it has a bow:
A stern:
A fore:
An aft:
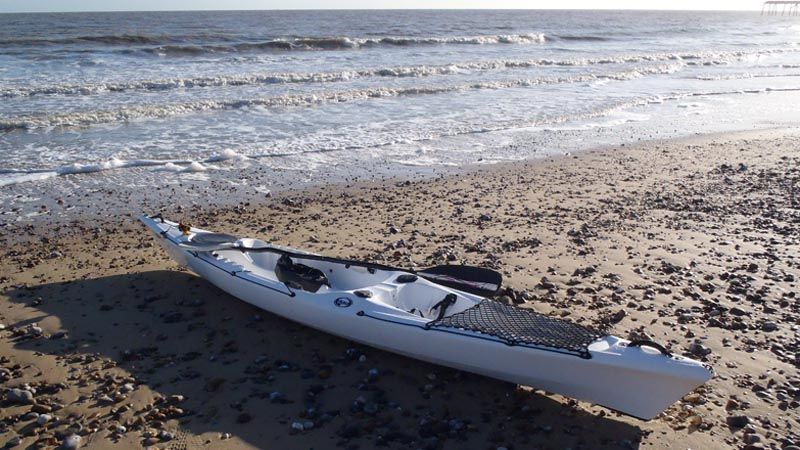
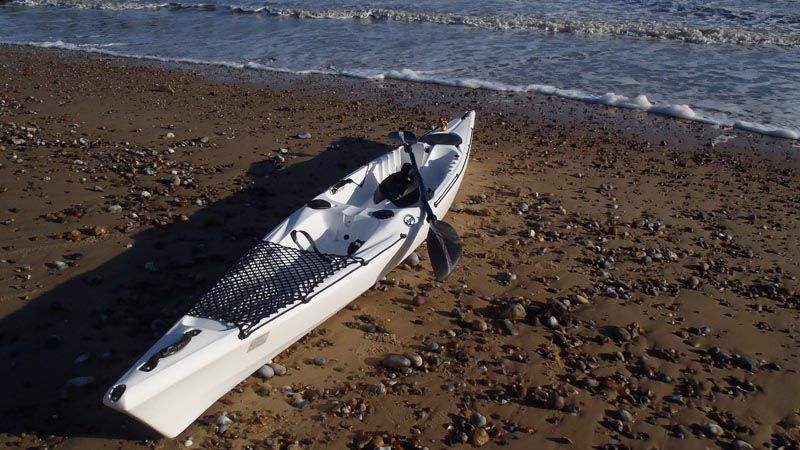
But you want to see the whole package, right? Well, I suppose if you’ve read through all of the above then you deserve it…so here is Annette, my spanking new DAD MidWay Angler, in stock condition ready for trials, rigging and 2014!
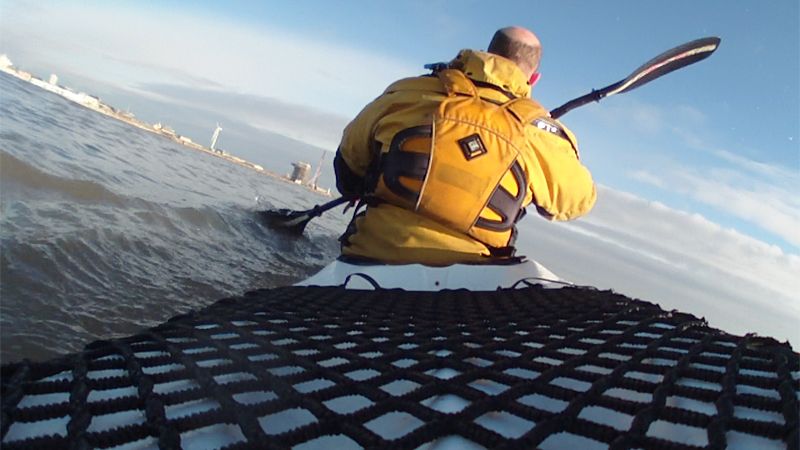
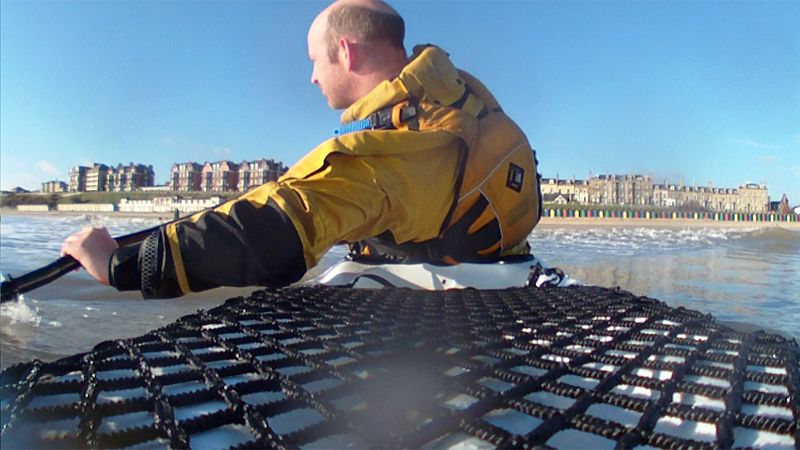
That’s that done. Now, with a few simple ingredients - a bow-mount camera, a paddle, me and an anchor reel I’m ready for sea trials… YES! The Maiden Voyage. I’ve covered what she is and what she has and where it is and what it’s for and all that side of things so it’s time to move onto the next stage. The next stage is of course a test paddle before I do any modifications to get Annette set up for my kind of use. That’s an empty paddle, no fishing equipment, no rods, just kayak, paddle, trolley, drysuit, buoyancy aid and cameras. And me of course. Camera-wise there’s the Olympus in my pocket and the ATC9K on the bow. I knew I should have dealt with the latter the day before because I suddenly discovered that I had the wrong size screw for the brass inserts on the deck. It was intended purely as a temporary fixture for recording the tests so I had no intention of doing any drilling right now. No matter, I attached the (camera) supplied 3M rubber pad to the hull, off-centre, and superglued a quick mount to the top of it, sliding the camera into position, locking and leashing it. That just left the trolley and a walk to the end of the road. My C-Tug went under the seat and was strapped in place, I took hold of the front handle and walked down the road. Yes, the good-looking handle was comfortable too. For serious distance dragging a toggle handle will possibly go on but I’ll wait and see for the time being. Once down the beach it was time to answer that all-important question – does a C-Tug fit in the bow hatch? Well, yes it does. With room to spare (my anchor, reel and buoy also went in as I didn’t need them just yet).
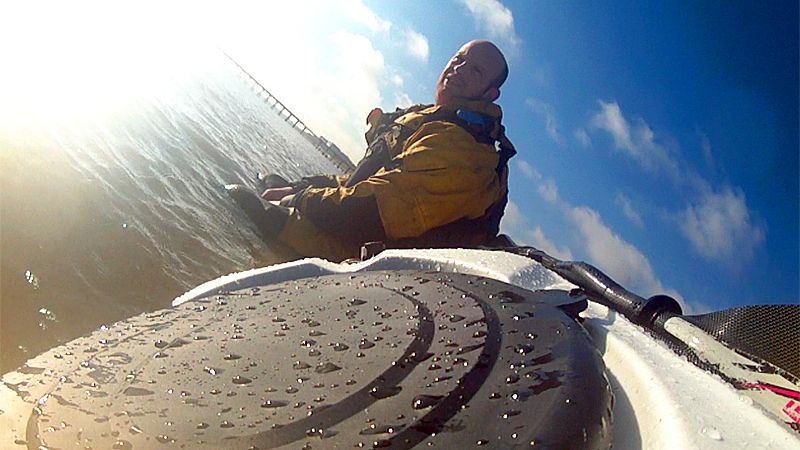
Perfect…time to launch. A quick run down first. 14 knot wind cross/onshore, gusting to 25 knots – this taken from the Yacht Club yacht station weather data online, the yacht club being a few hundred metres north of me. The tide was ebbing, running south to north and I was heading south; against flow and wind (south, shifting to south southeast while I was out). No swell, just a short chop, 12-18 inch waves a couple of seconds apart. Some slightly bigger but not by much, apart from the shore dump of course. My weight today, clothed and kitted, 86.8kg. Height is 5”10’, using a full carbon composite 215cm cranked Lendal Nordkapp with sixty degree feather. No seat. No thigh braces.
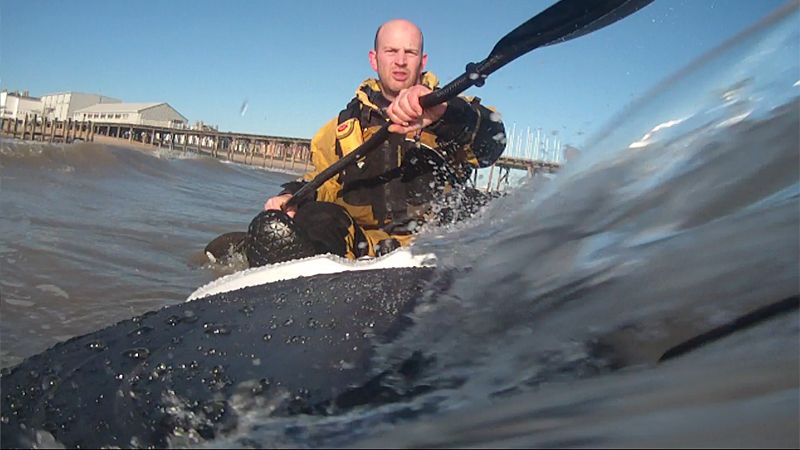
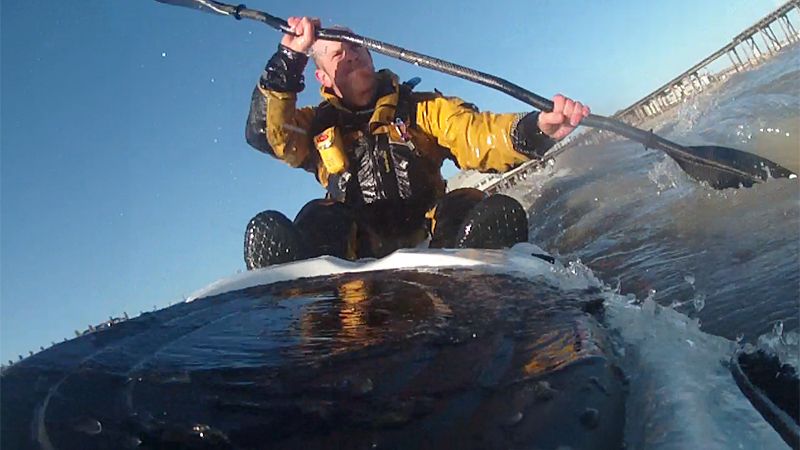
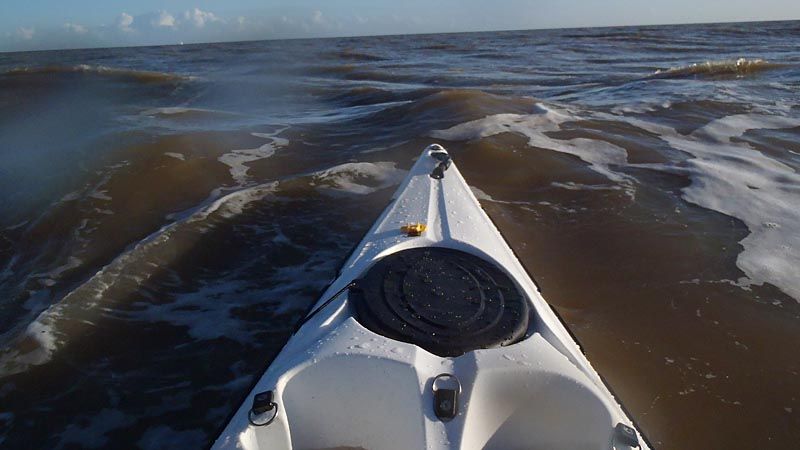
The MidWay floats in only a few inches, a few more and I can sit in it properly afloat. I do my usual Spitfire Scramble, pulling her forwards and jumping on. I wobble a bit, not sure where the balance is on her and I’m not really very straight to the waves. I dig in and accelerate rapidly, straight out through the waves.
Yes, through. The 8kg or so in the bow hatch keeps the nose down and though there’s lift there it naturally spears the waves and of course the water washes over and into the cockpit. That’s Watersports for you. It makes the kayak heavier and therefore requiring of more effort naturally but there’s no appreciable speed difference and the water is draining away as fast as it’s being replaced by the next wave. Even full up it’s fine with no adverse effects. Of course anything carried in the cockpit needs to be attached or watertight.
I keep heading out straight, pick up some waves at the back of the gulley that are a shade bigger, approaching three feet perhaps but not cresting so I just ride over neatly. I stop paddling and drift. The wind is strong, the chop is noticeable and I could happily sit like this for a while. I try with my legs out next. This is my usual drifting or anchored position. The upright back and the width/depth of the seat cause no discomfort and I’m in a position I can maintain for lengthy periods, even with the paddle strapped to the gunwhale.
At rest there is a tendency to take more water in through the scuppers and to shed less, while moving it gets sucked out. This is what my weight does to the water level while static while there is practically none left when paddling along.
As you can see the cockpit narrows and this pushed the legs inwards. This always seems a bit odd to me as I’m used to having them straight and closer to the sides on my fishing and sea kayaks and straight on my surf kayak. I’m certain this has an effect on balance, presumably on two sides of a coin. Also seen here are the ridges for the feet positioning. I’m a fan of this, I don’t like flat footwells and I‘ve always had these and found them comfortable. That said, many don’t and prefer the flat option with footrails. Rails do of course allow extra pressure to be applied with the ball of the foot and I had them fitted to my Scupper but I’m not convinced they were worth the extra weight for me. These ridges aren’t as prominent as those I’ve seen on some other kayaks so perhaps it will prove less of a deal-breaker. Besides, it adds strength and rigidity. The final word on the footwells is in terms of leg length. I’ve got stumpy legs, 33” inside leg for a 5”10’ height. However there was a large space ahead of each foot for me which would allow taller paddlers to fit into the space. Or, in my case, defrosting squid, anchor and reel, that kind of thing. So, I’m sitting comfortably with my lower back supported upright and my knees bent at the natural and correct place, I can push down with either foot and feel the support straight away. What else? There is space around me in the cockpit. It’s wider than I’m used to and I do feel myself slopping around a little. This would of course be resolved by the use of a seat but, not being a seat man, I shall have to consider an alternative or just get used to it so that others can hop in and out from time to time, after al it makes edging the kayak far easier. Anyway, this sea is boring me and I’m now perfectly at ease; I turn and move into the shallows where the waves are breaking to run inside them and get a bit of excitement. It’s kind of like a solo, low-level version of the air assault scene in Apocalypse Now and I can just hear Colonel Kilgore egging us on…”Romeo Foxtrot, shall we dance”
I head inshore, the water is very low, very shallow and I’m maybe fifty yards out. The idea is to run along the line where everything curls over, breakers on the port side, so that I get the benefit of lateral forces hitting me while being lifted and invariably turned at one end or the other. A battered wallowing in effect and, like the above mentioned foxtrot, I’ll be going slow, slow, quick, quick, slow! With the rounded hull of my sea kayak I need to be moving otherwise I’m adjusting balance so much to remain upright. The faster the better and I always end up getting rolled along here. It’s very easy to over-compensate one way or other so if the push from the side doesn’t get me the opposing force will. How would the MidWay fare? Well, I seem to have already got the balance and feel of her as my compensating is instinctive and to the right amount. I’m being lifted and pushed but no turning; the tracking grooves are coming into play as is the lack of rocker. I can hold my course with ease even at a snail’s pace.
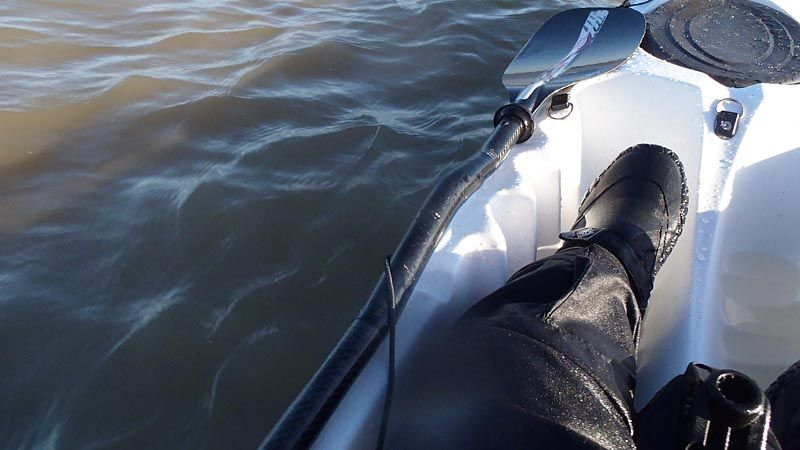
I give it a while and just play around in here, try and catch a few waves but they’re too small to stay on – I end up turning with the wave but it’s hard to put myself where I want to be when I want to. I need bigger water and more practice on here first. I’m now a mile or so uptide, having been back and forth and land briefly to get my anchor system out. Nothing is rigged as yet so I put the warp through the rear of one of the grablines and drop it down like that. I have a couple of knots of tide and this is what I most want answered. Now, I always, always tell people to put their legs over the side while dropping anchor and I always sit with mine over while at anchor or drift fishing, they act as outriggers and often the air temperature and windchill is worse than the water temperature combined with flow through my footwear. So, with paddle stowed my feet go over and I drop, let out plenty of warp and sit there.
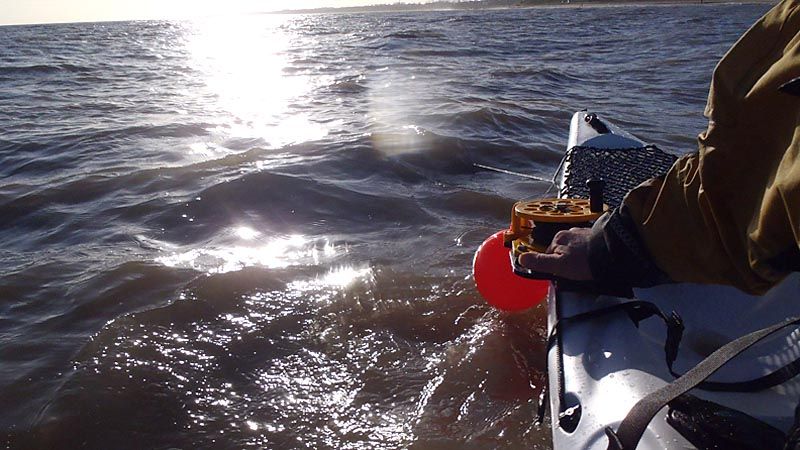
The MidWay sits straight. None of the wandering, this time anyway, that I‘m used to (though it’s difficult to judge without another mark in proximity), no feeling of instability or anything negative. I can lean around quite happily and I bring my feet in to find that yes, she’s fine. That is without doubt my top question answered. I can fish at anchor. I sit like this for a good quarter of an hour and then pull up, from the rear with no ill-effect, and head in for a landing to stow the anchor again. It’s a tight rubber hatch on the bow you see, not so easy to open on the water but far more waterproof than the alternative.


Back out again.
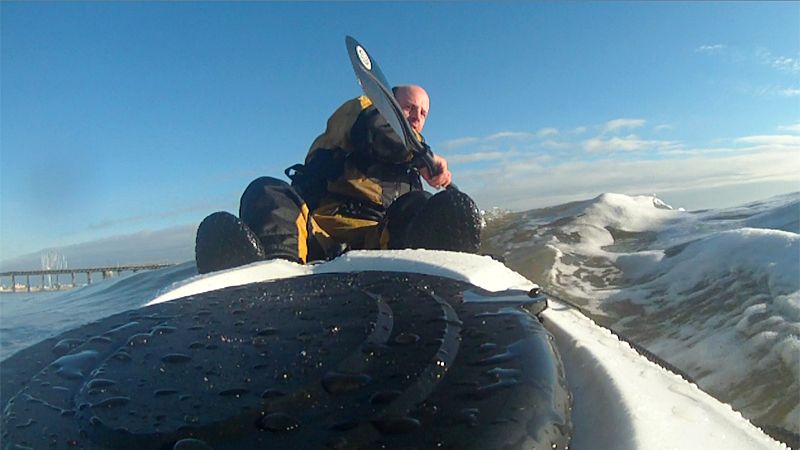
What next. I do a bit more paddling in the breakers, forward and reverse, beam on from both sides, catching what waves I can to try and surf; just really getting a feel for things and getting used to her. I head out further and start trying lean turns, paddling on edge on both sides, manoeuvring. I trying edging; stick her on her edge and she locks solid, sitting, hard, on the chines. That was a real surprise, having never paddled an obviously chined boat before. I do a capsize and self-rescue; it’s easy, those chines come into play again, there’s plenty of buoyancy, everything is fine. I try drifting with my legs in, legs over the side, sitting side-on and then I head in through the waves, picking up what I can to ride in and up the beach. The tracking grooves and lack of rocker give less manoeuvrability than I’m used to on the waves but the relative buoyancy makes it easy to keep the nose up and though I can’t really steer on a wave I can lean in and go up and off the top easy enough and it feels easier to avoid purling than in the various Prowlers I’ve used. Which just left an easy, light drag off the beach and back home…
My initial thoughts are that largely she performs as I expected in paddling terms – fast, responsive and comfortable, light and easy to propel. Very much like a sea kayak in those respects. The chines lock things solidly when on an edge or lean so increasing the secondary stability. The hull grooves give superb tracking, at the expense of manoeuvrability, and lock you in so speed isn’t lost. Easy to handle in waves, or flat. Just a very pleasant paddling boat. As to the fishing side, limited primary stability will not suit the beginner and storage is of course restricted (though similar to what I’ve been using for years). Anchoring is fine from the stern even in a good flow, keeping straight and steady, the stern also rides high which keeps the water off (which further aids stability) and with feet outboard there’s no reason why she can’t be used anchored or drifting whether bait, lure, jig or fly fishing but that’s for further exploration and, with the camera running out of power I’ll expand on self-rescues after the next launch. Cameras recharged and a couple of hours spare. Time to continue exploring the capabilities, all of which had been briefly touched upon already. Low offshore wind today, bright and mild, flat with just a long, rolling swell about eighteen inches high in general. Better for recording sound than yesterday then! I launched and paddled out and put the kayak on edge, first to port then to starboard, paddling a hundred yards or so and keeping an eye on water levels against the gunwhales. The chines locked in once again and I sat comfortably on them, maintaining my edge as I moved in a shallow curve.
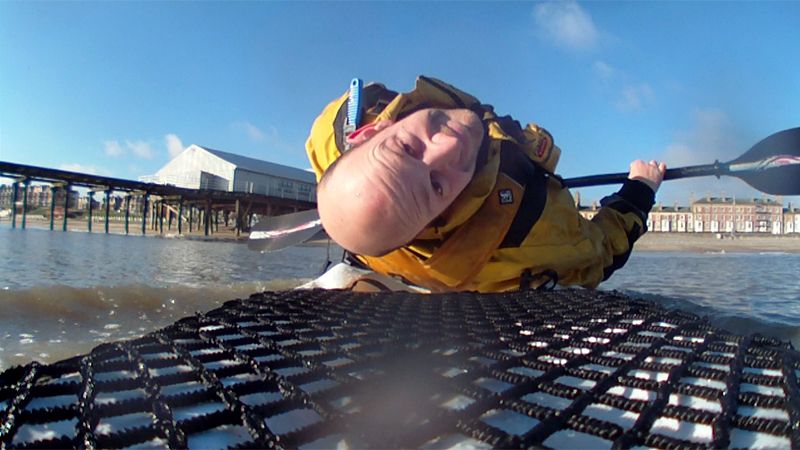
Lower? I tried and could go into an even tighter turn, putting the water right to the edge, lapping into the cockpit at times. So I decided to try and keep the gunwhale submerged and the water level in the cockpit while still paddling forwards (keeping my body upright). I maintained this for a while too before pushing things just that bit too far and ending up in the water. It took effort to end up there and I was now aware how far I could push things. I had to do this as rocking violently side to side had not had me over!
So now I am in position to do a capsize recovery and self-rescue. The kayak is inverted and so I put one hand beneath on the far side and with the other hand on the nearside push upwards and flick the kayak deck uppermost. That’s the correct way; reaching over the kayak and rolling it towards you can result in an injury. Right-side up and the paddle stowed on the far side it is time to get back in. The MidWay is narrow which makes reaching across easy and with the carry handles on the inside I can take hold and pull myself up without rolling the gunwhale under water. So, holding the handle and allowing my legs to float up to the surface I kick and push my stomach up and onto the deck, shuffle forwards a bit more, head low and roll onto my back where I drop down into the seat and rotate my legs around to the normal paddling position.

I set off again, playing around, more edging, leaning and stern ruddering for the sake of it.
I head off to the wooden pier and paddle up through the supports. There’s quite a flow now from the tide and I’m paddling across it, making a few corrective strokes as and when required and then head inshore to play in the breakers again, just for fun. I run along the beach in shallow water beam on, paddle out through some waves and in on some others, catching them and riding in.
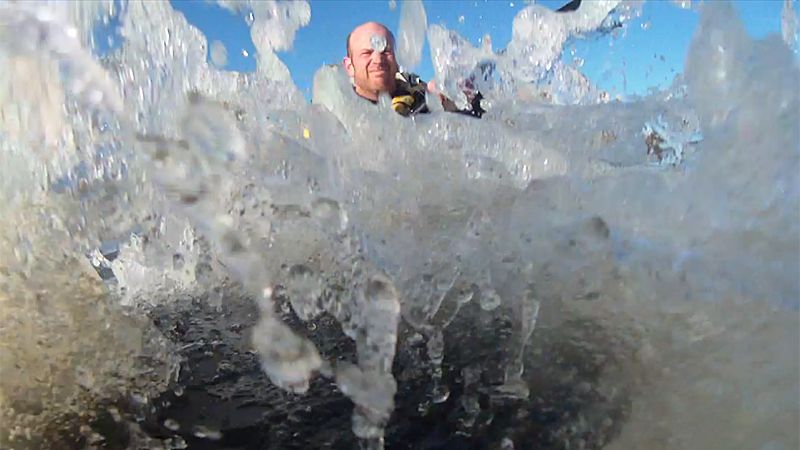
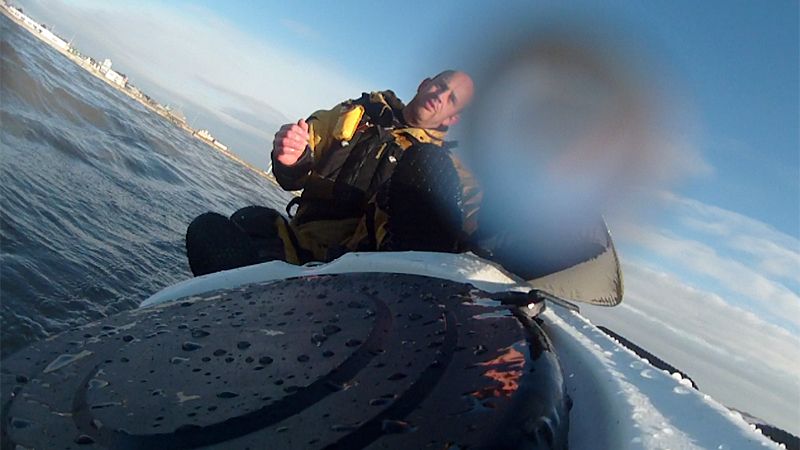
Very low-level surfing but she catches them easily, accelerating before the wave and then staying with them when in reality they would roll on underneath with most other kayaks. I pass through the pier supports again and watch for the larger waves that form in the bay here where they hit the sandbars.By larger I only mean a couple of feet today but they’re well-spaced and rideable. I pick one, ride it in, carve around and off the top with my blade just resting flat on top to steer and head back out. I pick a second, start moving and leave the paddle across my lap; it takes me in as far as it wants and I come back off again. My hands in the air and just the slightest input from my body. I decide on a glory shot for the rear camera; catch a third, lean all the way back and smile for the camera.
I paddle back to the launch point, do a couple more easy self-rescues and then decide to drift while sitting side-saddle. Again she locks down on the chine and I sit as steady as a rock. I progressively lean forwards and drop the gunwhale further, water trickling and then pouring into the cockpit. I sit there, bringing the level up until I’m sitting with the sea level with the water inside the cockpit, the gunwhale submerged. Rather interesting – I thought I’d read this kayak was tippy?
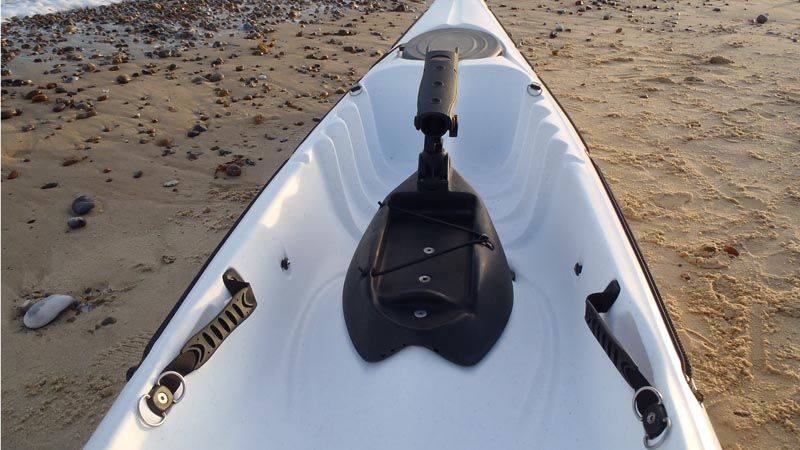
There’s not really much else to try now until I get some harsh conditions. I think it’s time I took her fishing. MidWay Update So, I’ve been paddling and fishing my MidWay for a while now, in big seas (up to 6ft waves) and challenging winds (up to force six) so it’s time for an update. It’s fully rigged now of course, with rod holders, anchor systems, cameras and so on so is no longer a stock boat but a fisher… Originally I had concerns of how it would behave at anchor. I would say I was pleasantly surprised but that’s an understatement. My main concerns were whether it would sit straight in the tide rather than wander from side to side like my old Scupper Pro did and whether it would have sufficient volume at the stern to keep it upright and dry. Well, on both counts it’s passed with flying colours. I’ve sat out tides up to four knots with no wandering induced by the water, this helps to keep the baits in place and keep the scent trail unbroken which should translate to better catches. The stern, narrow but high, stays high in the water and even with big waves coming from behind she just rides backwards, up and over, with no flooding of the tankwell or feeling of instability. That’s as much as I could ask on that count. I fish with my feet over the side and the reduced width makes this easier on my thighs and in this position the kayak is very stable. It has, as already mentioned, excellent secondary stability but this feet-over-the-side makes the reduced primary stability unnoticeable and irrelevant. I mentioned the height. She is quite high-sided and this additional freeboard does of course catch more wind than my Scupper did. It doesn’t seem to be blown around at anchor any more than I’m used to however and with the hull staying straighter in the water I suspect this is the reason. However, it does suffer more with a following wind and sea and one-sided paddling has become a regular occurrence with the weather we’ve been having of late. In more sensible conditions it won’t be an issue but the option of a skeg (preferably) or rudder would be a good addition on the occasions when conditions are more trying. Another slight negative for me is the position of the rear flush mounts. These are designed principally for carrying rods in and for this they are fine, keeping them out of the way during paddling and even when bracing or ruddering from the rear when landing through surf. This is a plus side from a paddler’s criteria or for someone who only wishes to store the rods before fishing but I regularly troll lures and for this it’s less suitable. Granted, many people prefer to troll with the rods placed in holders ahead of them or with placed in moveable rod holders/tubes behind and to the side of the seat but I prefer them behind in the solid, unmoveable flushmounts where they can’t be pulled out if I hit a snag. So what difference does this make? Well, when trolling I need to regularly watch the rod tips to ensure they are vibrating, signifying that the lures are working correctly and no weed has been hooked. I turn my head from side to side to do this and with the rods stowed inboard (and angled slightly inwards too) I am having to turn more than usual which does affect the feeling of stability (though not the actual stability). I’ll get used to it or can switch to the RAM tubes if not so it’s not important. It’s certainly a paddler’s kayak! It’s fast, responsive and effortless to paddle, very much like my sea kayak in fact (which I now no longer have a use for. It might not be quite as fast or sleek but it’s not a pronounced enough difference for me to justify keeping 17ft of glass for even less paddle trips!). Paddling uptide doesn’t take too much consideration, certainly I’m not put off by the prospect. Paddling in the beaten zone amongst dumping waves and taking them side on is trouble free and normal landings are accomplished with ease. As yet I’ve not got to grips with surfing her, falling out as often as I stay in but I’ve yet to have any proper waves to practice on. The acceleration is enough to catch pretty much anything, even rolling swell at sea. So…how do I feel about my choice after using it in the kind of trying conditions I regularly experience? I envisaged a kayak that could take things to the next stage without having to buy glass and this has performed exactly as expected, being faster and lighter with no serious drawbacks. The concerns I had beforehand have proved unfounded and where I’d envisaged it as being mainly used as my summer kayak now I’m not so sure; once the Tempo arrives I suspect I’ll just take either kayak out as I wish. Stage Two; The Rigging. Having tested the suitability of my MidWay Angler for use in the sea, paddling and at anchor and giving freshwater fishing a go which required no modification I was ready to begin setting the kayak up for my sea fishing requirements. In summer time this is largely lure fishing, whether on the troll, casting lures or jigging and feathering on the drift in which case a stock boat is fine. However, wintertime is predominantly a case of anchored bait fishing in the North Sea off the East Anglian coast fishing tides of two or three knots with a pair of rods. The first stage of rigging a fishing kayak is the removal of anything not required. The first thing I took off was the centre pod. This gives something to brace against with the knees while paddling and has a striking rod holder mounted between my knees as well as a flat area for a small tackle box, held in place by a shockcord. The removal of this is quick and easy, a case of three bolts into brass inserts being removed leaving a central ridge, more space for working on fish and a significant weight saving; it also makes self-rescuing simpler. Ideally a flat area for cutting and preparing baits or putting a loose box down would be there but it’s not a hindrance and there is useable space to the sides.

I did, after a few weeks, replace this, minus the rod holder and found that the extra bracing for paddling in rough water was worth its retention and was no real issue in regards to self-rescuing.
The next items on the list were the side grablines; with full length anchor trolley systems running either side these become redundant and served only as extra weight and extra lines to snag; these were thus removed. I don’t use scupper stoppers in the sea either, preferring to have open drainage; these are simply looped through a D-Ring and can be put back if required. Easily removed. The rear flushmounts, used for carrying rods and trolling with have rubber covers; these are unnecessary for my use and get in the way so were cut away from the flush mounts.
Into the tankwell, a gear strap to secure a waterproof barrel was also not needed; simply unbolted along with the mounts for them it cleared the area. A couple of bungee buttons were also removed having no immediate use for me.
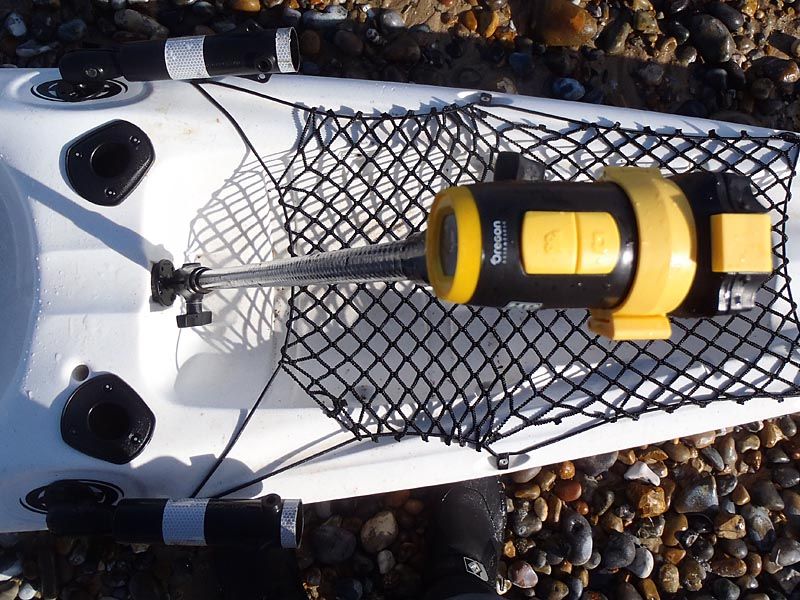
The cargo net is a great feature that I’ve often admired, providing easily accessible and reasonably secure stowage for my anchor system while paddling and any fish that I catch while anchored with drainage through the scupper hole; having previously thrown my catch down a central hatch into the hull I can now avoid the pungent residue that builds up inside. The net is further back than required however, covering a shallower area that doesn’t really require it so the fixtures were unbolted and moved forward to cover the main area instead. This has proven itself to work very well, keeping fish secure and able to drain (when bled) while being an easy area to clean. However, a dumping wave on the stern can pull fish out so a couple of P clips will be added shortly.
Now for a slight modification. The removable dragging keel strip on the stern can potentially trap lines in the gaps so it’s removed, some sealant squeezed on as filler and replaced before having some waterproof duct tape added to reduce the chance of this happening. It won’t remove the possibility of it happening completely as pressure on lines can be quite pronounced but there’s more chance of it slipping past than otherwise.
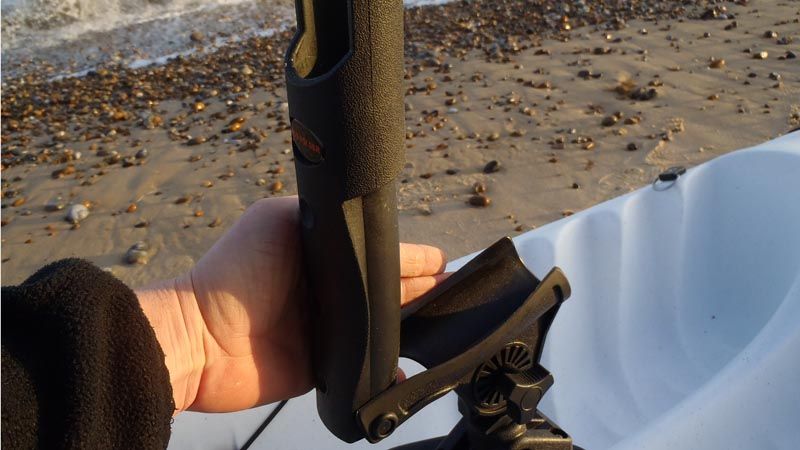
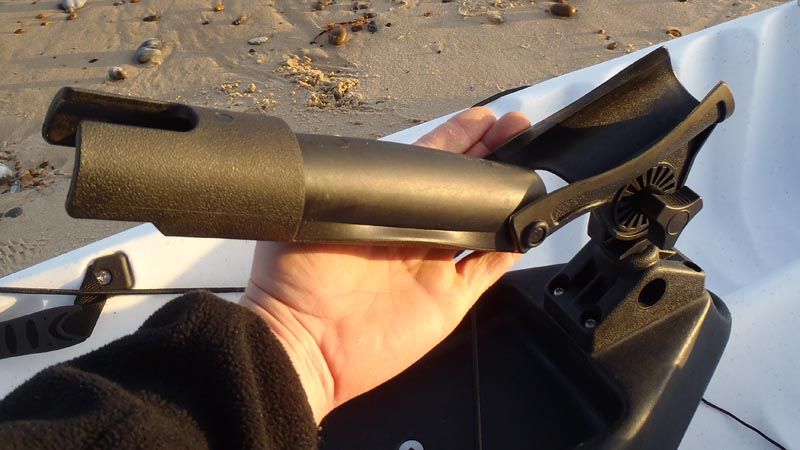
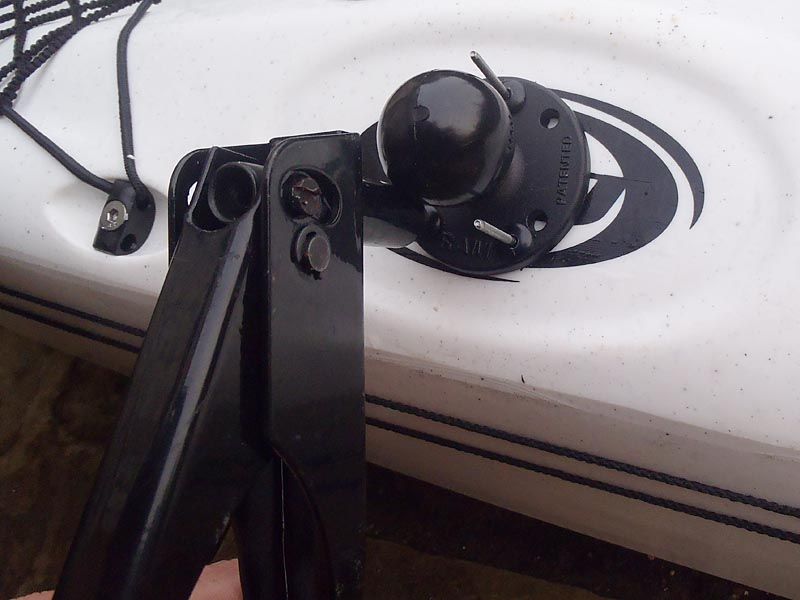
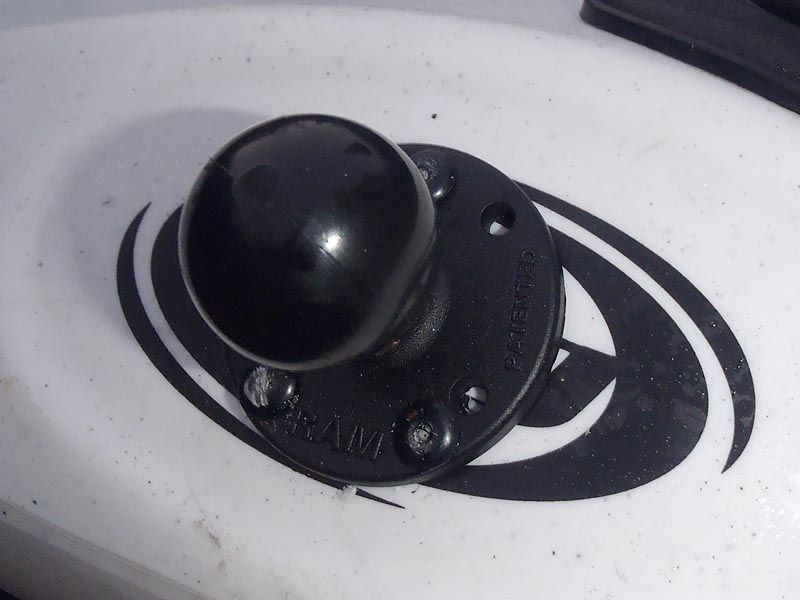
That’s the base kayak ready for adding my own parts in suitable areas. The first additions are the forward rod holders. I’ve been a fan of the versatile RAM tube system since first fitting them in 2007. I chose the RAP 119 nylon tubes mounted onto 1.5 inch balls, cut shorter to remove the bulky flared ends and reduce weight while giving sufficient support and faster removal when responding to bites. A ring of reflective T-ISS SOLAS tape around them aids visibility to other water users.
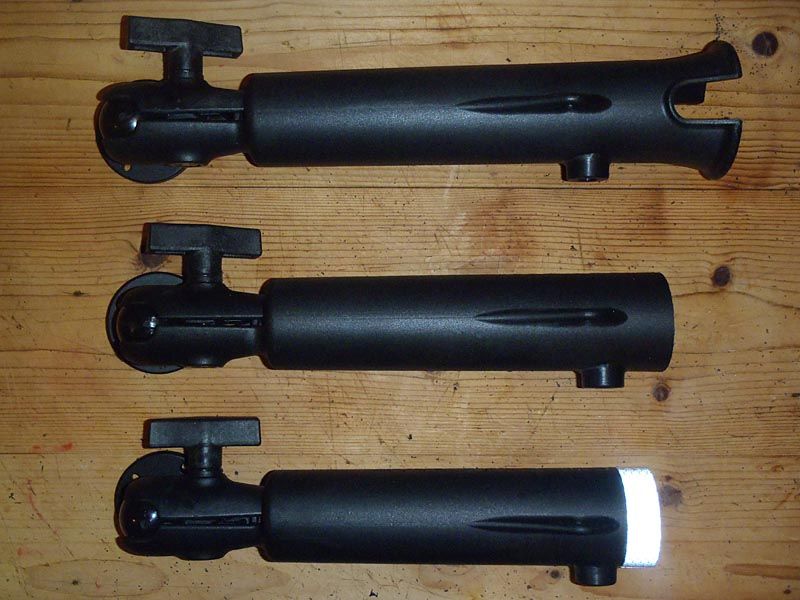
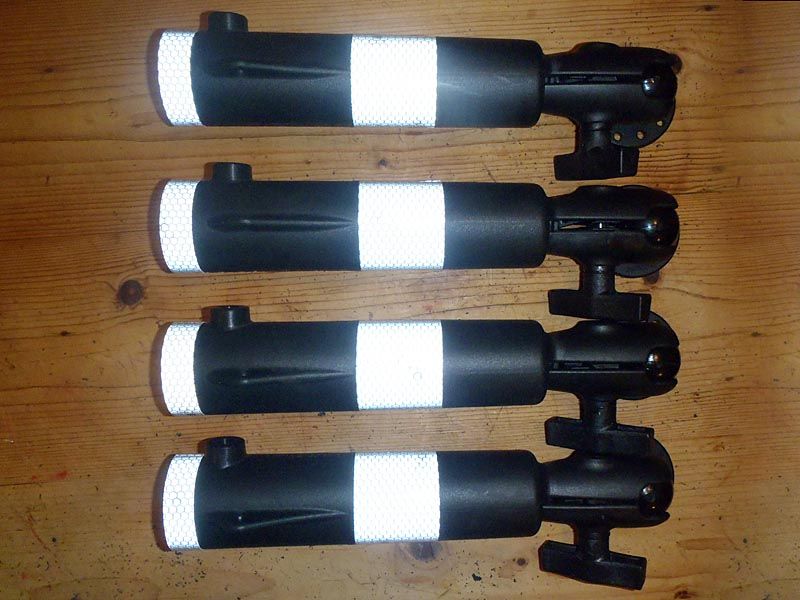
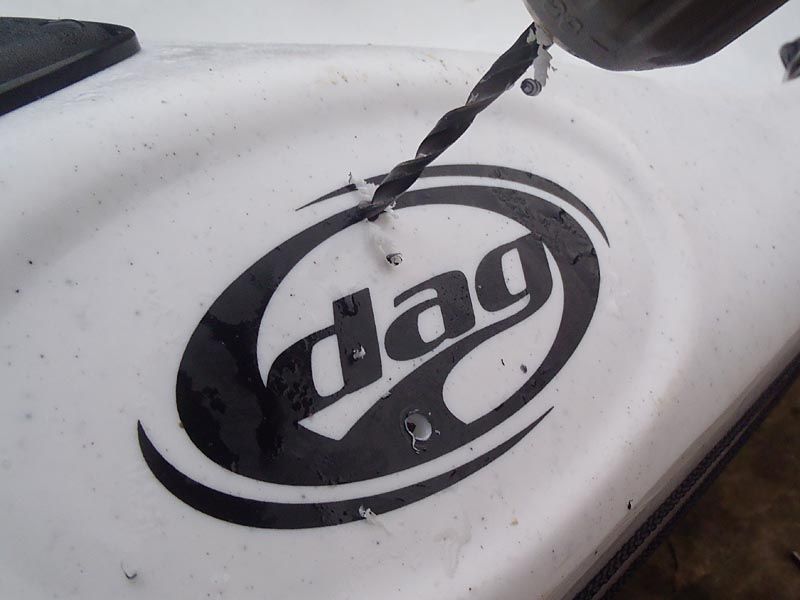
The Ram tubes can be rotated out of the way when paddling and locked into position once I am ready to fish. They can also be used for a wider spread when trolling if desired though I prefer the solidity of the pre-fitted flushmounts. The tubes can be easily removed leaving only the ball mounts when not required. The mounts themselves are once again fitted with trifold rivets coated in sealant. The ideal position for these is in a flat area positioned just behind the hips which unfortunately obscures the DAG logo but needs must.
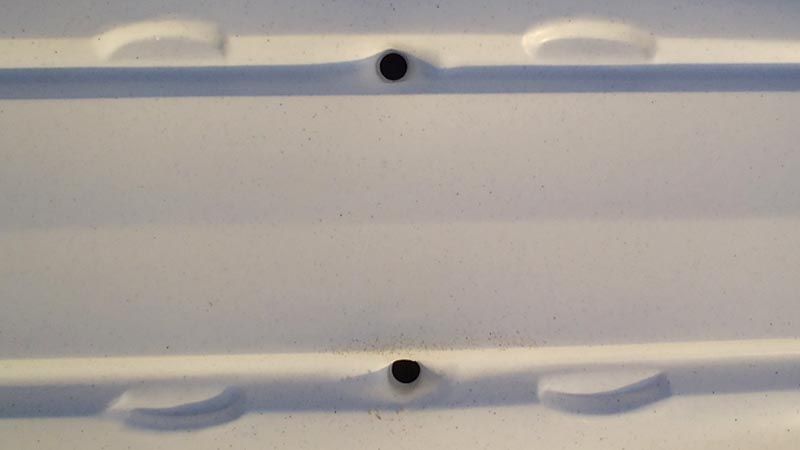
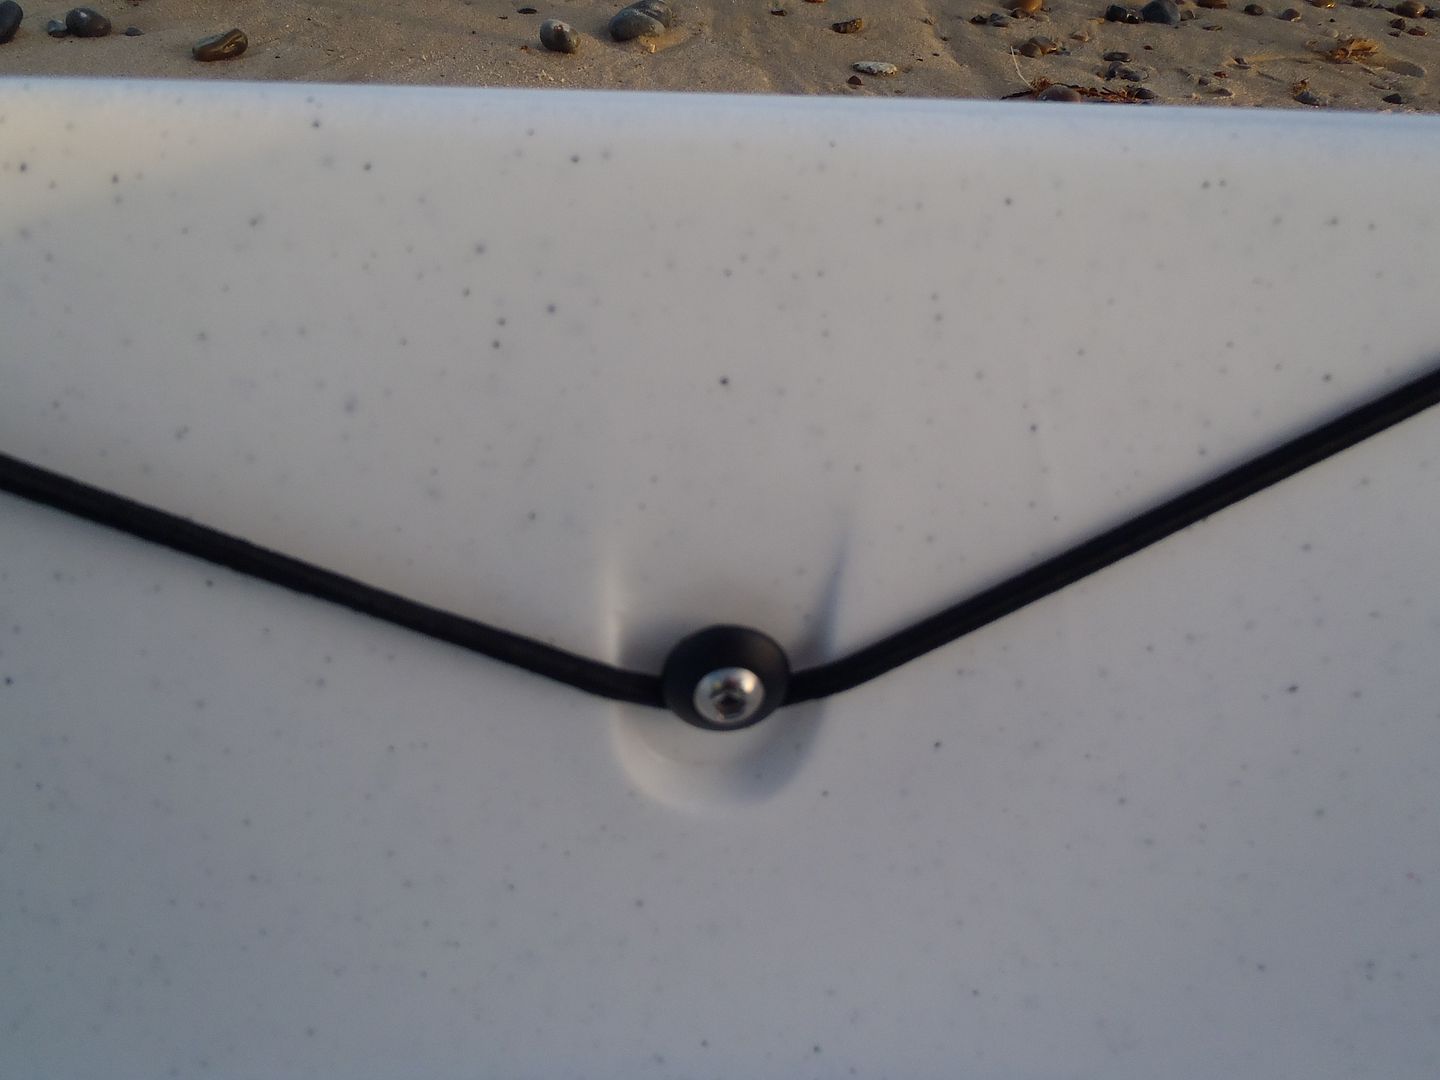
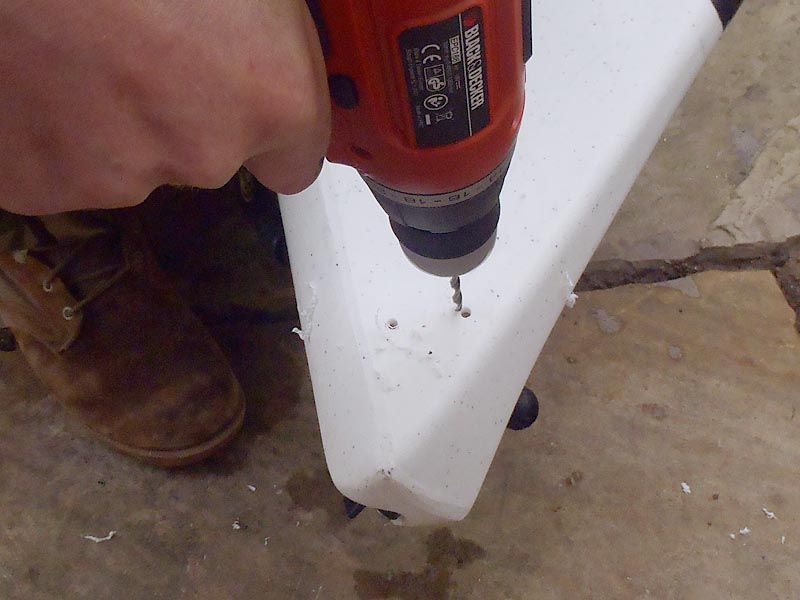
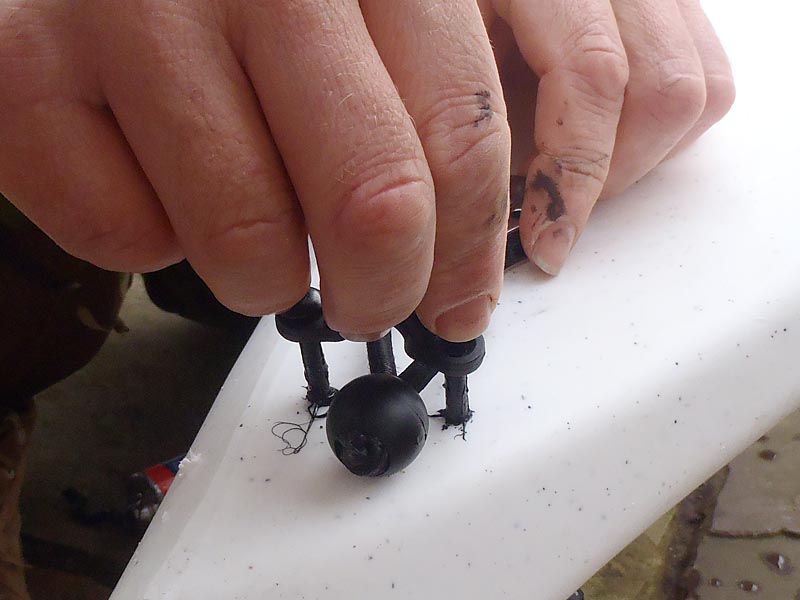
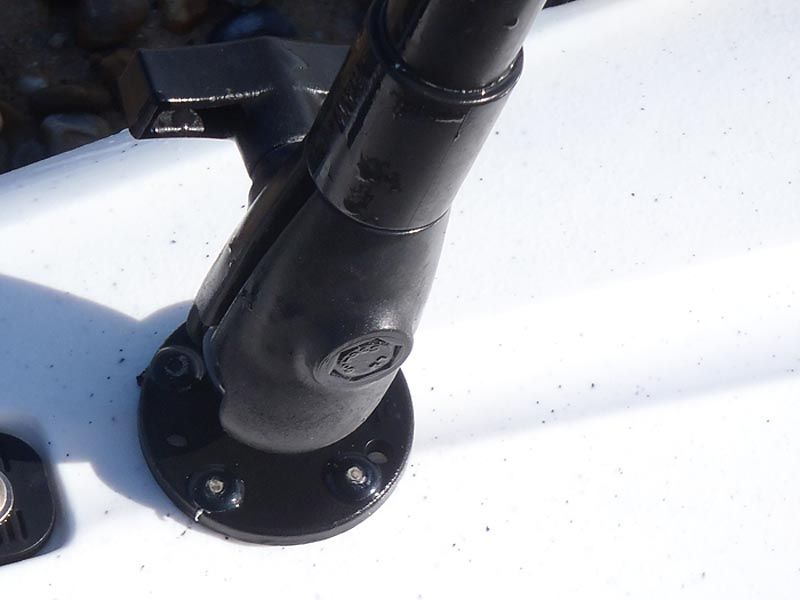
Next come the afore-mentioned anchor trolleys. Drilling as close to the bow and stern as possible and above the waterline below the top deck this avoids crossing any critical areas where it can catch other fittings but remains in easy reach from the seat. The holes made have a nylon strap-eye fixed in place with gasketed trifold rivets coated in adhesive sealant. The further fore and aft the fittings go the straighter and more steady the kayak will sit in the tide.
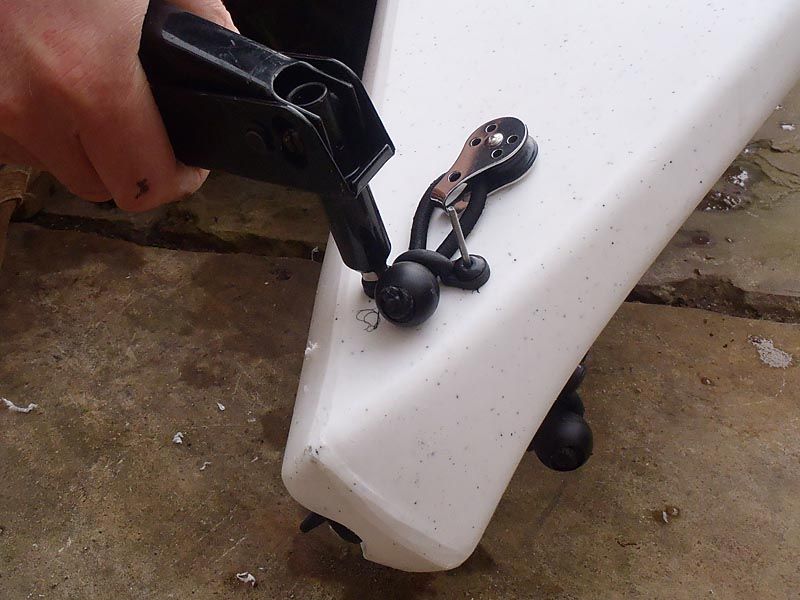
Through these strapeyes I’ve placed a short loop of shockcord running through a marine grade stainless steel and nylon pulley block terminated at the end with a nylon parrel bead covering the overhand knot. The shockcord serves two purposes, those of shock absorption of wave movement and keeping the trolley lines tight against the hull to avoid slippage out of reach as well as loose line to snag hooks and create drag.
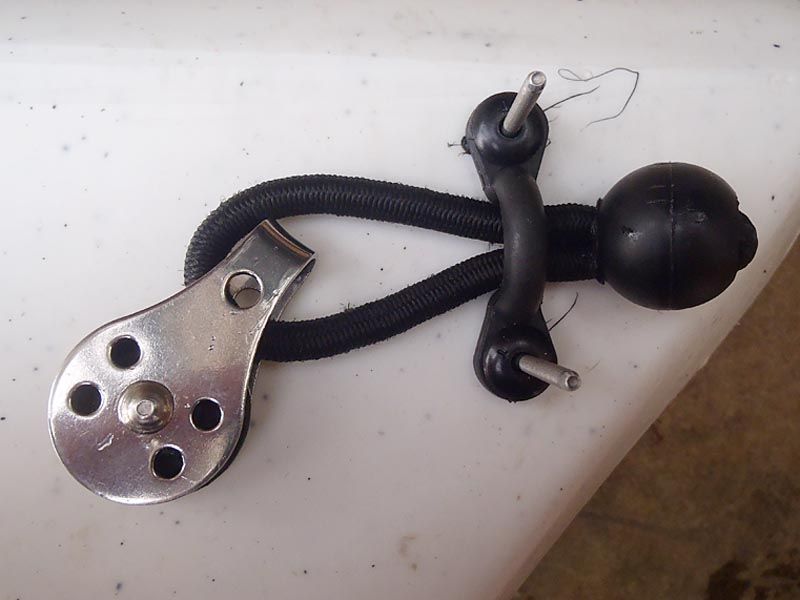
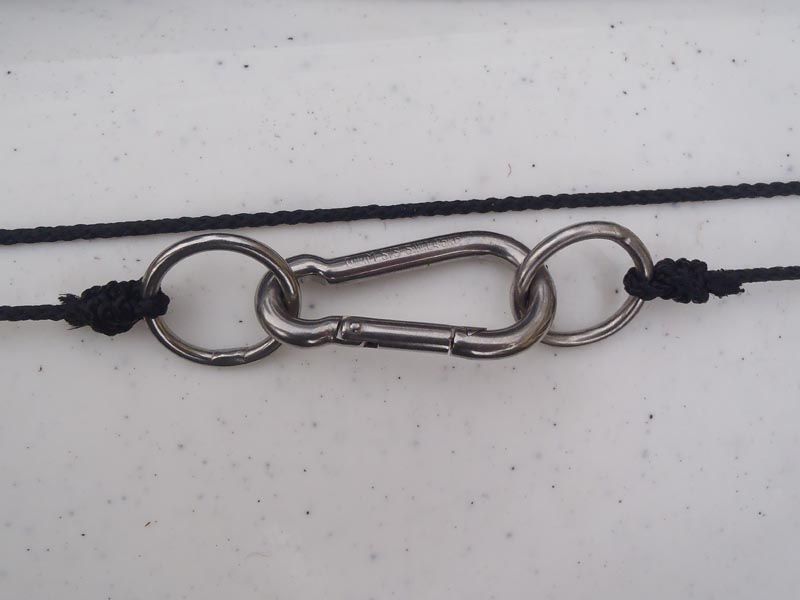
2.5mm nylon braid is looped through the two blocks and terminated each end with a 20mm marine grade stainless ring attached with a centauri knot. These are connected through a small marine grade stainless carabiner through which the anchor warp is run. This can be unclipped from either end to allow the trolley lines to be used as a towline.
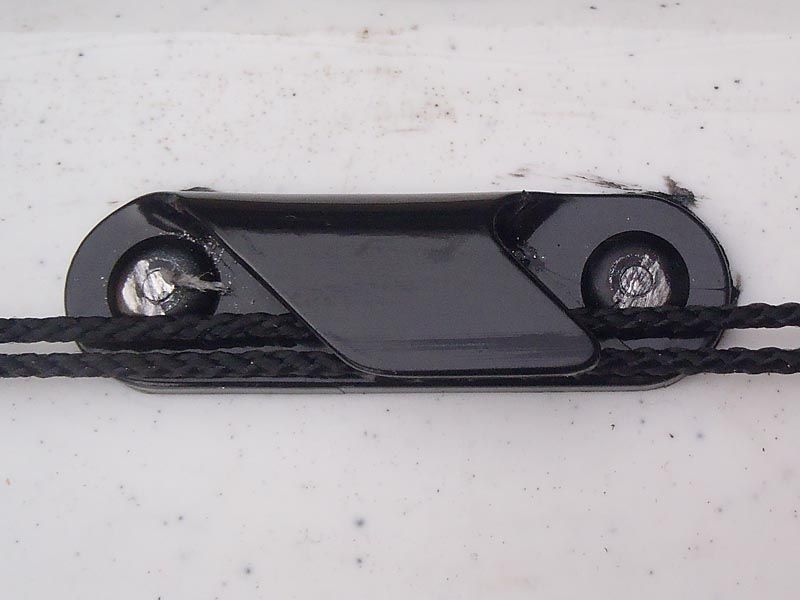
Finally a fineline cleat is added either side to lock the trolley into position. This is located in such a position that it can also double for setting the lines on my Pacific Action sail if I decide to fit it on occasion.
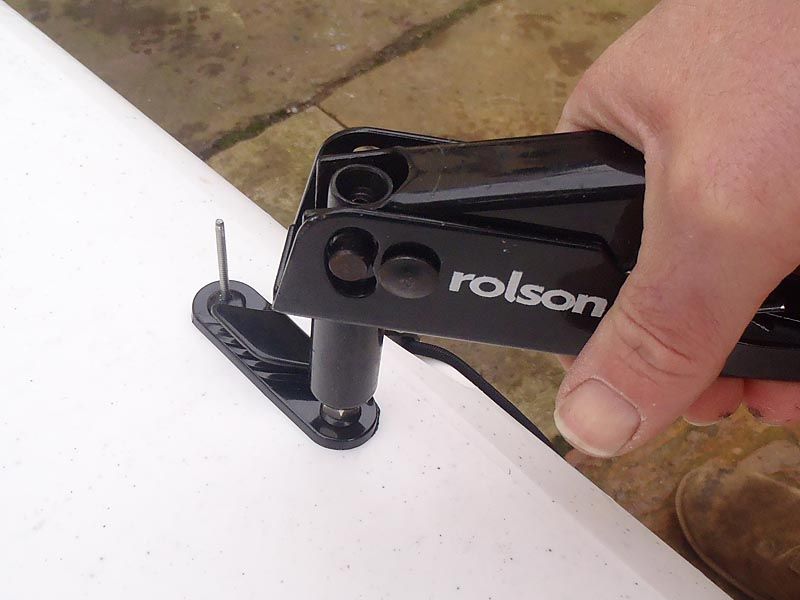
These are fitted on both sides to give versatility; a drogue can be set from one with an anchor on the other, the anchor can be set on the side most suited for wind, swell and tide conditions and of course to provide grablines from either side. They can also be hooked over bankside obtrusions to keep me in place on rivers.
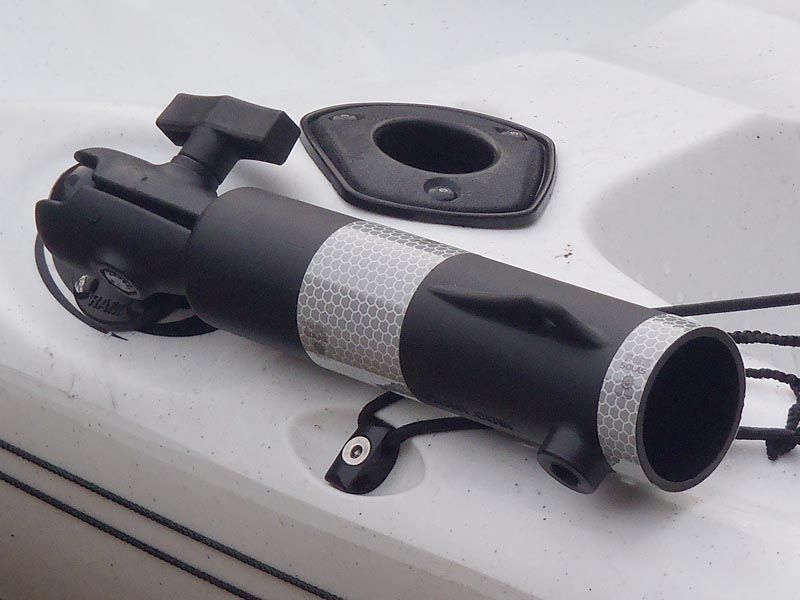
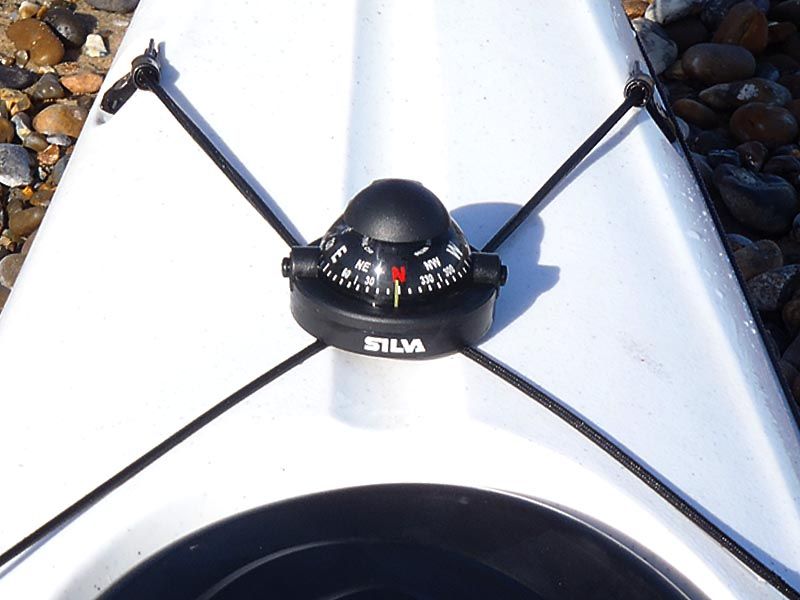
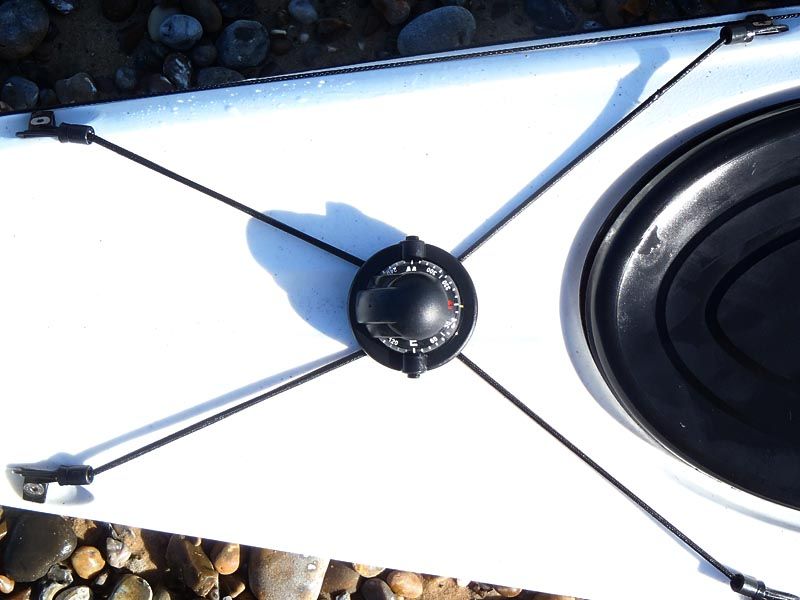
Finally, in case of fog descending while I’m on the water when my electronic navigation aids are unavailable through failure, low battery or not being carried, a deck-mounted compass is fitted. Not strictly a modification as it’s normal portable equipment attached to existing fittings it’s important to mention as it will stay permanently attached and is a vital safety consideration. I chose the small and lightweight Silva 58 with its shockcord and clip attachment which is attached to existing mounts.
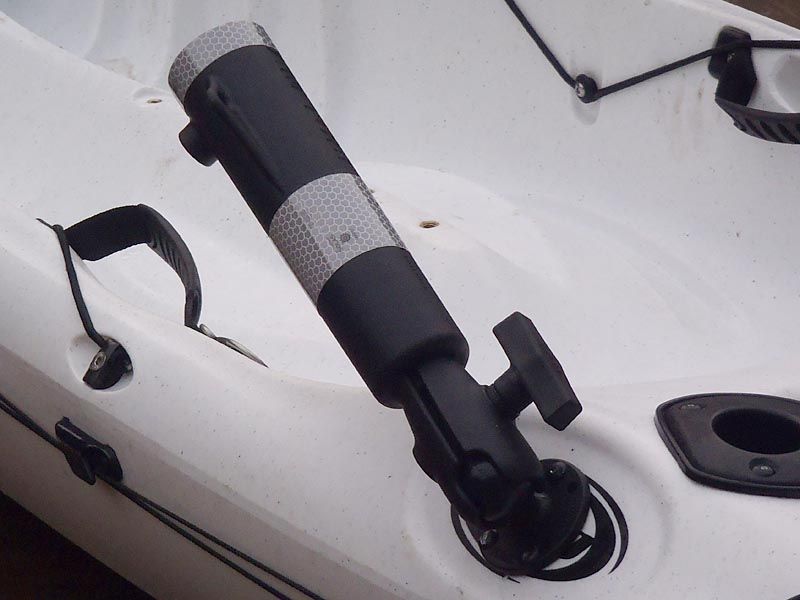
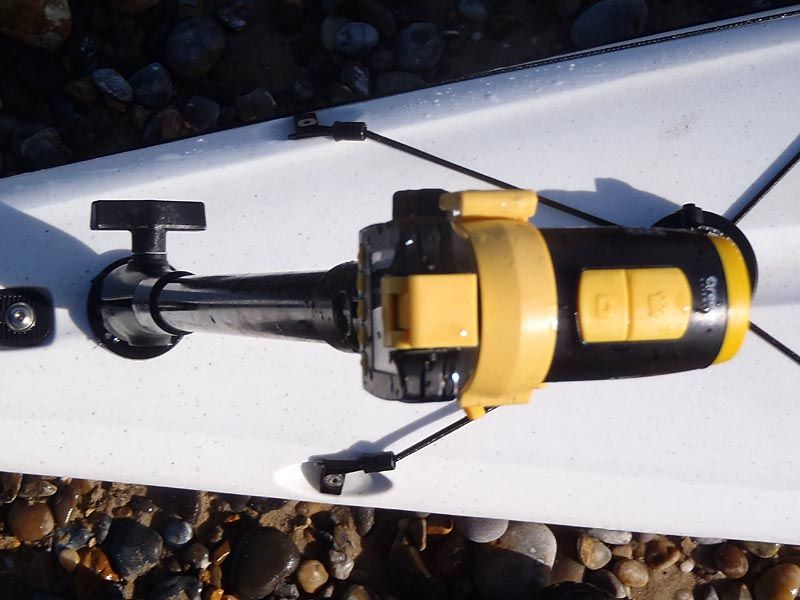
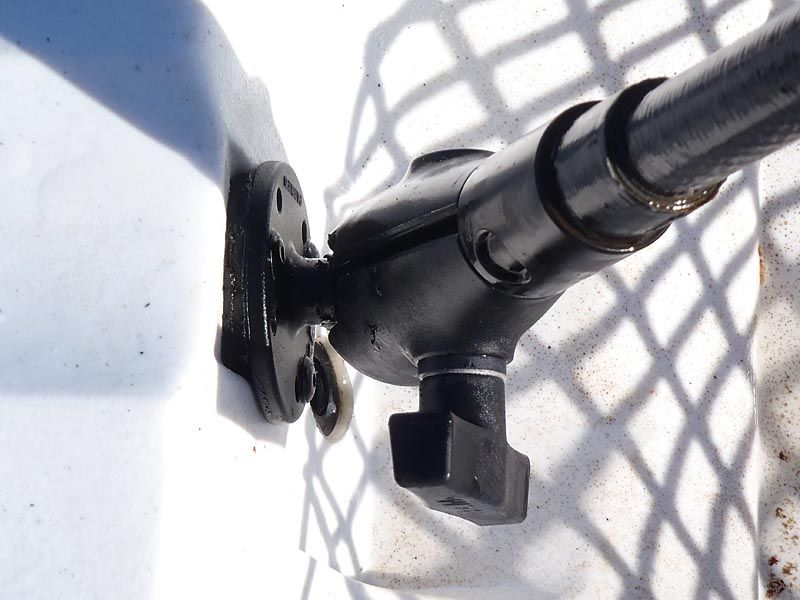
That’s my fishing needs covered and complete. I like to fit action cameras (in my case the Oregon Scientific ATC9K) to the kayak to record my sessions and so I looked for suitable mounting options. I again utilised the RAM system, obtaining a pair of 18” camera poles with 1” ball mounts with a ¼” screw fitting. These are fixed to the deck by 1.5” balls, riveted once more. These allow very versatile positioning of the cameras which can film downwards into the cockpit, out to the sides, parallel to the deck or any position in between. The first is fitted to the foredeck to shoot backwards towards the paddler and the latter behind the seat on the vertical front wall of the tankwell to film forwards or over the stern. These can also be fitted to the forward-facing RAM rod mounts if required. I replaced the rear pole for a longer carbon one to allow a clear view over the shoulder as I felt the supplied one was a bit short. Fore:
Aft:
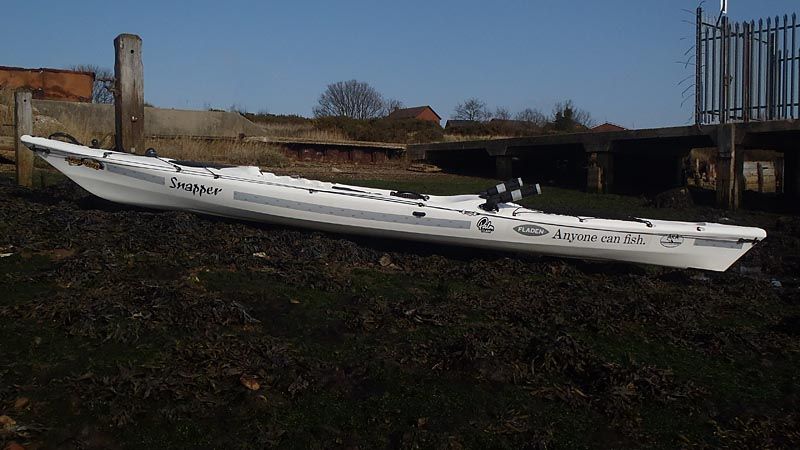
My final additions are of the adhesive type. T-ISS reflective SOLAS tape is run around the hull for additional visibility in low light (the only drawback being reflections from the camera flash), marine vinyl stickers identifying the kayak (Snapper – my VHF callsign, nickname and the name I use on kayak fishing forums) and a contact details sticker inside the forward hatch obtained from the Maritime Coastguard Agency in case the kayak is found unattended at any time. Which just leaves me to add the names of my sponsors…
…my MidWay is ready to fish; job done.