My aunt bought herself an Oregon Scientific ATC2K bullet-style action camera to use on here fishing boats to produce films but found that it wasn’t getting a lot of use so when my parents were over there recently she decided to give it to them to bring back for me…a good choice! Of course, I couldn’t wait to use it and once it finally made itself back from Amsterdam in luggage separated from my parents by the volcanic ash cloud it was all systems go! The weekend that followed saw fishing postponed but with the high winds and messy sea it had the perfect opportunity to be field tested in ‘The Cauldron’ at Gorleston. This is an area of fairly shallow water that curves around in an L shape formed by the concrete pier and sea defences and which suffers from a great deal of turbulence when wind-driven waves or swell are heading in a northerly or easterly direction. What happens is that waves roll in and are reflected from two angles forming large breaking peaks as they collide and waves which approach from two or three directions at once. It provides an excellent training ground for rough water and an enjoyable yet solid workout. Further down the beach the waves are better formed and are popular for surfing and kite-boarding.
The parts that came my way were the camera itself with a helmet mount and strap. Having a kayaking helmet (rarely used) I set about attaching the two together by strapping it through the side vents.
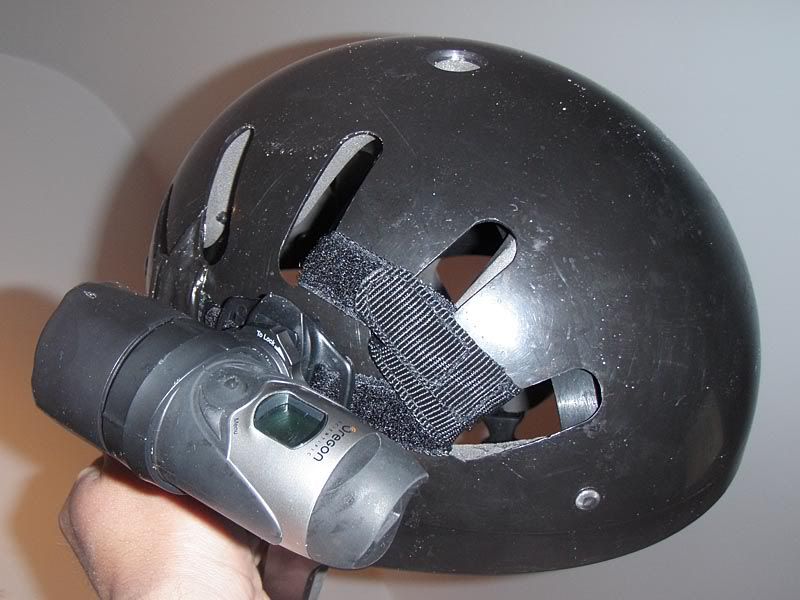
This allowed me to film directly ahead with a small offset from where my eyes were looking. The head cam will run until stopped either by the two AA batteries running down or the memory card being full and on high resolution with a 2GB card this results in an hour’s worth of footage. So, with the camera attached to the helmet, switched on and set to record, I launched out into the sea.
I began by paddling out and riding a wave in. This is what the camera should do best as it’s not too extreme.
Next came a bit more of a test, bouncing up and down in the broken water and collisions. This is a bit more of a test as the camera gets frequent soakings by spray.
The ultimate test, however, is a by-product of my occasional inability to stay upright whereupon the camera gets a good dunking as I end upside down in a naturally-formed washing machine! This all went well and the camera continued to record without switching itself off (which has happened to me with other cameras from the shock of sudden changes in orientation and gravitational force etc).
I then leant the camera and helmet to my friend Steve to have a play with as he took off on his kite board – speed, jumps, spray and buffeting by wind all coming into the mix. The camera didn’t miss a beat.
Once we’d finished our session I went home and downloaded the footage to my PC. There are two ways to do this, via the USB port and supplied cable or by removing the SD card and using a reader. I chose the latter as I could then wash the headcam free of salt and leave it hanging up to dry. The files transferred easily and, being standard AVI file-types (specifically M-JPEG), were imported without hardship into Windows Movie Maker, an easy programme to use that is supplied with Windows Operating Systems from XP onwards.
With the files imported it was then time to load them onto the timeline and start editing. It was here that I noticed room for improvement in the method of filming. When fishing or paddling normally it is more likely that the user will face in one direction for relatively lengthy periods however, when kayak surfing or playing in turbulent water the user’s head is constantly moving – checking out waves, their direction and collision points and proximity to other people in the water thus the camera was being moved around a lot and finding clips that were held steady long enough became a bit of an issue. There were enough sequences but I could have made a better job of the camera’s capabilities! Well, it was the start of the learning curve and things could only get better.
I thought about my options over the following week and tried to work out the best way to fix the camera to my various kayaks. The first test was a temporary Heath-Robinson affair involving closed-cell foam, gaffer tape, the strap and my fishfinder to film on my fishing kayak. I taped the headcam to this and used it as a tilt and swivel tripod head on an evening fishing trip. I didn’t have the finder wired up to a battery so don’t know if one would cause interference with the other but it is unlikely that this would be the position I would fit the camera too on a permanent basis.
I got down to the beach quite late and I had literally only half an hour before it became dark by the time I actually launched. This would allow an unplanned further test of the camera, that of handling low light levels. I switched the camera on, paddled out through the shore break and returned to the beach before paddling out again to my fishing spot whereupon it became too dark and I stayed too static to continue filming and so I switched the camera off.
The results were surprisingly good – the camera seemed to boost the light and contrast through its exposure meter sufficiently that the footage was usable. It was positioned just over a metre from me and when looking back at me while paddling the recording was sufficiently sharp and detailed to be of use for a more normal application although I would need to position it further forward to increase the area of coverage. Pointed forwards the footage was also sufficiently clear that I was able to give a good illustration of the sea conditions and paddling, although waves always look smaller with pictorial capture than the reality! It had passed my test again. Okay, it’s going to perform better in brighter conditions but at least it is useable into dusk
Well, the timing couldn’t have been better! The weekend saw an increase in wind speed again and with the swell direction and tides this combined to give a prediction of reasonable surf at Lowestoft’s south beach. As I was arriving home after work I swung off towards the beach to have a look and was greeted by the sight of surfers in the water and some riding waves. They weren’t the biggest, the largest coming through while I watched breaking at around head height, but they were the cleanest and best formed waves I had ever seen here. I immediately asked my wife for permission to have an hour that evening before she went out but this wasn’t an option! It was no major issue though as the next day was Saturday and I could get up early and hit the beach at its best. I spread the word and the next morning saw four of us at mine for 7am, ready for a couple of hours on the water.
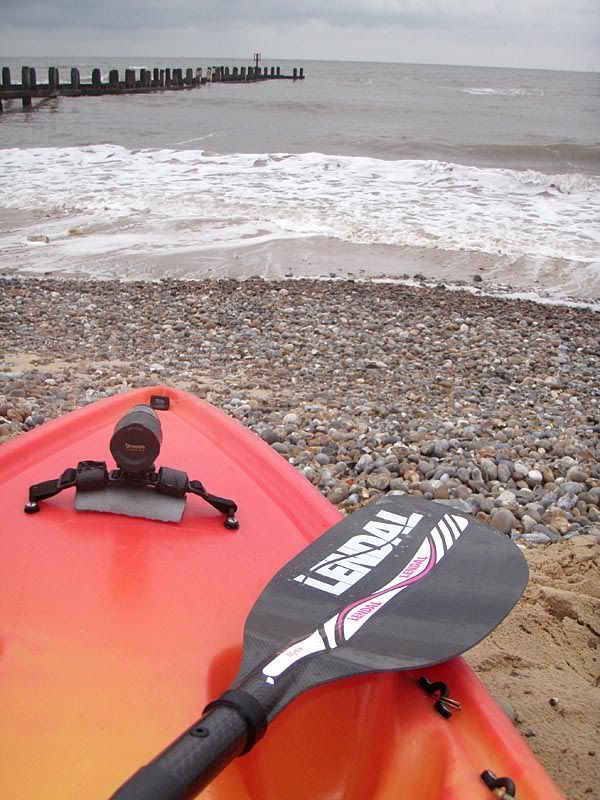
So, what to do with my Friday night? Well, I figured I wanted to have good footage from this session and proceeded to drill four holes in my Yak Board. I attached two strap eyes a few inches apart near the bow with well-nuts, far enough back to protect the camera from too much movement and lessen the chance of damage which also left enough of the nose visible to put the footage into the context of it being filmed from the kayak. I then used a long webbing strap with the helmet mount threaded through and a couple of plastic ladderlock buckles to attach the camera to the front of the board, tightening as much as I could before putting some foam pipe lagging beneath it to tighten further and allow the camera to be orientated at different angles. Then I was ready for the beach.

The waves were still very good, a bit lower than the previous evening but still building as the tide continued to ebb. I hopped aboard, altered the camera angle and headed out through the shore break.
I’d not quite pointed it where I thought! Unfortunately it was set too high and so I missed the nose of the kayak and a lot of the imagery of the waves themselves. There was still enough to see what was going on with some patient editing though and so although it wasn’t what I’d envisaged it was still useable.
I next tried pointing back at myself, angled upwards for the paddle out and in. This worked really well, the angle was right and the camera remained in position even through a couple of wipeouts when it got battered by the waves! The first one in the clip had a steep face to climb which I stood no chance on as it broke as I was climbing over!
It was then that it occurred to me it might be good to film other people and I did a couple of runs alongside them before I swapped my yak Board for Tim’s Mysto and posed for the camera myself. In this instance I made further use of the moveable mount and turned the camera to point to the left. Tim and I positioned ourselves and waited for the wave we wanted to roll in. It did, and we missed it! As is usual though there was another one coming along and we both took off on it…
With my card full we carried on playing but that was it on the filming front for the day. Back home I had loads of useful footage to edit together and with so much of it being good quality it took a long time to distill it all down to a selection of short enough clips (I like producing short, fast-paced films). They beat my previous surf footage efforts hands-down!
Back again the next morning, the waves had dropped dramatically but were still capable of giving us a little bit of fun. I made sure I lowered the camera further and off we went
The position was what I had hoped for the previous day and, when mixed in with the other views, gave me the kind of finished clip that I was hoping for all along. Considering the battering I gave the camera during these sessions I can’t fault its build quality at all – I’d leashed it with 30lb breaking strain monofilament line in case the mount broke but it wasn’t needed – lucky really, as the line snapped at least twice!
All in all the camera had now proved itself to be more than suitable for the additional footage I want to include in future postings and had proved itself rugged enough for my abuses. So, what of the technical side of things?
Well here’s the bad news – the ATC2K is now a discontinued product, having been superceded by the ATC3K and ATC5K. The good news of course is that it is still widely available and at very reasonable prices. As it’s the one I currently have and have used so far though I will continue with the review, adding feature and specification comparisons with the current models afterwards as there are some important additional characteristics, especially with the ATC5K.
The ATC2K is described by Oregon Scientific as being “a tough, no-nonsense digital movie camera that attaches easily to a helmet, mast, harness, or handlebars” and is “water, dirt, rain, snow and shock proof too.” I’d go along with those statements! The term waterproof is often abused but in this instance the camera is rated at a depth of up to three metres which is more than sufficient for anything I’ll be doing with it on the kayak, depthwise, and clearly will withstand the pressure of large waves slamming into it. The seal is provided by two O rings on the inside of the camera, over which the rear half of the casing is rotated onto until it locks firmly in position. If you manage to get any moisture past the first O ring there is nothing for it to attack – for any further ingress to make it past the second seal you’re probably not going to be worrying about the camera.
On dimensions, the camera weighs around half a pound including the batteries so isn’t heavy when worn on a helmet. It’s slim and compact too, being circular in cross-section and measuring around 4cm x 12cm. That’s pretty unobtrusive! It includes a rubber lenshood, for want of a better term, which helps to protect the front element from damage and, being shaped, allows water to drain from it reasonably quickly (subject, of course, to orientation).
The video capability is the important part though. It is important to bear in mind that the clips I have posted have come directly from the camera into Movie Maker, been compressed once edited and then further compressed by Youtube. This drop in quality is very noticeable from the raw footage but still more than adequate for internet use; the original filming is fine at full screen on my computer. Okay, so it’s not the same quality as a professionally produced movie but if I could afford the sort of camera that does that I’d need to get a bigger boat! There is a choice of 3 resolutions from the 640x480 VGA CMOS sensor – 640 x 480 pixels, 320 x 240 pixels and 160 x 120 pixels and footage can be shot at 15 or 30 frames per second. Having been a photographer for many years I’ve always avoided lowering my image quality unless absolutely vital so would recommend carrying spare 2GB cards (the maximum size it takes) instead of dropping the quality if you’re going to need more extended recording times, likewise the frame rate transition is smoother at 30 fps and if you catch that perfect wave or monster fish you don’t want to mess your record of it up. Playback can be done via the supplied USB cable to a computer or there is also the option of playback on a television set by using the provided AV cables.
There are various mounting options with the kit, the helmet mount, as previously mentioned, which is a quick-release bracket through which a webbing and Velcro strap (two lengths supplied) is threaded, a silicon rubber strap for fixing to non-vented helmets, a handlebar mount which could be fitted to a navigation light or paddle for example. The really clever thing here is that the mounting ring attached to the camera can be rotated 360 degrees on the base plate but also 360 degrees inside the mounting ring thus giving you full opportunity to get the best angle. An over-the-shoulder clip of a kayaker paddling or of a fish being fought and landed, for example, can be obtained with the minimum of fuss and by tightening and loosening the mount the camera position can be altered accordingly.
The camera is very easy to operate and has that great retro feature loved by those of us in our thirties or older – that of being simple to operate. There is no fancy menu giving multiple options which will almost never be used, there is no turning of dials, clicking of switches or adjustment of exposures. Even my father could operate this without my mother reading him the manual and I know that my five year old will run the card and batteries out if I don’t lock it away. All you need to do is press and hold one pressure switch for two seconds to switch on and another to record and that’s it – it’ll default to the high resolution 640x480. You can hold the menu button down to access the menu if you wish to alter the resolution, mute the sound recording, change the frame rate, set the time and date or delete footage and this is all visible as you cycle through the icons on the LCD screen; this screen displays filming time when the camera is in use.
But surely it falls short somewhere? Well, yes and no. Nothing in life is perfect and criteria aren’t the same for everyone in all situations. One criticism aired widely over the reviews on the internet is in sound quality. The capability for capturing sound is reduced a lot on this camera and while some see it as a disadvantage others will feel quite the opposite. Personally I can see both sides as there will be times when I want greater or lesser volume. For the surfing it’s ideal as the noise from the wind and the water would make the clip pretty unbearable to listen to unless the volume controls are dropped way down. However, in calm conditions a running commentary might be a bonus if filming something that requires it. It’s personal choice but speaking for myself I have a whole lot of clips from previous cameras ruined by wind noise and bursts of VHF static and I don’t have the patience or the software to effectively edit sound on my system.
I did find also that in bright sunlight the camera was affected by colour failure when presented with a very bright yellow/orange kayak being illuminated against a dark sea which affected the automatic white balance and gave a bluish cast to the footage. I’m sure that the right software on my PC could deal with this but as I’m running a very simple programme I have yet to find a way to address this. When printing colour photographs in the past this was something which all films were subject to and varying levels of correction would have to be filtered in or out to correct it but I’m not sure that it’s really that much of an issue here; but judge for yourself:
What else? Well, again, dependant on how it’s going to be used this one is a 50:50 consideration. The camera is set with a depth of focus from 1.5 metres to infinity and the angle of view is quite narrow so filming into the cockpit while having the camera in easy reach to operate is tricky although on a longer kayak than one used for surfing it might not be a problem if you switch on before you begin or someone else can come alongside to operate it. So personally I would have found a wide view useful…but then again, perspective changes and with a wider lens anything in the distance becomes smaller so those waves would have looked even smaller (until they hit), the notion of speed would have been reduced and the footage of other people filmed from the side would have them less prominent in the viewfinder and believe me, we were getting as close as we dared while surfing at times (high fives and the odd bump notwithstanding!). As there is no viewfinder or display screen on the camera some difficulty can be had, as I discovered, in composing the scene. The only way to actually aim the camera is by looking along the body and trusting that it is ‘thereabouts’. Obviously a wider view would assist with things here but I suspect familiarity will soon resolve the situation for me. These considerations put me in a quandary of which side of the fence to stand on so I’ll remain seated firmly on it for now!
One feature that I do miss is the lack of a standard tripod-mounting thread. I wouldn’t normally expect to tripod mount this type of camera however ball and socket heads can be had cheaply from camera shops and can be fitted onto the kayak securely, multiple ones being a possibility if desired too. As I’m looking to have mounting points for both bow and stern with the option to point in either direction this would have been a useful way to do things, especially if there was the option to trigger the camera remotely.
Which leads me nicely onto the current version, the ATC5K. Guess what? The lens is wider, it has a tripod socket, there is a colour TFT screen on the back of it for aiming and reviewing and a remote release! Not only that, it does even more…but that’s for the future…
So, what’s my overall verdict? So far so good…and I definitely wish I’d had one earlier. It’s an excellent addition to my box of shiny toys and one that also benefits from being good at what it’s supposed to do and looks like it’ll take my kind of treatment. I'm getting footage that I couldn't have got before and plenty of it too! You can’t say better than that.